# Blog Post & Social Media Generator (/en/cookbooks/blog-social-media-generator)
---
title: Blog Post & Social Media Generator
description: Learn both sequential and parallel processing in one workflow. Generate blog articles from topics and create optimized social media posts for multiple platforms.
---
This recipe shows you how to build an app where you enter a topic (and optionally an image), and AI creates an outline, writes a full blog article, then generates optimized posts for X, Instagram, and LinkedIn in parallel based on the article content.
## Overview
**Purpose**: Generate blog articles from topics and create social media posts in parallel based on the article content.
| Node | Role | Model |
|------|------|-------|
| App Request | Topic input + image (optional) | - |
| Text Node | Article structure prompt | - |
| Generator 1 (Outline) | Generate article structure | gpt-5-nano |
| Generator 2 (Article) | Generate body from outline | claude-haiku-4.5 |
| Generator 3 (X) | Generate short text for X from article | gpt-5-nano |
| Generator 4 (Instagram) | Generate Instagram caption from article (image support) | gemini-2.5-flash-lite |
| Generator 5 (LinkedIn) | Generate professional LinkedIn post from article | claude-haiku-4.5 |
**What you'll learn**: Node chaining (sequential processing), parallel processing, prompt design, multimodal input (optional)
## Workflow Diagram
```mermaid
flowchart LR
A[Topic Input] --> B[Outline Generator]
B --> C[Article Writer]
D[Blog Writing Guidelines] --> C
C --> E[X Post Generator]
C --> F[Instagram Caption Generator]
C --> G[LinkedIn Post Generator]
A --> F
```
## Node Configuration Details
### 1. App Request
| Item | Value |
|------|-------|
| Node Name | `Topic Input` |
| Node Input Name | `topic` |
| File Input | Optional (Image: PNG, JPEG, GIF, WebP) |
| Prompt | - (User input only) |
### 2. Text Node
| Item | Value |
|------|-------|
| Node Name | `Blog Writing Guidelines` |
| Text Content | (see below) |
```
You are a professional blog writer. Follow these guidelines when creating content:
- Write in a clear, engaging, and informative tone
- Use headings and subheadings for better readability
- Include an introduction, main body, and conclusion
- Target length: 800-1200 words
- Make the content SEO-friendly with natural keyword usage
```
### 3. Generator Node (Outline)
| Item | Value |
|------|-------|
| Node Name | `Outline Generator` |
| Model | gpt-5-nano |
| Thinking | OFF |
| Web Search | - |
**Prompt:**
```
Create a detailed blog post outline for the following topic:
@Topic Input
Include:
1. A compelling title
2. Introduction hook
3. 3-5 main sections with subpoints
4. Conclusion summary
5. Call-to-action suggestion
Output the outline in a structured format.
```
### 4. Generator Node (Article)
| Item | Value |
|------|-------|
| Node Name | `Article Writer` |
| Model | claude-haiku-4.5 |
| Thinking | ON |
| Web Search | OFF |
**Prompt:**
```
Write a complete blog article based on the following outline:
@Outline Generator
Follow these writing guidelines:
@Blog Writing Guidelines
Make sure to:
- Expand each section with detailed, valuable content
- Use smooth transitions between sections
- Include relevant examples where appropriate
- Maintain a consistent voice throughout
```
### 5. Generator Node (X)
| Item | Value |
|------|-------|
| Node Name | `X Post Generator` |
| Model | gpt-5-nano |
| Thinking | OFF |
| Web Search | - |
**Prompt:**
```
Create a post for X (Twitter) to promote the following blog article:
@Article Writer
Requirements:
- Maximum 280 characters
- Highlight the key insight or hook from the article
- Engaging and concise
- Include 1-3 relevant hashtags
- Use a conversational tone
- Include a call-to-action to read the full article
```
### 6. Generator Node (Instagram)
| Item | Value |
|------|-------|
| Node Name | `Instagram Caption Generator` |
| Model | gemini-2.5-flash-lite |
| Thinking | - |
| Web Search | OFF |
**Prompt:**
```
Create an Instagram caption to promote the following blog article:
@Article Writer
Additional context (if image provided):
@Topic Input
Requirements:
- If an image is provided, analyze it and incorporate visual elements into the caption
- Summarize the article's key points in an engaging way
- Engaging opening line to hook readers
- Use line breaks for readability
- Include 5-10 relevant hashtags at the end
- Add 2-3 relevant emojis
- Include a call-to-action (e.g., "Link in bio to read the full article")
- Optimal length: 150-300 characters for the main text
```
### 7. Generator Node (LinkedIn)
| Item | Value |
|------|-------|
| Node Name | `LinkedIn Post Generator` |
| Model | claude-haiku-4.5 |
| Thinking | OFF |
| Web Search | OFF |
**Prompt:**
```
Create a LinkedIn post to promote the following blog article:
@Article Writer
Requirements:
- Professional and insightful tone
- Start with a hook or thought-provoking question from the article
- Summarize key takeaways from the article
- Use short paragraphs and line breaks for readability
- Include a clear lesson or insight
- End with a question to encourage engagement
- Optimal length: 1,300-2,000 characters
- No hashtags or limit to 3 professional ones
- Include a call-to-action to read the full article
```
# Knowledge Base Q&A (/en/cookbooks/knowledge-base-qa)
---
title: Knowledge Base Q&A
description: Learn how to build a RAG (Retrieval-Augmented Generation) workflow using both Document Vector Store and GitHub Vector Store together, with query optimization.
---
This recipe shows you how to build an app that combines multiple Vector Stores for a powerful RAG (Retrieval-Augmented Generation) workflow. Learn to integrate Document Vector Store and GitHub Vector Store with query optimization for comprehensive knowledge base Q&A.
## Overview
**Purpose**: Learn how RAG works by combining multiple Vector Stores.
| Node | Role | Model |
|------|------|-------|
| Document Vector Store | Vectorize PDF/text documents | text-embedding-3-small |
| GitHub Vector Store | Vectorize code repository | text-embedding-3-small |
| App Entry | Question input | - |
| Generator x2 | Optimize search queries | gpt-5-nano |
| Query Node x2 | Search for relevant information | - |
| Generator | Generate answer from search results | claude-haiku-4.5 |
**What you'll learn**: RAG (Retrieval-Augmented Generation), Document Vector Store, GitHub Vector Store, query optimization, integrating multiple Query nodes
## Workflow Diagram
```mermaid
flowchart LR
A[Question Input] --> B1[Doc Query Generator]
A --> B2[Code Query Generator]
B1 --> C1[Document Search]
B2 --> C2[Code Search]
D[Document Knowledge Base] --> C1
E[GitHub Knowledge Base] --> C2
C1 --> F[Answer Generator]
C2 --> F
A --> F
```
## Node Configuration Details
### 1. Document Vector Store
| Item | Value |
|------|-------|
| Node Name | `Document Knowledge Base` |
| Embedding Model | OpenAI text-embedding-3-small |
**Pre-loaded Files:**
| File | Source URL | Content |
|------|-----------|---------|
| `docs.giselles.ai-llms-full.txt` | `https://docs.giselles.ai/llms-full.txt` | Documentation (Text) |
| `giselles-terms.pdf` | `https://giselles.ai/legal/terms` | Terms of Service |
| `giselles-privacy.pdf` | `https://giselles.ai/legal/privacy` | Privacy Policy |
### 2. GitHub Vector Store
| Item | Value |
|------|-------|
| Node Name | `GitHub Knowledge Base` |
| Repository | `giselles-ai/giselle` |
| Include Code | ON |
| Include Issues | ON |
| Include Pull Requests | ON |
| Embedding Model | OpenAI text-embedding-3-small |
### 3. App Entry
| Item | Value |
|------|-------|
| Node Name | `Question Input` |
| Node Input Name | `question` |
| Prompt | - (User input only) |
### 4. Generator Node (Doc Query)
| Item | Value |
|------|-------|
| Node Name | `Doc Query Generator` |
| Model | gpt-5-nano |
| Thinking | OFF |
| Web Search | - |
**Prompt:**
```
Convert the following question into an optimized search query for documentation:
Question: @Question Input
Generate a query with relevant keywords and concepts for searching documentation.
Output only the query, nothing else.
```
### 5. Generator Node (Code Query)
| Item | Value |
|------|-------|
| Node Name | `Code Query Generator` |
| Model | gpt-5-nano |
| Thinking | OFF |
| Web Search | - |
**Prompt:**
```
Convert the following question into an optimized search query for code:
Question: @Question Input
Generate a query with function names, file patterns, and technical terms for searching code.
Output only the query, nothing else.
```
### 6. Query Node (Document)
| Item | Value |
|------|-------|
| Node Name | `Document Search` |
| Source | `@Document Knowledge Base` |
| Query | `@Doc Query Generator` |
| Max Results | 10 |
| Similarity Threshold | 0.3 |
### 7. Query Node (GitHub)
| Item | Value |
|------|-------|
| Node Name | `Code Search` |
| Source | `@GitHub Knowledge Base` |
| Query | `@Code Query Generator` |
| Max Results | 10 |
| Similarity Threshold | 0.3 |
### 8. Generator Node (Answer)
| Item | Value |
|------|-------|
| Node Name | `Answer Generator` |
| Model | claude-haiku-4.5 |
| Thinking | ON |
| Web Search | OFF |
**Prompt:**
```
Answer the following question based on the provided content:
Question: @Question Input
Documentation:
@Document Search
Code & Repository:
@Code Search
Requirements:
- Answer based on both documentation and code repository content
- Reference specific files or passages when applicable
- If the answer is not found, clearly state that
- Be concise but thorough
```
# What are Cookbooks (/en/cookbooks/overview)
---
title: What are Cookbooks
description: Step-by-step recipes for building practical AI apps with Giselle, from content generation to RAG-powered Q&A systems.
---
Cookbooks are practical, step-by-step guides that show you how to build real-world AI apps with Giselle. Each recipe includes complete node configurations, prompts, and workflow diagrams you can follow to create your own apps.
## Available Recipes
| Recipe | What You'll Build | Key Features |
|--------|-------------------|--------------|
| [Blog Post & Social Media Generator](/en/cookbooks/blog-social-media-generator) | Content creation pipeline that generates blog posts and social media content from a topic | Sequential processing, multiple generators, content adaptation |
| [Web Research Assistant](/en/cookbooks/web-research-assistant) | Research tool that combines fixed reference pages with real-time web search | Webpage node, LLM Web Search, information synthesis |
| [Knowledge Base Q&A](/en/cookbooks/knowledge-base-qa) | RAG system using Document and GitHub Vector Stores | RAG, Vector Stores, query optimization, multi-source search |
## What You'll Learn
Through these recipes, you'll learn how to:
- **Connect nodes** to build multi-step AI workflows
- **Use Vector Stores** for RAG (Retrieval-Augmented Generation)
- **Combine information sources** like web pages, documents, and code repositories
- **Optimize queries** to improve search results
- **Chain generators** for sequential content processing
# Web Research Assistant (/en/cookbooks/web-research-assistant)
---
title: Web Research Assistant
description: Learn how to combine the Webpage node with LLM Web Search. Ask a question, and the AI will research using both the reference documentation and real-time web search.
---
This recipe shows you how to build an app that combines fixed reference pages with LLM web search capabilities. Ask a question, and the AI will research using both the reference documentation and real-time web search to provide comprehensive answers.
## Overview
**Purpose**: Combine fixed reference pages with LLM web search for comprehensive research.
| Node | Role | Model |
|------|------|-------|
| App Entry | Question input | - |
| Webpage Node | Fetch reference information from fixed URL | - |
| Generator 1 (Research) | Collect information via web search | claude-haiku-4.5 |
| Generator 2 (Summary) | Summarize research results | gemini-2.5-flash-lite |
**What you'll learn**: Webpage node, LLM Web Search feature, combining information sources
## Workflow Diagram
```mermaid
flowchart LR
A[Research Question] --> C[Web Researcher]
B[Reference Webpage] --> C
C --> D[Summary Generator]
```
## Node Configuration Details
### 1. App Entry
| Item | Value |
|------|-------|
| Node Name | `Research Question` |
| Node Input Name | `question` |
| Prompt | - (User input only) |
### 2. Webpage Node
| Item | Value |
|------|-------|
| Node Name | `Reference Webpage` |
| URL | `https://docs.giselles.ai/llms-full.txt` |
### 3. Generator Node (Web Researcher)
| Item | Value |
|------|-------|
| Node Name | `Web Researcher` |
| Model | claude-haiku-4.5 |
| Thinking | ON |
| Web Search | ON |
**Prompt:**
```
Research the following question using web search and the reference page:
Question: @Research Question
Reference Information: @Reference Webpage
Requirements:
- Search the web for the latest and most relevant information
- Combine web search results with the reference page content
- Provide accurate and up-to-date answers
- Cite sources when possible
```
### 4. Generator Node (Summary)
| Item | Value |
|------|-------|
| Node Name | `Summary Generator` |
| Model | gemini-2.5-flash-lite |
| Thinking | - |
| Web Search | OFF |
**Prompt:**
```
Summarize the research findings into a clear report:
@Web Researcher
Requirements:
- Executive summary (2-3 sentences)
- Key findings as bullet points
- Conclusion and recommendations
```
# Action Node (/en/glossary/action-node)
---
title: Action Node
description: "Learn how Action Nodes in Giselle enable your workflows to interact with external services like GitHub, performing tasks such as creating issues, comments, or retrieving discussions in your repositories."
---
## Action Node in Giselle
**Action Node** empowers your Giselle workflows to connect with and control external services. It acts as a bridge, allowing you to automate tasks beyond the Giselle environment. Currently, the primary integration is with **GitHub**, enabling a variety of repository operations. We are continuously working to expand support for more external services.
### GitHub Action
The GitHub Action capability within the Action Node allows your workflows to perform specific operations in your GitHub repositories. This is useful for automating tasks like issue creation, commenting, retrieving data, and more, based on the logic and data processed within your Giselle flow.
#### Setting up a GitHub Action:
1. **Select GitHub Account/Organization**:
* Upon adding an Action Node and choosing GitHub as the service, you'll first need to select the GitHub account or organization where your target repository resides (e.g., `giselles-ai`, `liam-hq`).
2. **Choose a Repository**:
* Next, a list of repositories accessible under the selected account/organization will appear (e.g., `docs`, `giselle`).
* Click the **Set up** button next to the repository you want the action to target (e.g., `giselle`).
3. **Choose the GitHub Action to Perform**:
* Once a repository is selected (e.g., `giselles-ai/giselle`), you'll need to specify what action the Giselle's app should execute.
* Click on the dropdown menu, which might be labeled "Choose what action you want to perform."
* Select the desired action from the list. Examples include:
* **Create Issue**
* **Create Issue Comment**
* **Create Pull Request Comment**
* **Reply Pull Request Review Comment**
* **Get Discussion**
* After selecting an action, click the **Setup Action** button to proceed to parameter configuration.
4. **Configure Action Parameters**:
* Each GitHub action requires specific parameters to execute correctly. For instance, the "Create Issue Comment" action requires an `issueNumber` and a `body` for the comment, as indicated by "Required" fields.
* The configuration panel will display the selected repository and the chosen action (e.g., "Create Issue Comment"). Below this, the necessary parameters will be listed.
* For each parameter, you'll need to provide a value. This can often be done by:
* Entering a static value directly.
* **Selecting a Source**: This allows you to map data dynamically from the output of previous nodes in your flow or from the Giselle's app flow's initial trigger input. The "Select Source" option next to each parameter field facilitates this.
* Ensure all parameters marked as "Required" are filled in.
* Once all parameters are configured, the changes are typically saved by an "Action" button or similar confirmation in the UI. The node on the canvas will update to reflect the configured action (e.g., showing "Create Issue Comment" with inputs for `issueNumber` and `body`).
#### Output of the Action Node:
After successfully performing its task, an Action Node will typically produce an **output**. This output can contain information relevant to the action performed, such as the ID or URL of a created issue or comment, or the data retrieved from a service (like discussion content). This output can then be used as input by subsequent nodes in your workflow, enabling complex chains of operations. The node preview often indicates the availability of an "output".
#### Example: Creating an Issue Comment
Imagine you've configured an Action Node to "Create Issue Comment" for the `giselles-ai/giselle` repository:
* **Repository**: `giselles-ai/giselle`
* **Action**: Create Issue Comment
* **Required Parameters (Inputs)**:
* `issueNumber`: Sourced from a workflow trigger or a previous node (e.g., an issue number identified earlier in the flow).
* `body`: Sourced from another node (e.g., a text summary generated by an AI model in a preceding step).
* **Execution**: When this node runs, it will post a new comment using the provided `body` to the issue specified by `issueNumber` within the `giselles-ai/giselle` repository.
* **Potential Output**: The node might output details like the URL or ID of the newly created comment, which can be used in further steps.
#### Example: Replying to a Pull Request Review Comment
Here's how you might configure an Action Node to "Reply Pull Request Review Comment" in the `giselles-ai/giselle` repository, as shown in the provided image:
* **Repository**: `giselles-ai/giselle`
* **Action**: Reply Pull Request Review Comment
* **Required Parameters (Inputs)**:
* `pullNumber`: The number of the pull request containing the review comment. This would typically be sourced from a trigger event (e.g., a GitHub Trigger for "Pull Request Review Comment Created") or a previous node that identified the pull request.
* `commentId`: The ID of the specific review comment to which you are replying. This also would likely come from the trigger data or a preceding node that fetched comment details.
* `body`: The content of your reply. This could be static text, or more powerfully, dynamically generated text from an AI node in your workflow (e.g., an automated acknowledgment, a question, or a summary).
* **Execution**: When this Action Node executes, it will post the content from the `body` parameter as a reply to the specified `commentId` on the given `pullNumber` within the `giselles-ai/giselle` repository.
* **Potential Output**: The node may output information about the reply that was posted, such as its own ID or URL, which could be useful for further conditional workflow logic.
#### Example: Getting a GitHub Discussion
This action allows your workflow to retrieve the content and details of a specific GitHub Discussion from your repository.
* **Repository**: `giselles-ai/giselle` (or any other configured repository)
* **Action**: Get Discussion
* **Required Parameters (Inputs)**:
* `discussionNumber`: The number of the GitHub Discussion to retrieve. This can be a static value or sourced dynamically from a previous node's output or a trigger input.
* **Execution**: When this node runs, it connects to GitHub and fetches the details of the discussion specified by `discussionNumber` from the selected repository.
* **Potential Output**: The node will output an object containing the discussion data. This typically includes details such as the discussion's `id`, `title`, `bodyHTML` (the content of the discussion in HTML format), `createdAt`, `updatedAt`, `author` information, and an array of `comments` associated with the discussion (each comment also having details like `bodyHTML`, `author`, etc.). This structured data can then be used by subsequent nodes in your workflow, for example, to summarize the discussion, extract key points, perform analysis on the comments, or trigger other actions based on its content.
The Action Node, particularly with its GitHub integration, is a versatile tool for extending Giselle's automation capabilities into your software development and project management lifecycles. Stay tuned for more actions and integrations with other external services!
# AI Parameters (/en/glossary/ai-parameters)
---
title: AI Parameters
description: "Dictionary of Generation Parameters Used Across AI Models in Giselle."
---
This document provides a detailed overview of common generation parameters ("Generation Parameters") that can be configured within Giselle's Generator Nodes to fine-tune outputs from various multimodal AI models such as Claude, Gemini, GPT-4o, Sonar, and Fal AI.
Please note that definitions and availability of generation parameters may vary depending on the AI provider and specific models. Additionally, Giselle does not currently implement all parameters supported by each provider's API. This document primarily covers general definitions and typical usages of the parameters that are available. If you have suggestions for parameters you would like Giselle to support, please feel free to contact us.
## Common AI Parameters
### Temperature
- **Definition:** Controls randomness in text or image generation.
- **Range:** 0 (less random, deterministic) to 1 (highly random, creative).
- **Recommended use:**
- Lower values (0–0.3) for precise, factual outputs.
- Higher values (0.7–1.0) for creative or exploratory outputs.
### Top-p (Nucleus Sampling)
- **Definition:** Limits token selection to the smallest set whose cumulative probability exceeds a threshold (p).
- **Range:** Typically 0.0 to 1.0.
- **Recommended use:**
- Lower values (0.7–0.9) for focused, consistent outputs.
- Higher values (~1.0) for broader, diverse content generation.
### Max Tokens
- **Definition:** Maximum number of tokens generated in a response.
- **Recommended use:**
- Adjust based on desired response length and API/model token limits.
- Essential for cost management and resource optimization.
## Reasoning Parameters
### Reasoning Effort
- **Definition:** Controls how many reasoning tokens the model generates before producing a response. Higher levels result in more thorough reasoning at the cost of increased latency.
- **Range:** Model-dependent. GPT-5.2 supports `none`, `low`, `medium`, `high`, `xhigh`. Traditional models support `minimal`, `low`, `medium`, `high`.
- **Default:** `none` for GPT-5.2/5.1 models, `medium` for traditional models.
- **Recommended use:**
- `none`: Low-latency interactions where quick responses are prioritized.
- `low` to `medium`: Balanced reasoning for general tasks.
- `high` to `xhigh`: Complex problem-solving, deep analysis, and tasks requiring thorough reasoning.
### Text Verbosity
- **Definition:** Determines how many output tokens are generated. Controls the length and detail of the model's response.
- **Range:** `low`, `medium`, `high`.
- **Default:** `medium`.
- **Recommended use:**
- `low`: Concise answers, simple code generation (e.g., SQL queries), situations where brevity is preferred.
- `medium`: Balanced output length for most tasks.
- `high`: Thorough explanations, extensive code refactoring, detailed documentation.
> **Note:** Text verbosity sets a general token range at the system prompt level, but actual output can still be influenced by prompting within that range.
## Text-Specific Parameters
### Frequency Penalty
- **Definition:** Reduces repetition by penalizing repeated tokens.
- **Range:** Typically 0.0 (no penalty) to 1.0 (strong penalty).
- **Recommended use:**
- Increase when repetitive outputs are undesirable.
### Presence Penalty
- **Definition:** Encourages new content by penalizing tokens previously used.
- **Range:** Typically 0.0 (no penalty) to 1.0 (strong penalty).
- **Recommended use:**
- Helpful for generating more diverse text outputs.
### Stop Sequences
- **Definition:** Tokens or phrases indicating where the model should stop generating.
- **Recommended use:**
- Define clearly when structured or partial outputs are required.
## Image Generation Parameters
### Guidance Scale
- **Definition:** Influences how closely the generated image follows the provided prompt.
- **Range:** Typically 1 (less strict adherence) to 20 (highly strict adherence).
- **Recommended use:**
- Lower values for exploratory, abstract outputs.
- Higher values for precise, detailed adherence to prompts.
### Inference Steps
- **Definition:** Number of steps in the diffusion process.
- **Recommended use:**
- Lower values (1–4 steps with flux/schnell) for rapid prototyping.
- Higher values (~28 steps with stable-diffusion) for detailed, high-quality images.
## Multimodal Parameters
### Context Window
- **Definition:** Maximum tokens/models can "remember" or process at once.
- **Typical values:**
- Gemini: up to 1M tokens.
- GPT-5.2: 400k tokens.
- GPT-4o: 128k tokens.
- Claude: up to 200k tokens.
- **Recommended use:**
- Use larger context windows for extensive documents, multimodal data analysis, and tasks requiring detailed understanding.
### Input Modalities
- **Definition:** Types of inputs supported by the model (text, images, audio, video).
- **Models:**
- Gemini 2.5 Pro and GPT-4o support extensive multimodal inputs.
- Choose models based on required input modalities.
## Web-Search Parameters
### Grounding
- **Definition:** Enables the model to incorporate real-time web-search results into generated responses.
- **Recommended use:**
- Enable for up-to-date, fact-based research tasks or informational queries.
## Practical Recommendations for Giselle
- **Experimentation and Adjustment:** Regularly adjust parameters based on task-specific results.
- **Node Integration:** Use parameters strategically across chained nodes to maximize workflow effectiveness.
- **Document Settings Clearly:** Clearly document chosen parameter settings within your Giselle workflow for team clarity and reproducibility.
# Data Query Node (/en/glossary/data-query-node)
---
title: Data Query Node
description: "Learn how to use the Data Query Node to execute SQL queries against Data Store Node."
---
This feature is currently in **Private Preview**. Access is limited to select users. Features may change without notice.
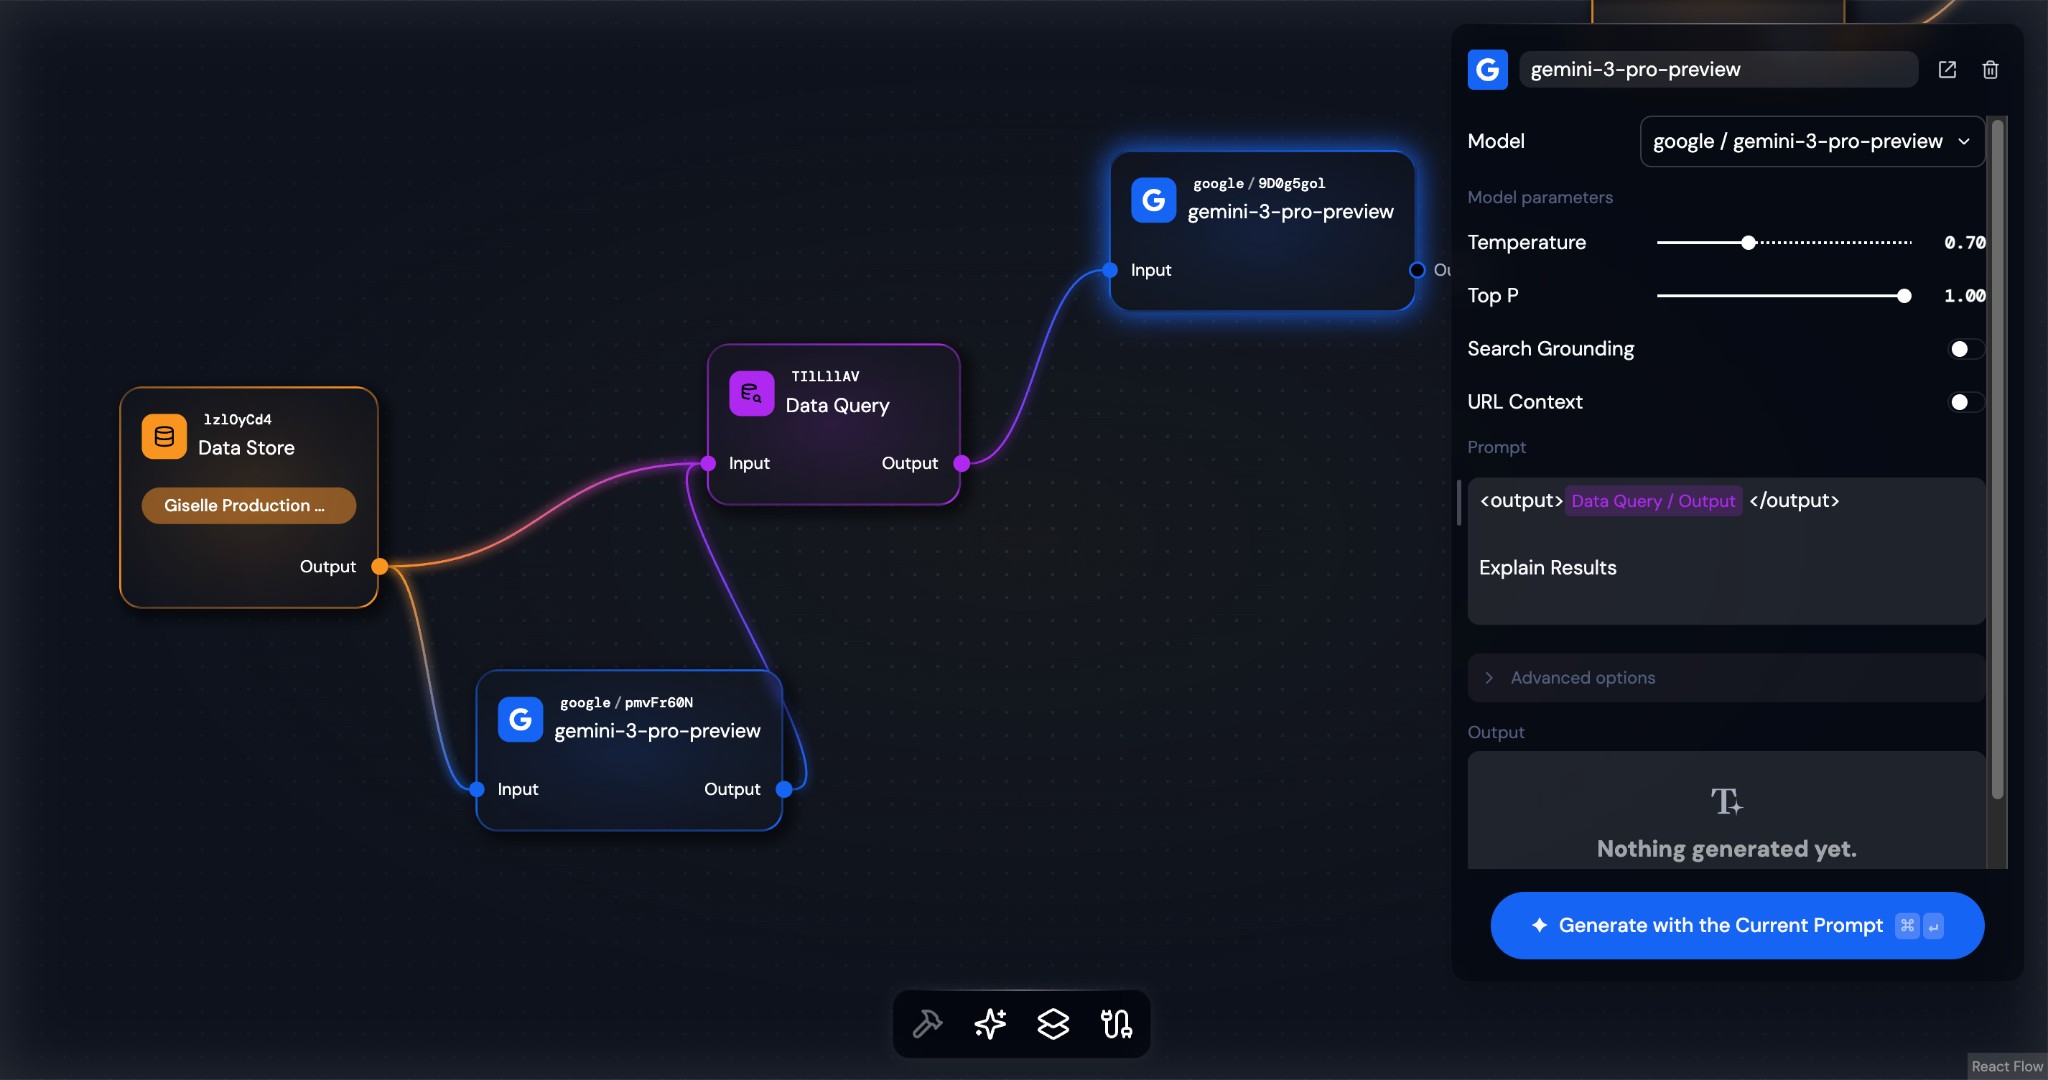
## Data Query Node in Giselle
The **Data Query Node** is a Giselle component designed to execute SQL queries against a connected Data Store Node and return results in JSON format.
It works with the following nodes and serves as an essential building block for leveraging databases within workflows:
- **[Data Store Node](data-store-node)**: Provides database connections registered in team settings to your workflow.
### How to Use Data Query Node
#### 1. Add Data Query Node
1. From the toolbar at the bottom of the canvas, click the **Context** icon.
2. Select **Data Query** from the popup menu to add the node to your Workspace.
#### 2. Connect Data Store Node
The Data Query Node requires input from a Data Store Node to function. You need to connect the Data Store Node's **output** to the Data Query Node's **input**. Until a Data Store Node is connected, the Data Query Node displays "No data sources connected • Connect a Data Store node".
Once connected, Data Store information appears at the top of the query editor:
- **Connected**: Data Store is properly configured
- **Requires setup**: Select a connection in the Data Store Node
#### 3. Write and Execute Queries
Once a Data Store Node is connected, you can configure the Data Query Node:
1. **Enter query**: Enter your SQL query in the "SQL Query" input field in the settings panel. Type `@` to reference outputs from other nodes.
2. **Execute query**: Click the **Run Query** button to execute the query against the connected database.
#### 4. Review Results
After the query executes, results are displayed directly in the node's panel. Results include:
- A summary of returned rows (e.g., "5 rows returned")
- The executed query (with parameters expanded)
- Result data (JSON format, collapsible)
If no rows are returned, "Query executed successfully but returned no rows." is displayed.
### Creating Dynamic Queries
From the Data Query Node's settings panel, you can use `@` to reference outputs from other nodes within your query. This allows you to build dynamic queries based on user input or AI-generated values.
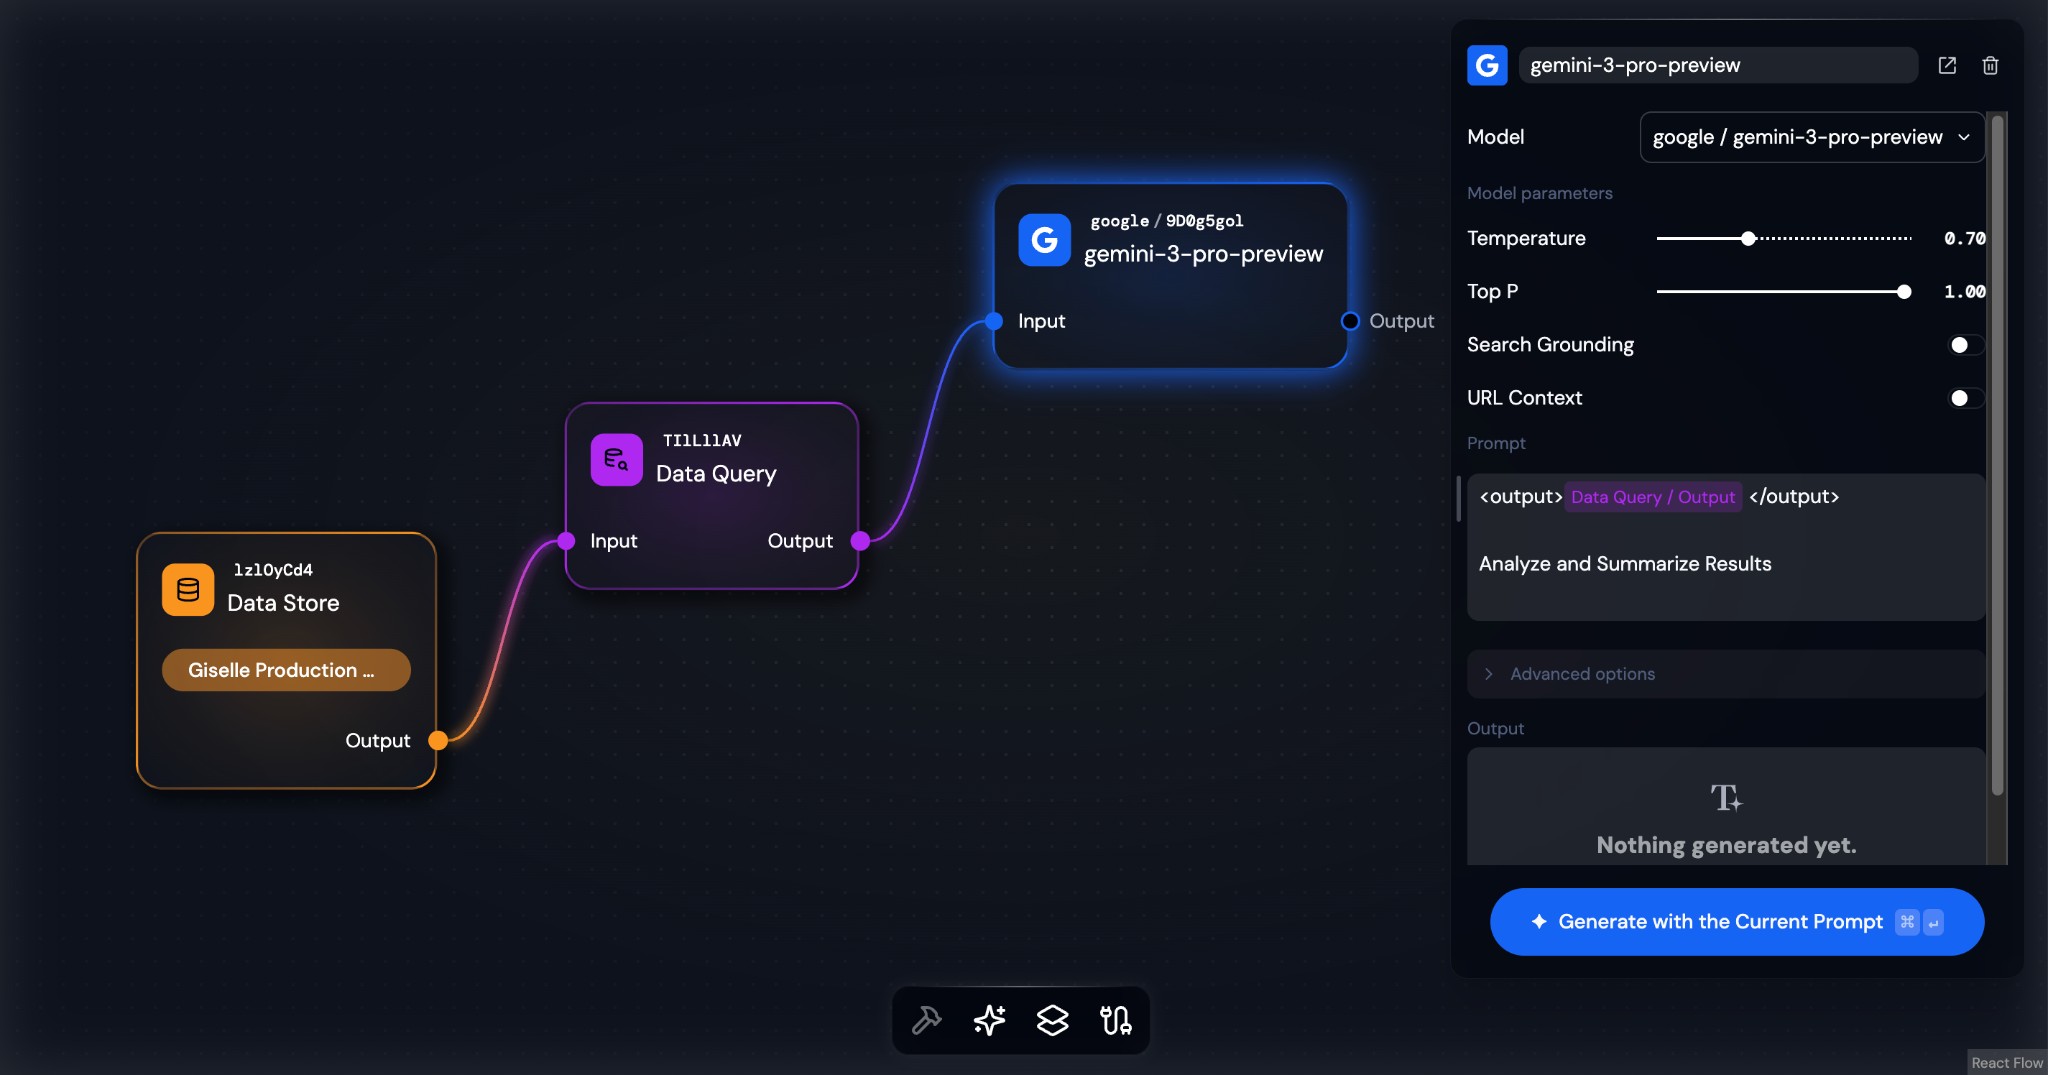
### Use Case: Leveraging Databases in Workflows
The primary purpose of the Data Query Node is to enable **leveraging databases in workflows**. By providing information retrieved from databases to AI models, you can generate more accurate and fact-based responses.
A typical workflow in Giselle looks like this:
1. **Data Store Node**: Provides the database connection registered in team settings.
2. **Data Query Node**: Executes SQL queries and retrieves relevant data from the database.
3. **Generator Node**: Receives query results, analyzes and summarizes the data, and generates user-friendly responses.
For more advanced workflows, you can reference database schema in Generator Node to generate SQL from natural language:
### Data Query Node Output
The Data Query Node's "result" output contains query results in JSON format. This structured data can be passed to subsequent nodes (most commonly a Generator Node) to serve as context for data analysis or response generation.
Output includes:
- **rows**: Array of query results
- **rowCount**: Number of rows returned
- **query**: The executed query
For details on configuring database connections, see the [Data Stores documentation](../guides/settings/team/data-stores) and [Data Store Node](data-store-node) documentation.
# Data Store Node (/en/glossary/data-store-node)
---
title: Data Store Node
description: "Learn how to use the Data Store Node to integrate PostgreSQL databases into your workflows."
---
This feature is currently in **Private Preview**. Access is limited to select users. Features may change without notice.
## Data Store Node in Giselle
The **Data Store Node** is a specialized "variable node" that provides PostgreSQL database connections registered in team settings to your workflow. When combined with the Data Query Node, you can execute SQL queries against databases from within your workflow and process the results with a Generator Node or other nodes.
## Prerequisites
To use the Data Store Node, you must first register a database connection. See [How to Create a Data Store](../guides/settings/team/data-stores#creating-a-data-store) for details.
### Adding a Data Store Node to Your Workflow
#### Add the Node
1. From the toolbar at the bottom of the canvas, click the **Context** icon.
2. Select **Data Store** from the popup menu to add the node to your Workspace.
#### Configure the Data Store
1. When first added, the node displays a "Requires setup" status.
2. Select the node to open the settings panel on the right.
3. Click the **Data Store** dropdown menu and select the Data Store you created earlier.
#### Complete Setup
Once configured, the node on the canvas updates to display the selected Data Store's name. The node is now ready to be connected to a Data Query Node in your workflow.
### Using in Workflows
The Data Store Node is designed to be used in combination with a Data Query Node. It provides the database connection for a Data Query Node to execute queries.
- **Connect the output**: You need to connect the Data Store Node's "output" to the Data Query Node's input.
- **Execute queries**: The Data Query Node receives SQL queries, executes them against the connected database, and passes the results to subsequent nodes (such as Generator Node) for processing, analysis, or summarization.
### Workflow Example
### Advanced Use Case
By combining with a Generator Node, you can generate SQL from natural language and execute dynamic queries:

### Node Output
The Data Store Node's **output** provides a **reference to the connected database's schema**. By connecting this output to a Generator Node, AI models can understand the database structure (table names and column names) and generate appropriate SQL queries.
### Error Handling
If you encounter issues with the Data Store Node, possible reasons include:
- **Data Store not selected**: Select a Data Store in the node's property panel.
- **Data Store was deleted**: If the selected Data Store was deleted, a "Requires setup" status will appear. Select a different Data Store.
- **Data Store not found**: Verify that the Data Store has been created in team settings.
For details on error messages and limitations, see the [Data Stores documentation](../guides/settings/team/data-stores).
# Document Vector Store Node (/en/glossary/document-vector-store-node)
---
title: 'Document Vector Store Node'
description: 'Learn how the Document Vector Store Node enables you to upload and search documents using vector embeddings for AI-powered retrieval in your Giselle workflows.'
---
## Document Vector Store Node in Giselle
The **Document Vector Store Node** is a specialized "Variable" node that creates a powerful, searchable knowledge base from uploaded documents. It works by processing your documents (PDFs, text files, and markdown) into vector embeddings, allowing AI models to perform semantic searches and retrieve relevant context for answering questions and generating responses.
This process uses advanced embedding models to convert your document content into vector embeddings. You can select from multiple embedding models, including OpenAI's [`text-embedding-3-small`](https://platform.openai.com/docs/models/text-embedding-3-small) (1536 dimensions) and [`text-embedding-3-large`](https://platform.openai.com/docs/models/text-embedding-3-large) (3072 dimensions). These vectorized data are then stored securely in Giselle's dedicated Vector Store.
### Setting up a Document Vector Store:
Before using the Document Vector Store Node in your workflow, you need to create and configure a vector store through your team settings:
1. **Navigate to Vector Store Settings**:
* Go to **Settings > Team > Vector Stores** in your Giselle account.
* You can access this page here: [https://studio.giselles.ai/settings/team/vector-stores/document](https://studio.giselles.ai/settings/team/vector-stores/document).
2. **Create a New Document Vector Store**:
* Click the button to create a new document vector store.
* Enter a descriptive name for your vector store (e.g., "Company Documentation" or "Product Manuals").
3. **Upload Documents**:
* After creating the vector store, you can upload documents by clicking the upload area or dragging and dropping files.
* **Supported File Types**: PDF (`.pdf`), Text (`.txt`), Markdown (`.md`)
* **Maximum File Size**: 4.5 MB per file
* You can upload multiple documents to build a comprehensive knowledge base.
4. **Document Processing**:
* Once uploaded, documents are automatically processed through several stages:
* **Text Extraction**: Text is extracted from PDFs and decoded from text files.
* **Chunking**: Content is divided into manageable chunks (max 150 lines or 6000 characters per chunk, with 30-line overlap).
* **Embedding Generation**: Each chunk is converted into vector embeddings using the selected embedding model.
* **Storage**: Embeddings are stored with HNSW (Hierarchical Navigable Small World) indexes for fast similarity search.
5. **Monitor Processing Status**:
* Each document shows its status: **Pending**, **Processing**, **Ready**, or **Failed**.
* Wait for documents to reach the "Ready" status before using the vector store in your workflows.
### Adding a Document Vector Store Node to Your Workflow:
1. **Add the Node**:
* From the toolbar at the bottom of the canvas, click the **Variable** icon.
* Select **Document Vector Store** from the pop-up menu to add the node to your workspace.
2. **Configure the Vector Store**:
* When first added, the node will display a "REQUIRES SETUP" status.
* Select the node to open its configuration panel on the right.
* Click the **Select a vector store** dropdown menu and choose the document vector store you created earlier.
3. **Select the Embedding Profile**:
* After selecting a vector store, choose which embedding model to use for queries.
* This must match one of the embedding profiles used when the documents were processed.
* Available options typically include:
* **text-embedding-3-small**: 1536 dimensions - Efficient and suitable for most use cases.
* **text-embedding-3-large**: 3072 dimensions - Higher precision for complex semantic understanding.
4. **Finalize Setup**:
* Once configured, the node on the canvas will update to show the name of the selected vector store.
* The node is now ready to be connected to other nodes in your workflow.
### Supported File Types
The Document Vector Store supports multiple file types, each with specific size limits:
| File Type | Supported Formats | Maximum Size | Common Use Cases |
| :-------- | :---------------- | :----------- | :--------------- |
| **PDF** | `.pdf` | 4.5MB | Documentation, reports, manuals, articles |
| **Text** | `.txt` | 4.5MB | Plain text documents, logs, transcripts |
| **Markdown** | `.md` | 4.5MB | Technical documentation, README files, notes |
### Usage in Workflows
The Document Vector Store Node is designed to be used in combination with a **Vector Query Node**. It acts as the knowledge base that the Vector Query Node searches through.
* **Connect the Output**: The "Output" of the Document Vector Store Node should be connected to the input of a Vector Query Node.
* **Perform a Search**: The Vector Query Node takes a user's question or dynamic input, searches the vectorized document content for the most relevant information, and passes that information to subsequent nodes (like a Generator Node) for processing, analysis, or summarization.
#### Example Workflow:
```
[Text Node: "What are the safety guidelines?"]
↓
[Vector Query Node] ←── [Document Vector Store Node]
↓
[Generator Node: Summarizes safety guidelines based on search results]
```
### Query Parameters
When using a Vector Query Node with the Document Vector Store, you can configure:
* **Max Results**: The maximum number of document chunks to return (default: 20, maximum: 100).
* **Similarity Threshold**: The minimum cosine similarity score for results (default: 0.3, range: 0-1). Higher values return only more relevant results.
### Output of the Node
The Document Vector Store Node's **output** is a reference to the vectorized data of your uploaded documents. This output provides the necessary connection for other nodes, like the Vector Query Node, to access and search the document content.
### Managing Your Document Vector Stores
You can manage all your document vector stores from the team settings page:
* **Add Documents**: Upload additional documents to existing vector stores.
* **Monitor Status**: View the processing status of each document.
* **Remove Documents**: Delete documents that are no longer needed.
* **Delete Vector Stores**: Remove entire vector stores when they're no longer in use.
### Technical Considerations
* **File Size Limit**: The maximum file size per document is **4.5 MB** due to platform constraints.
* **Processing Time**: Larger documents or multiple simultaneous uploads may take longer to process.
* **Embedding Consistency**: Ensure you use the same embedding profile when querying that was used during document ingestion for optimal search results.
* **Concurrent Processing**: The system prevents duplicate processing through atomic claim mechanisms, ensuring each document is processed only once.
### Error Handling
If a document fails to process, possible reasons include:
* **Unsupported File Type**: Ensure your file is PDF, TXT, or MD format.
* **File Too Large**: Files exceeding 4.5 MB will fail to upload.
* **Extraction Failed**: PDFs with non-standard encoding or corruption may fail during text extraction.
* **Processing Errors**: Network issues or system errors during embedding generation.
When errors occur, you can re-upload the document or contact support if the issue persists.
# File Node (/en/glossary/file-node)
---
title: File Node
description: "Learn how the File Node in Giselle allows you to upload and use files like PDFs, images, and text as inputs for your AI workflows."
---
## File Node in Giselle
The **File Node** is a specialized type of "Variable Node" that allows you to handle file uploads and processing directly within your Giselle workflows. It acts as an input source, enabling you to incorporate documents, images, and text files for AI models to analyze, summarize, or transform.
### How to Use a File Node
1. **Add the Node**: Drag and drop a "File" node from the toolbar at the bottom of the canvas onto your workspace.
2. **Upload a File**: Select the node to open its configuration panel. You can upload a file by dragging and dropping it onto the designated area or by clicking to open a file selector.
3. **Monitor Status**: The node will display the status of the upload. Files can be in one of three states: "uploading," "uploaded," or "failed." Once successfully uploaded, the file is securely stored in your workspace and ready to be used in your workflow.
### Supported File Types
The File Node supports several types of files, each with specific use cases and limitations.
| File Type | Accepted Formats | Max Size | Common Use Cases |
| :-------- | :-------------------------------- | :------- | :--------------------------------------------- |
| **PDF** | `application/pdf` | 4.5MB | Document processing, text extraction, analysis |
| **Image** | `image/png`, `image/jpeg`, `image/gif`, `image/svg` | 4.5MB | Visual content analysis and generation |
| **Text** | `text/plain`, `text/markdown` | 4.5MB | Text content processing and generation |
### Workflow Integration
The primary purpose of a File Node is to provide data to other nodes, most commonly a [Generator Node](./generator-node).
* **Connect the Output**: The "Output" of a File Node can be connected to the input of a Generator Node.
* **Process the Content**: In the Generator Node, you can then prompt an AI model to perform a task on the file's content. For example, you can connect a PDF file and instruct the AI to "Summarize the key findings from the attached document."
#### Model Compatibility
The type of file you can connect depends on the capabilities of the target AI model. For example:
* **PDF and Text files** can be connected to text-based or multimodal models for tasks like analysis, summarization, or Q&A.
* **Image files** can be connected to multimodal models that accept image inputs for analysis, or to image generation models for transformation tasks.
### Technical Limitations
Please be aware of the following limitations when using File Nodes:
* **Maximum File Size**: Due to platform constraints (Vercel Serverless Function limits), the maximum size for any single file upload is **4.5MB**.
* **Image Size Limit**: Image files have a maximum size of **4.5MB**.
* **Connection Restrictions**: You cannot connect a file to a node that does not support its type. For instance, a PDF file cannot be connected to a node that only generates images, and an image file may not be compatible with older text-only generation models.
# Generator Node (/en/glossary/generator-node)
---
title: Generator Node
description: Learn how the Generator Node in Giselle uses AI models to generate text, images, and more, forming the core of your AI flows.
---
## Generator Node in Giselle
The **Generator Node** is the central component for AI-driven content creation in Giselle. It allows you to harness the power of various advanced AI models to generate text and images based on your instructions. By configuring prompts, selecting models, and providing tools, you can create highly customized outputs for any flow.
The Generator Node is configured through the following sections in its settings panel:
* **Model**
* **Prompt**
* **Advanced options**
* **Output**
### Prompt Tab
This is where you provide the instructions for the AI model. Write a clear and detailed prompt describing the task you want the AI to perform. The output generated by the model will appear at the bottom of this panel, allowing you to quickly see the results.
**Referencing other node output**: If you want to insert the output of another node as a variable within your prompt, you can click the `@` key to display a suggestion list. From this list, you can select the output of another node that is connected to the current node's input and insert it into your prompt.
You can also test the node individually by clicking the **Generate** button, which runs only this node without executing the entire flow.
### Model Tab
In the Model tab, you can select the specific AI model you want to use for the generation task. Giselle provides access to a wide range of models from leading providers.
* **Select a Model**: Choose from a list of available models, such as OpenAI's `gpt-4o`, Anthropic's `claude-4-opus`, or Google's `gemini-2.5-pro`.
* **Configure Parameters**: Depending on the selected model, you can adjust various [AI Parameters](ai-parameters) like `Temperature` or `Max Tokens` to fine-tune the output.
For more details on the available models from each provider, see our documentation:
* [Anthropic](https://docs.giselles.ai/models/providers/anthropic)
* [fal.ai](https://docs.giselles.ai/models/providers/fal)
* [Google](https://docs.giselles.ai/models/providers/google)
* [OpenAI](https://docs.giselles.ai/models/providers/openai)
### Advanced options
Advanced options lets you configure output format and tool settings in detail.
#### Output Format
Output Format specifies the output format of the Generator Node.
* **Text** (default): Outputs in text format.
* **JSON**: Outputs structured data in JSON format.
When you select JSON, a **Set Schema** button appears, allowing you to open the Structured Output schema definition dialog.
**Defining a Structured Output Schema**
The structured output schema is defined using a form-based interface.
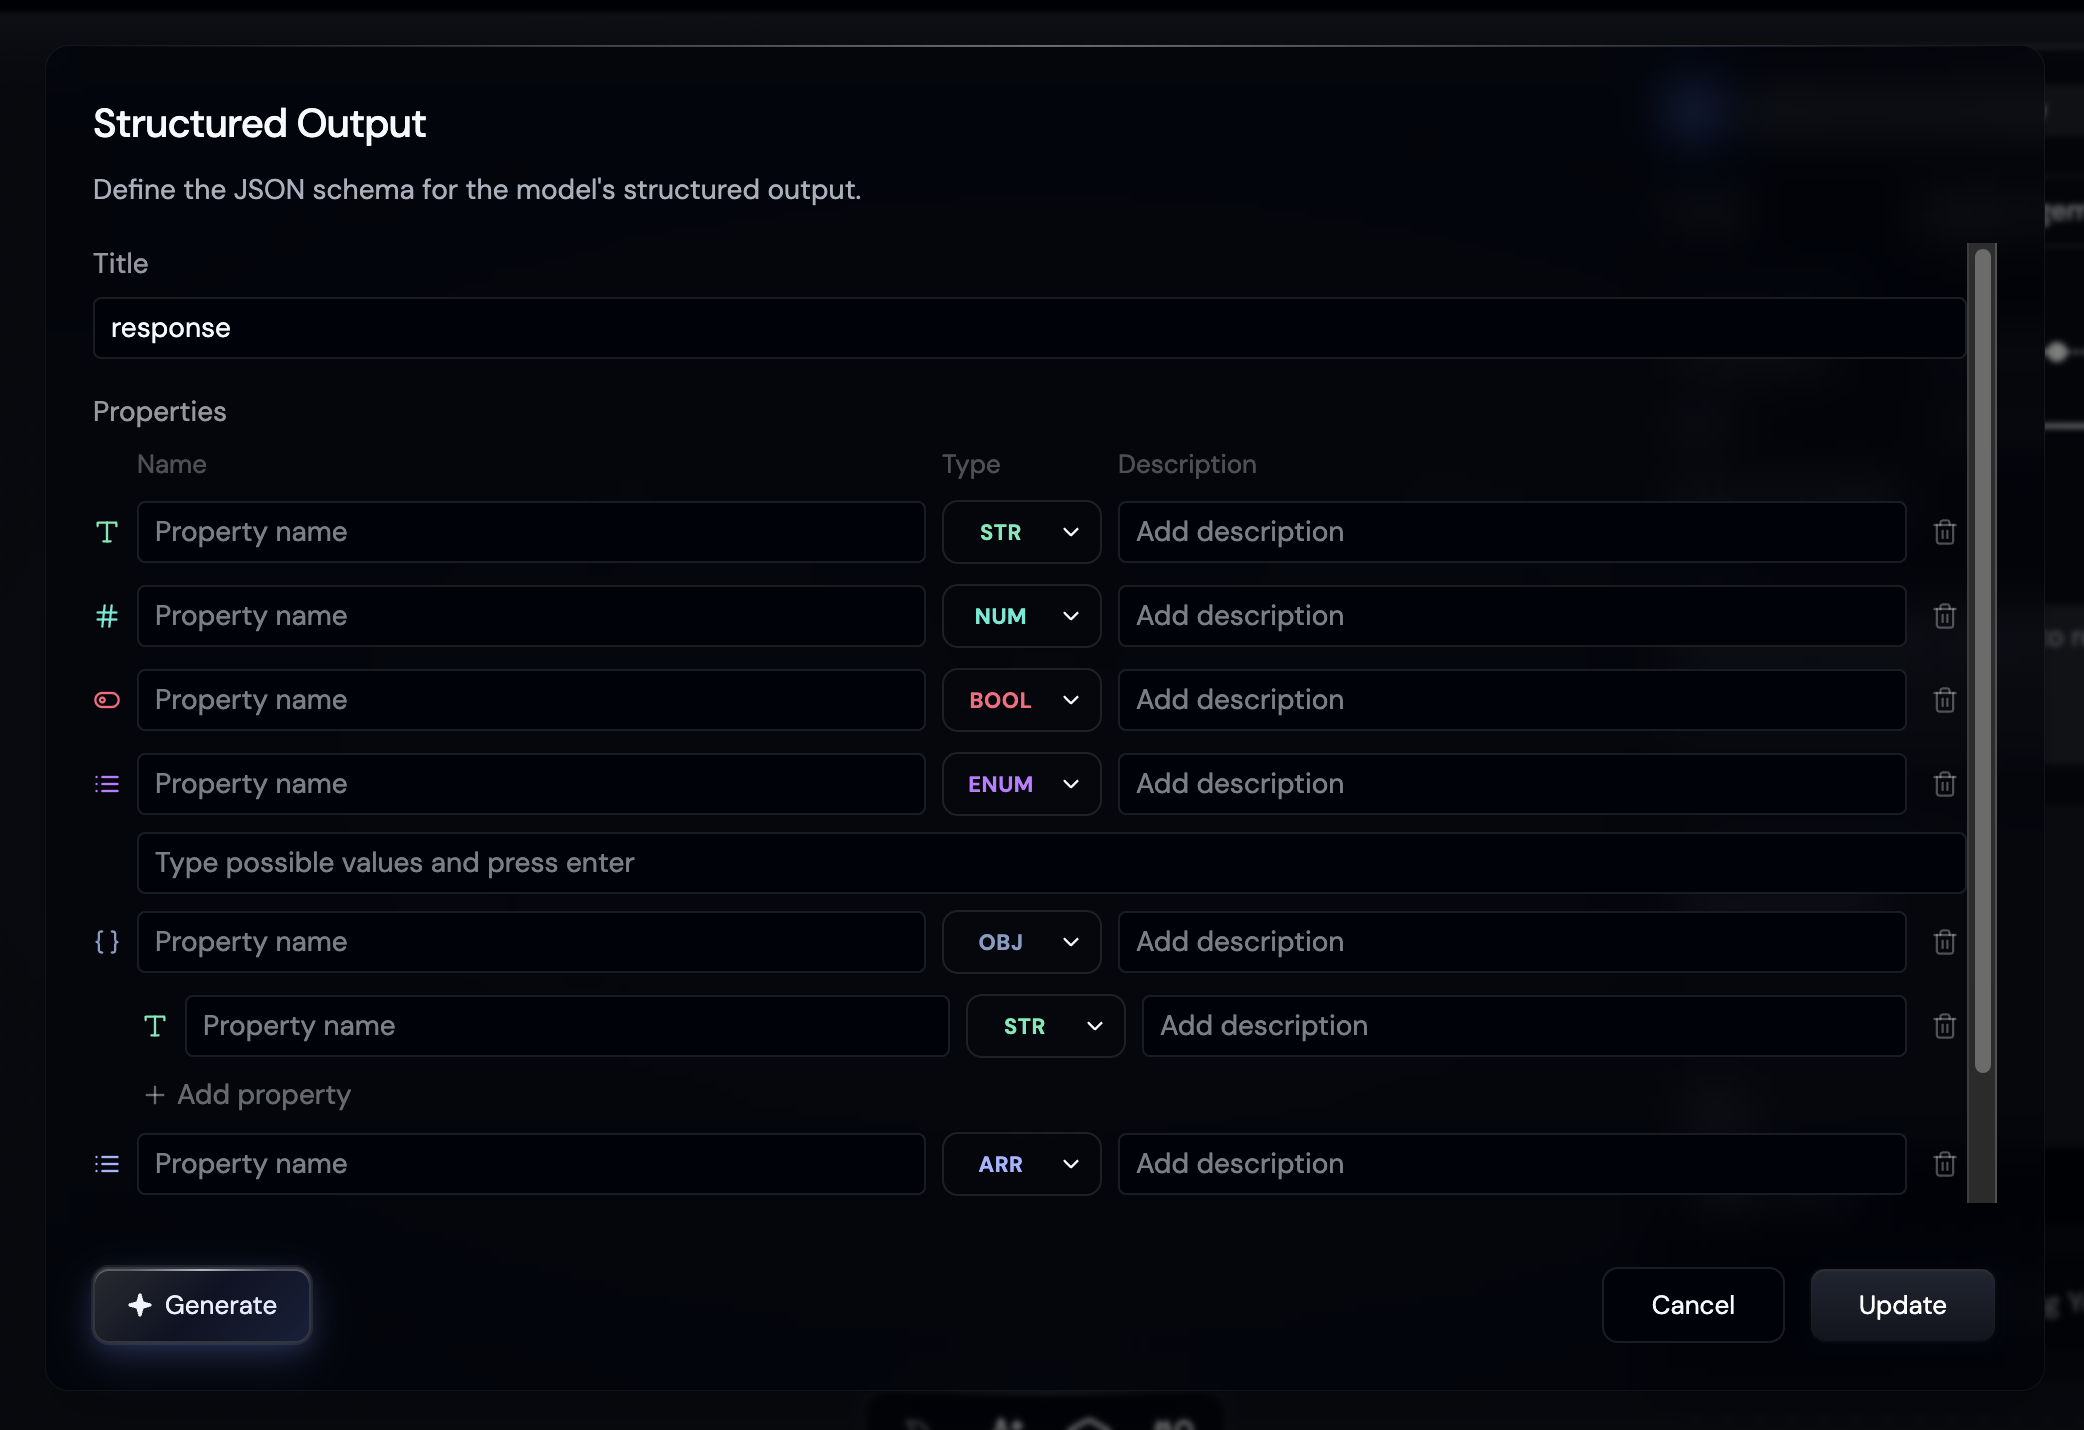
* **Title**: Schema name (required)
* **Properties**: Field list
* **Name**: Field name (required)
* **Type**: STR / NUM / BOOL / ENUM / OBJ / ARR
* **Description**: Field description
* **Add property**: Add a new field
* **Generate**: Enter a description of the expected output, and AI will generate an appropriate schema and auto-fill the form
Nested types work as follows:
* **OBJ**: Define additional properties within an object (e.g., `name` and `age` inside `user`)
* **ARR**: Select a single element type for the array (e.g., an array of strings)
* **ENUM**: Define a list of allowed output values (e.g., `low`, `medium`, `high`)
Input constraints:
* Title is required
* Field names are required and may only contain alphanumeric characters and underscores (`_`)
* Duplicate field names at the same level are not allowed
There are no explicit limits on object nesting depth, number of properties, or number of ENUM options.
#### Tools
The Tools section within Advanced options lets you configure external access for the AI. This is useful for creating more dynamic and powerful flows.
Currently, the following tools are supported:
* [GitHub](/en/glossary/github-tools)
* [PostgreSQL](/en/glossary/postgresql-tools)
We are continuously working to add support for more tools in the future.
## Output of the Generator Node
The primary output of a Generator Node is the content it creates (e.g., a block of text or an image). This output can be connected to the input of other nodes, allowing you to chain AI tasks together. For example, the text generated by one node can be used as the input for another node that summarizes or translates it.
# GitHub Tools (/en/glossary/github-tools)
---
title: GitHub Tools
description: "Learn how to configure and use GitHub Tools within a Generator Node, empowering your AI models to interact directly with your GitHub repositories."
---
**GitHub Tools** enable AI models inside a Generator Node to perform a wide range of actions on GitHub by giving them access to a curated set of functions. This feature, often referred to as "tool use" or "function calling," allows you to build powerful AI agents that can automate development workflows, such as creating issues, managing pull requests, searching for code, and more, all based on natural language instructions in your prompt.
## Configuring GitHub Tools
Follow these steps to connect your GitHub account and enable specific tools for a Generator Node.
### 1. Navigate to the Tools Tab
In any Generator Node (e.g., `gemini-2.5-pro`), select the **Tools** tab. You will see a list of available integrations that can be connected.
### 2. Connect to GitHub
Click the **+ Connect** button next to the GitHub integration. This will open a configuration modal to add your credentials.
### 3. Add Your Personal Access Token (PAT)
To authenticate with GitHub, you need to provide a Personal Access Token (PAT).
You can create a new PAT from your GitHub account settings: [https://github.com/settings/personal-access-tokens](https://github.com/settings/personal-access-tokens). Ensure your token has the necessary permissions (scopes) for the actions you want to perform.
In the "Connect to GitHub" window:
1. **Token Name**: Give your token a descriptive name for easy identification later (e.g., "Create Issue" or "Update Docs").
2. **Personal Access Token (PAT)**: Paste your token into this field. Giselle encrypts the token with authenticated encryption before saving it.
3. Click **Save & Connect**.
### 4. Select the Tools to Enable
After your token is validated, you'll be presented with a list of available GitHub tools, grouped by category. For security and control, you must explicitly select which actions the AI model is allowed to perform.
Check the boxes next to the tools you want to enable for this node (e.g., `createIssue`, `getPullRequest`, `createOrUpdateFile`).
### 5. Save the Configuration
Once you've selected the desired tools, click **Save & Connect** at the bottom of the modal. The Generator Node will now show that GitHub is connected, displaying the enabled tools and a **Configuration** button to make future changes.
## Available GitHub Tools
The following is a list of tools you can enable for your AI model, categorized as they appear in the configuration screen.
**Note**: GitHub tools conform to the definitions at [https://github.com/github/github-mcp-server](https://github.com/github/github-mcp-server)
### Repository
#### `getFileContents`
Retrieves file or directory contents from a repository
* **Required**:
* `owner` (Repository owner)
* `path` (Path to file/directory)
* `repo` (Repository name)
* **Optional**: `branch` (Branch to get contents from)
#### `listBranches`
Lists all branches in a repository with pagination support
* **Required**:
* `owner` (Repository owner)
* `repo` (Repository name)
* **Optional**:
* `page` (Page number for pagination, min 1)
* `perPage` (Results per page, min 1, max 100)
### Issues
#### `createIssue`
Opens a new issue with required title and optional body, assignees, labels, and milestone number
* **Required**:
* `owner` (Repository owner)
* `repo` (Repository name)
* `title` (Issue title)
* **Optional**:
* `body` (Issue body content)
* `assignees` (Array of usernames to assign)
* `labels` (Array of labels to apply)
* `milestone` (Milestone number)
#### `getIssue`
Retrieves detailed information about a specific issue by its number
* **Required**:
* `owner` (Repository owner)
* `repo` (Repository name)
* `issueNumber` (Issue number)
#### `listIssues`
Lists repository issues with filters for state, labels, date, sort order, and direction with pagination
* **Required**:
* `owner` (Repository owner)
* `repo` (Repository name)
* **Optional**:
* `state` (open/closed/all)
* `labels` (Array of labels to filter by)
* `sort` (created/updated/comments)
* `direction` (asc/desc)
* `since` (ISO 8601 timestamp)
* `page` (Page number, min 1)
* `perPage` (Results per page, min 1, max 100)
#### `updateIssue`
Updates an existing issue's properties
* **Required**:
* `owner` (Repository owner)
* `repo` (Repository name)
* `issueNumber` (Issue number to update)
* **Optional**:
* `title` (New title)
* `body` (New description)
* `state` (open/closed)
* `assignees` (New assignees array)
* `labels` (New labels array)
* `milestone` (New milestone number)
#### `addIssueComment`
Adds a comment to an existing issue with required body content
* **Required**:
* `owner` (Repository owner)
* `repo` (Repository name)
* `issueNumber` (Issue number)
* `body` (Comment content)
#### `getIssueComments`
Retrieves all comments on a specific issue with pagination support
* **Required**:
* `owner` (Repository owner)
* `repo` (Repository name)
* `issueNumber` (Issue number)
* **Optional**:
* `page` (Page number)
* `perPage` (Number of records per page)
### Pull Requests
#### `createPullRequest`
Opens a new PR from head branch to base branch with title, optional body, draft status
* **Required**:
* `owner` (Repository owner)
* `repo` (Repository name)
* `title` (PR title)
* `head` (Branch containing changes)
* `base` (Branch to merge into)
* **Optional**:
* `body` (PR description)
* `draft` (Create as draft PR)
* `maintainerCanModify` (Allow maintainer edits)
#### `getPullRequest`
Fetches detailed information about a specific pull request by number
* **Required**:
* `owner` (Repository owner)
* `repo` (Repository name)
* `pullNumber` (Pull request number)
#### `updatePullRequest`
Edits PR properties including title, body, base branch, state, and maintainer permissions
* **Required**:
* `owner` (Repository owner)
* `repo` (Repository name)
* `pullNumber` (Pull request number)
* **Optional**:
* `title` (New title)
* `body` (New description)
* `state` (open/closed)
* `base` (New base branch name)
* `maintainerCanModify` (Allow maintainer edits)
#### `listPullRequests`
Lists PRs with filters for state, base/head branches, sort order, and direction with pagination
* **Required**:
* `owner` (Repository owner)
* `repo` (Repository name)
* **Optional**:
* `state` (open/closed/all)
* `head` (Filter by head user/org and branch)
* `base` (Filter by base branch)
* `sort` (created/updated/popularity/long-running)
* `direction` (asc/desc)
* `page` (Page number, min 1)
* `perPage` (Results per page, min 1, max 100)
#### `getPullRequestComments`
Retrieves review comments on a pull request
* **Required**:
* `owner` (Repository owner)
* `repo` (Repository name)
* `pullNumber` (Pull request number)
#### `getPullRequestFiles`
Lists all files changed in a pull request with pagination
* **Required**:
* `owner` (Repository owner)
* `repo` (Repository name)
* `pullNumber` (Pull request number)
#### `getPullRequestReviews`
Gets all reviews submitted for a PR
* **Required**:
* `owner` (Repository owner)
* `repo` (Repository name)
* `pullNumber` (Pull request number)
#### `getPullRequestStatus`
Checks CI/CD status checks for a pull request
* **Required**:
* `owner` (Repository owner)
* `repo` (Repository name)
* `pullNumber` (Pull request number)
#### `createPullRequestReview`
Creates a pending review that can be submitted later
* **Required**:
* `owner` (Repository owner)
* `repo` (Repository name)
* `pullNumber` (Pull request number)
* `event` (APPROVE/REQUEST\_CHANGES/COMMENT)
* **Optional**:
* `body` (Review comment text)
* `commitId` (SHA of commit to review)
* `comments` (Array of line-specific comment objects)
#### `addPullRequestReviewComment`
Adds inline comments to specific lines/files during review with support for multi-line comments
* **Required**:
* `owner` (Repository owner)
* `repo` (Repository name)
* `pullNumber` (Pull request number)
* `body` (Review comment text)
* **Optional** (one of these patterns required):
* **Pattern 1 (reply)**: `inReplyTo` (ID of comment to reply to)
* **Pattern 2 (new comment)**:
* `commitId` (SHA of commit to comment on)
* `path` (Relative path to file)
* `line` (Line number in the diff)
* `side` (LEFT/RIGHT)
* `startLine` (For multi-line comments)
* `startSide` (LEFT/RIGHT for multi-line)
* `subjectType` (line/file)
#### `mergePullRequest`
Merges a PR with options for merge method, commit title, and commit message
* **Required**:
* `owner` (Repository owner)
* `repo` (Repository name)
* `pullNumber` (Pull request number)
* **Optional**:
* `mergeMethod` (merge/squash/rebase)
* `commitTitle` (Title for merge commit)
* `commitMessage` (Extra detail for merge commit)
#### `updatePullRequestBranch`
Updates PR branch with latest changes from base branch
* **Required**:
* `owner` (Repository owner)
* `repo` (Repository name)
* `pullNumber` (Pull request number)
* **Optional**:
* `expectedHeadSha` (Expected SHA of the PR's HEAD ref)
### Code Management
#### `createBranch`
Creates a new branch from an existing branch or repository's default branch
* **Required**:
* `owner` (Repository owner)
* `repo` (Repository name)
* `branch` (Name for new branch)
* **Optional**:
* `fromBranch` (Source branch, defaults to repo default)
#### `createOrUpdateFile`
Creates new files or updates existing ones with content, commit message, and branch. Requires SHA for updates
* **Required**:
* `owner` (Repository owner)
* `repo` (Repository name)
* `path` (Path where to create/update the file)
* `content` (Content of the file)
* `message` (Commit message)
* `branch` (Branch to create/update the file in)
* **Optional**:
* `sha` (SHA of file being replaced, required for updates)
#### `getCommit`
Retrieves detailed information about a specific commit by SHA, branch name, or tag name
* **Required**:
* `owner` (Repository owner)
* `repo` (Repository name)
* `sha` (Commit SHA, branch name, or tag name)
* **Optional**:
* `page` (Page number, min 1)
* `perPage` (Results per page, min 1, max 100)
#### `listCommits`
Lists commit history with optional filtering by author and SHA/branch/tag reference
* **Required**:
* `owner` (Repository owner)
* `repo` (Repository name)
* **Optional**:
* `sha` (SHA or branch name)
* `page` (Page number, min 1)
* `perPage` (Results per page, min 1, max 100)
### Search
#### `searchCode`
Searches for code using GitHub's code search syntax
* **Required**:
* `q` (Search query using GitHub code search syntax)
* **Optional**:
* `sort` (indexed)
* `order` (asc/desc)
* `page` (Page number, min 1)
* `perPage` (Results per page, min 1, max 100)
#### `searchIssues`
Searches issues and pull requests using GitHub search syntax, can be scoped to specific owner/repo
* **Required**:
* `q` (Search query using GitHub issues search syntax)
* **Optional**:
* `sort` (comments/reactions/reactions-+1/reactions--1/reactions-smile/reactions-thinking\_face/reactions-heart/reactions-tada/interactions/created/updated)
* `order` (asc/desc)
* `page` (Page number, min 1)
* `perPage` (Results per page, min 1, max 100)
#### `searchPullRequests`
Specifically searches pull requests with advanced filtering and GitHub search syntax
* **Required**:
* `q` (Search query using GitHub issues search syntax, automatically adds type:pr)
* **Optional**:
* `sort` (comments/reactions/reactions-+1/reactions--1/reactions-smile/reactions-thinking\_face/reactions-heart/reactions-tada/interactions/created/updated)
* `order` (asc/desc)
* `page` (Page number, min 1)
* `perPage` (Results per page, min 1, max 100)
#### `searchRepositories`
Finds repositories matching search query with pagination support
* **Required**:
* `query` (Search query)
* **Optional**:
* `page` (Page number, min 1)
* `perPage` (Results per page, min 1, max 100)
#### `searchUsers`
Searches for GitHub users using search syntax
* **Required**:
* `q` (Search query using GitHub users search syntax)
* **Optional**:
* `sort` (followers/repositories/joined)
* `order` (asc/desc)
* `page` (Page number, min 1)
* `perPage` (Results per page, min 1, max 100)
## How to Use GitHub Tools
Once configured, you can instruct the AI model to use the enabled tools directly in your prompt. The model will understand your request and call the appropriate function with the necessary parameters to complete the task.
### Example Prompt: Create a pull request to add a new documentation page
Imagine you have enabled the `getFileContents`, `createPullRequest`, `createBranch` and `createOrUpdateFile` tools for a node.
```markdown
Please complete the last step without checking with me.
Creating the pull request, please follow these steps:
1. Create a new branch in your GitHub repository https://github.com/giselles-ai/docs
- Use GitHub tool createBranch
- fromBranch: main
- newBranchName: prefix giselle/create-docs-xxx
2. Please create a new file based on the contents of followings
- Use GitHub tool createOrUpdateFile
- Contents: @generate-contents-node-output
- Latest SHA: @getSHA-node-output
3. Create pull request to https://github.com/giselles-ai/docs
- Use GitHub tool createPullRequest
```
When this prompt is run, the Giselle will:
1. Create a new branch in your GitHub repository.
2. Create a new file based on the contents.
3. Create pull request.
# GitHub Vector Store Node (/en/glossary/github-vector-store-node)
---
title: 'GitHub Vector Store Node'
description: 'Learn how the GitHub Vector Store Node vectorizes your GitHub repositories, creating a searchable knowledge base for your AI workflows in Giselle.'
---
Learn how the GitHub Vector Store Node in Giselle vectorizes your GitHub repositories, creating a searchable knowledge base that can be queried within your AI workflows.
## GitHub Vector Store Node in Giselle
The **GitHub Vector Store Node** is a specialized "Source" node that creates a powerful, searchable database from the contents of a GitHub repository. It works by vectorizing the code and documents within the repository, allowing AI models to perform semantic searches and retrieve relevant context.
This process uses advanced embedding models to convert your repository's content into vector embeddings. You can select from multiple embedding models, including OpenAI's [`text-embedding-3-small`](https://platform.openai.com/docs/models/text-embedding-3-small) and [`text-embedding-3-large`](https://platform.openai.com/docs/models/text-embedding-3-large), as well as Google's [`gemini-embedding-001`](https://console.cloud.google.com/vertex-ai/publishers/google/model-garden/gemini-embedding-001?hl=en). These vectorized data are then stored securely in Giselle's dedicated Vector Store.
To use this feature, the [Giselle GitHub App](https://github.com/apps/giselles-ai) must be installed on the target GitHub repository.
### Setting up a GitHub Vector Store Node:
1. **Add the Node**:
* From the toolbar at the bottom of the canvas, click the **Source** icon (a folder with a link symbol).
* Select **GitHub Vector Store** from the pop-up menu to add the node to your workspace.
2. **Configure the Repository**:
* When first added, the node will display a "REQUIRES SETUP" status.
* Select the node to open its configuration panel on the right.
* Click the **Select a repository** dropdown menu. This list will only show repositories that have the Giselle GitHub App installed. Choose the repository you want to use as a knowledge source (e.g., `giselles-ai/docs`).
3. **Choose the Content Type**:
* After selecting a repository, you will need to specify which type of content to vectorize. The available options are:
* **Code**: Vectorizes the source code and documents from the repository's default branch. This is useful for creating a knowledge base from your codebase.
* **Issues**: Vectorizes the content from issues, including descriptions, comments, and discussions. This is ideal for analyzing problem patterns or summarizing bug tracking.
* **Pull Requests**: Vectorizes the content from pull requests, including descriptions, comments, and discussions. This is ideal for analyzing development patterns or summarizing changes.
* Select the radio button corresponding to the content you wish to use.
4. **Finalize Setup**:
* Once the repository and content type are selected, the node on the canvas will update to show the name of the configured repository. The vectorization process for this repository will be initiated or updated in the background.
### Managing Your Vector Stores
You can add, configure, and remove the GitHub repositories that are processed by the GitHub Vector Store Node from your team's settings page.
* Navigate to **Settings > Team > Vector Stores** in your Giselle account.
* Alternatively, you can click the **Set Up GitHub Vector Store** link directly from the node's configuration panel.
* This page allows you to manage which repositories are indexed and available for your workflows. You can access it here: [https://studio.giselles.ai/settings/team/vector-stores](https://studio.giselles.ai/settings/team/vector-stores).
#### Sources to Ingest
When registering a new repository, you can select which types of content to ingest. Giselle currently supports three sources:
* **Code**: Ingests the source code files from the repository. This source is required and cannot be disabled.
* **Issues**: Ingests the descriptions, comments, and discussions from issues. This is an optional source that can be enabled to provide additional context to your AI workflows.
* **Pull Requests**: Ingests the content and discussions from merged pull requests. This is an optional source that can be enabled to provide additional context to your AI workflows.
#### Embedding Models
When setting up a GitHub Vector Store, you can select from multiple embedding models for indexing your repository content. You must select at least one embedding model. Available options include:
* **OpenAI text-embedding-3-small**: Provider: OpenAI • Dimensions: 1536 - A powerful and efficient model suitable for most use cases.
* **OpenAI text-embedding-3-large**: Provider: OpenAI • Dimensions: 3072 - A larger model with higher precision for complex semantic understanding.
* **Google gemini-embedding-001**: Provider: Google • Dimensions: 3072 - Google's embedding model offering alternative semantic representation capabilities.
The choice of embedding model affects how your content is vectorized and can impact search quality and performance. You can select multiple models to leverage different semantic representation capabilities for your vector store.
### Rate Limits and Considerations
When using the GitHub Vector Store Node, please be aware of GitHub API rate limits. Giselle's GitHub Vector Store uses [GitHub App Installation](https://docs.github.com/ja/rest/using-the-rest-api/rate-limits-for-the-rest-api?apiVersion=2022-11-28#primary-rate-limit-for-github-app-installations) for GitHub API access, which has a rate limit of approximately 5,000 requests per hour. You may encounter errors when working with large-scale projects. If this occurs, please wait some time before trying again.
For large repositories or frequent updates, you may experience rate limiting during the vectorization process. If you encounter errors, simply wait and retry after the rate limit window resets.
### Usage in Workflows
The GitHub Vector Store Node is designed to be used in combination with a **Vector Query Node**. It acts as the knowledge base that the Vector Query Node searches through.
* **Connect the Output**: The "Output" of the GitHub Vector Store Node should be connected to the input of a Vector Query Node.
* **Perform a Search**: The Vector Query Node can then take a user's question or a dynamic input, search the vectorized repository content for the most relevant information, and pass that information to subsequent nodes (like a Generator Node) for processing, analysis, or summarization.
### Output of the Node
The GitHub Vector Store Node's **output** is a reference to the vectorized data of the selected repository. This output provides the necessary connection for other nodes, like the Vector Query Node, to access and search the repository's content.
# Nodes in Giselle (/en/glossary/node)
---
title: Nodes in Giselle
description: "Learn about nodes, the building blocks of AI apps on Giselle. Connect nodes with various functions to visually design powerful AI workflows."
---
## Giselle's AI Agents Can Be Built by Combining "Nodes"
Giselle is a platform that allows you to build powerful AI agents through an intuitive node-based interface. By connecting "nodes" with various functions, like assembling building blocks, you can visually design complex AI workflows. This makes it easy for anyone, even without specialized knowledge, to achieve automation with AI agents.
## Node Categories
Giselle organizes nodes into four main categories, accessible from the toolbar at the bottom of the canvas:
| Category | Hotkey | Description |
|----------|--------|-------------|
| **App** | A | Define the entry and exit points of your workflow |
| **Model** | M | Select AI models for content generation |
| **Context** | C | Add source data and retrieval capabilities |
| **Integration** | I | Connect with external services |
## App
The **App** category contains nodes that define the boundaries of your workflow.
### Start Node & End Node
Start Node and End Node are the essential boundary nodes that define the entry and exit points of any workflow. They work as a pair to establish the complete flow of your app, from receiving user input to delivering the final output.
For more details, see the [Start Node & End Node documentation](start-end-nodes).
## Model
The **Model** category provides access to AI models for generating content.
### Generator Node
The Generator Node can create both text and images using advanced AI models. By configuring prompts and conditions, you can generate content tailored to your needs. For text, this includes applications such as document creation, blog writing, and research report generation, leveraging Giselle's LLM API for high-quality, natural-sounding text. For images, you can generate visuals from text prompts, enabling creative content creation and workflows that utilize visual data.
**Web Search Capability**: When using models that support web search functionality, the Generator Node can access real-time information from the internet. This enables the creation of content based on the latest data and current events, making your AI workflows more dynamic and up-to-date.
For more details, see the [Generator Node documentation](generator-node).
## Context
The **Context** category contains nodes for providing data sources and retrieval capabilities to your workflows. It is divided into two groups: **Source** and **Retrieval**.
### Source
Source nodes provide input data for your AI workflows.
#### Text Node
Text Node is used to hold text data. It can be used to record prompts, instructions, annotations, and more. It helps manage and organize text data within the workflow, streamlining input to generation nodes and data usage in other nodes.
For more details, see the [Text Node documentation](text-node).
#### File Node
File Node is used to handle file data. You can upload PDF files, images, and text files to use as input for AI models. It is useful for various tasks that involve utilizing file data, such as data-based analysis and report generation.
For more details, see the [File Node documentation](file-node).
#### Web Page Node
The Web Page Node is used to fetch and hold content from web pages. You can input one or more URLs, and Giselle will attempt to retrieve the content from these pages. The fetched content is processed and made available primarily in Markdown format, enabling tasks like summarization, analysis, or content generation based on information from the web.
For more details, see the [Web Page Node documentation](webpage-node).
#### Document Vector Store Node
The Document Vector Store Node creates a searchable knowledge base from your uploaded documents (PDFs, text files, and markdown). It uses advanced embedding models to convert your document content into vector embeddings, enabling semantic search within your workflows.
For more details, see the [Document Vector Store Node documentation](document-vector-store-node).
#### GitHub Vector Store Node
The GitHub Vector Store Node creates a searchable knowledge base from the contents of a GitHub repository. It vectorizes code, issues, and pull requests, enabling semantic search within your workflows. This is especially useful for building Retrieval-Augmented Generation (RAG) applications.
For more details, see the [GitHub Vector Store Node documentation](github-vector-store-node).
### Retrieval
Retrieval nodes enable searching through vector stores to find relevant information.
#### Vector Query Node
The Vector Query Node is designed to execute search queries against connected vector store data sources (GitHub Vector Store Node or Document Vector Store Node). It retrieves the most relevant information (text chunks) from your vectorized content, which can then be used as dynamic context for AI generation.
For more details, see the [Vector Query Node documentation](vector-query-node).
## Integration
The **Integration** category contains nodes for connecting with external services. It is divided into two groups: **Trigger** and **Action**.
### Trigger
Trigger nodes start workflows based on external events.
#### Trigger Node
Trigger Node is the starting point for running workflows automatically. Currently, the GitHub Trigger Node enables workflows to be automatically triggered by GitHub webhooks. When the Giselle GitHub App is installed in a repository, this node can listen for specific events (like issue comments or pull requests) and start the workflow in response.
For more details, see the [Trigger Node documentation](trigger-node).
### Action
Action nodes perform operations on external services.
#### Action Node
Action Node is a node that can call external services. Currently, it primarily supports integrations with GitHub, allowing workflows to perform actions within your repositories such as creating issues or posting comments.
For more details, see the [Action Node documentation](action-node).
## Tips for Using Nodes
Here are some helpful tips to enhance your experience with nodes in Giselle.
### Node Duplication
To enhance workflow efficiency, Giselle supports node duplication. This feature allows you to quickly create a copy of an existing node within the workflow designer.
**How to Duplicate a Node:**
* **Right-Click Context Menu:** Right-click on any node in the workflow designer to open the context menu, then select "Duplicate Node."
* **Keyboard Shortcut:** Select the node you wish to duplicate and use the keyboard shortcut `Cmd + D` (on macOS) or `Ctrl + D` (on Windows/Linux).
**Duplication Behavior:**
* The duplicated node will appear at an offset position from the original node.
* Connections from the original node are preserved in the duplicate where applicable.
* For File nodes, the duplicated node will correctly reference newly copied files.
* Cloned nodes will start in an "unconfigured" state, allowing you to customize their settings independently from the original node.
* If the duplication process encounters an issue, an error message will be displayed.
This feature streamlines the process of building complex workflows by allowing for easy replication of configured or template nodes.
# PostgreSQL Tools (/en/glossary/postgresql-tools)
---
title: PostgreSQL Tools
description: Learn how to use PostgreSQL Tools in a Generator Node to connect your AI models to a PostgreSQL database, enabling them to query and retrieve data.
---
This feature is currently in **Private Preview**. Access is limited to selected users. Features and availability may change.
**PostgreSQL Tools** empower AI models within a Generator Node to connect directly to your PostgreSQL databases. This feature, a form of "tool use" or "function calling," allows you to build AI agents that can query tables, retrieve data, and understand your database schema, all based on natural language instructions in your prompt.
This enables powerful workflows, such as generating business reports, answering data-driven questions, or performing automated data analysis.
## Configuring PostgreSQL Tools
Follow these steps to connect your PostgreSQL database and enable specific tools for a Generator Node.
### 1. Navigate to the Tools Tab
In any Generator Node (e.g., `gemini-2.5-pro`), select the **Tools** tab. You will see a list of available integrations that can be connected.
### 2. Connect to PostgreSQL
Click the **+ Connect** button next to the PostgreSQL integration. This will open a configuration modal to add your database credentials.
### 3. Add Your Connection String
To authenticate with your PostgreSQL database, you need to provide a connection string.
The connection string typically follows the format: `postgresql://[user[:password]@][netloc][:port][/dbname][?param1=value1&...]`. For detailed information, refer to the [official PostgreSQL documentation](https://www.postgresql.org/docs/current/libpq-connect.html#LIBPQ-CONNSTRING).
In the "Connect to PostgreSQL" window:
1. **Connection Name**: Give your connection a short, descriptive name for easy identification (e.g., "giselle-db-preview"). You'll use this to link other nodes.
2. **Connection String**: Paste your full PostgreSQL connection string into this field. Giselle encrypts the connection string with authenticated encryption before saving it.
3. Click **Save & Connect**.
### 4. Select the Tools to Enable
After your connection is validated, you'll be presented with a list of available PostgreSQL tools. For security and control, you must explicitly select which actions the AI model is allowed to perform.
Check the boxes next to the tools you want to enable for this node:
* `getTableStructure`
* `query`
### 5. Save the Configuration
Once you've selected the desired tools, click **Save & Connect**. The Generator Node will now show that PostgreSQL is connected, displaying the enabled tools and a **Configuration** button to make future changes.
## Available PostgreSQL Tools
The following is a list of tools you can enable for your AI model.
### Schema
* `getTableStructure`: Allows the AI model to retrieve the schema of your database. This includes table names, column names, and data types. This is crucial for the AI to understand how to construct valid queries.
### Query
* `query`: Allows the AI model to execute a standard SQL query against the connected database and retrieve the results.
## How to Use PostgreSQL Tools
Once configured, you can instruct the AI model to use the enabled tools directly in your prompt. The model will understand your request, call the appropriate function, and use the results to complete the task.
### Example Prompt: Calculate the number of users
Imagine you have enabled the `getTableStructure` and `query` tools for a node.
```markdown
Please find out the total number of users from the database.
```
When this prompt is run, the Giselle agent will:
1. Call the `getTableStructure` function to understand the database layout.
2. Identify the relevant table (e.g., `users`).
3. Formulate a SQL query like `SELECT COUNT(*) FROM users;`.
4. Execute the query using the `query` tool.
5. Return a final answer based on the query result, such as: "The total number of users is 1,234."
# Start Node & End Node (/en/glossary/start-end-nodes)
---
title: Start Node & End Node
description: "Learn how Start and End Nodes in Giselle define the boundaries of your workflow, establishing where user input enters and where the final output is collected."
---
## Start Node & End Node in Giselle
**Start Node** and **End Node** are the essential boundary nodes that define the entry and exit points of any workflow in Giselle. They work as a pair to establish the complete flow of your app, from receiving user input to delivering the final output.
## Start Node
The **Start Node** is the entry point of your workflow. It defines the input parameters that users will provide when running your app in the Playground.
### Key Features
* **Entry Point**: The Start Node marks where workflow execution begins. All data flows from this node to downstream nodes.
* **Parameter Definition**: Define the input parameters that users will fill in when running your app, such as text input fields or file uploads.
* **Single Instance**: Each workflow can have only one Start Node. It cannot be duplicated.
* **Paired with End Node**: Start and End Nodes are always created together as a pair.
### Default Parameters
When you create a new app, the Start Node comes with two default input parameters:
1. **Input(Text)**: A multiline text field for users to enter text content. This is marked as required.
2. **Input(File)**: A file upload field that allows users to attach multiple files. This is optional by default.
The Start Node has a single output port that provides the user's input to downstream nodes in your workflow.
### Configuring the Start Node
1. **Select the Node**: Click on the Start Node to open its configuration panel.
2. **Edit App Description**: Customize the app description.
### Output of the Start Node
The Start Node has a single **output** that contains the values provided by the user when running the app. This output can be connected to any compatible node's input.
## End Node
The **End Node** is the endpoint of your workflow and the place where you define the app's final output. It collects processed data from upstream nodes and presents them as the app's results.
### Key Features
* **Workflow Endpoint**: The End Node is where workflow execution completes. Data connected here becomes the app's final result.
* **Output Definition**: Specify which node's output to include in the app's final result. You can connect multiple upstream nodes.
* **Single Instance**: Each workflow can have only one End Node. It cannot be duplicated.
* **Dynamic Input**: The End Node's input is created dynamically when you connect upstream nodes.
### Configuring the End Node
1. **Select the Node**: Click on the End Node to open its configuration panel.
2. **Add Output**: Click the "Add Output" button to select which upstream node's output should be included in the final result.
3. **Manage Connections**: View and disconnect connected nodes as needed.
4. **Enable Structured Output** (optional): Set the Output Format to JSON to assign property names to upstream node outputs, combine outputs from multiple nodes, and define a structured JSON response.
### Output Format
The End Node supports two output format options for the final response:
* **Raw**: Returns the selected node's output as-is without any processing.
* **JSON**: Define a schema to structure the final API response.
When you select JSON, the structured output schema definition dialog opens.
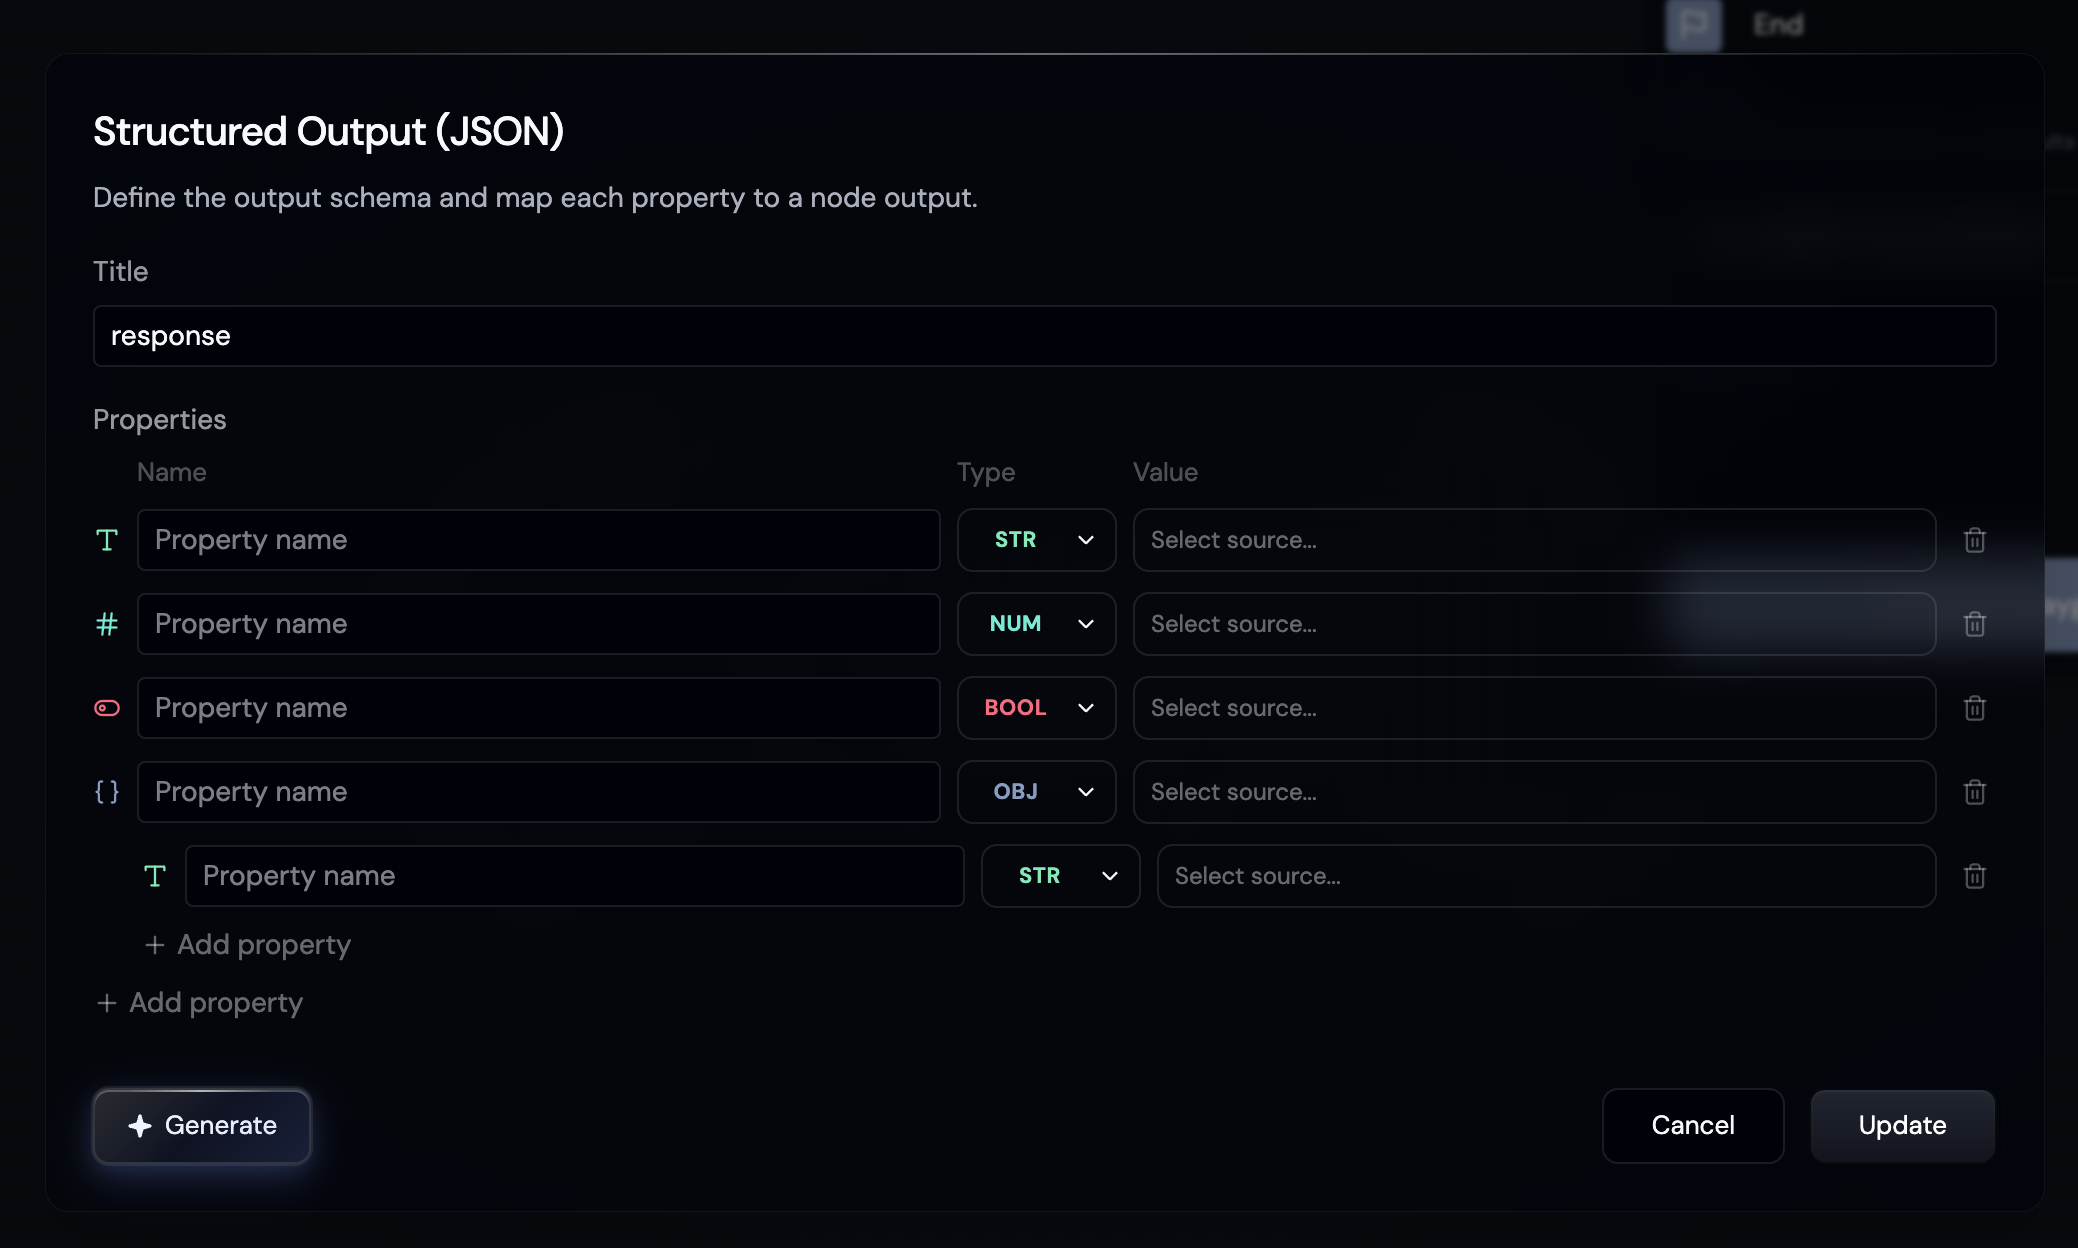
#### Value Selection
Each property requires a **Value** (source) to be selected from connected upstream nodes.
* Upstream nodes are grouped by type in the list
* If a node has structured output defined, you can select the entire object or individual properties
### Connection Rules
When connecting nodes to the End Node:
* The End Node itself cannot be selected as a source
* Nodes already connected cannot be selected again
* Nodes without an output cannot be connected
### Input of the End Node
The End Node has a single **input** that receives data from connected upstream nodes. The connected data is then presented as the final output of your app.
## Visual Appearance
Both Start and End Nodes share a distinctive **capsule-shaped design** that sets them apart from other nodes:
* **Start Node**: Has an output handle on the right side for connecting to downstream nodes
* **End Node**: Has an input handle on the left side for receiving data from upstream nodes
* Both display their respective icons and names ("Start" and "End" by default)
### Connection Status Indicator
When the Start Node is properly connected to the End Node through the workflow:
* Both nodes display with full opacity
* The "Try App in Playground" button becomes enabled
When there's no valid path from Start to End:
* Both nodes appear slightly faded with dashed borders
* The "Try App in Playground" button is disabled
## How They Work Together
1. **User Input**: When someone runs your app, they fill in the parameters defined in the Start Node.
2. **Data Flow**: Input values flow from the Start Node through connected nodes.
3. **Processing**: Data is processed by various nodes (text, file, query, action nodes, etc.).
4. **Collection**: Processed results are collected by the End Node.
5. **Output**: The End Node presents the final output to the user.
### Connection Requirement
For your app to be runnable, there must be a valid path from the Start Node to the End Node. The system verifies this connection using a breadth-first search algorithm. Without a valid path, your app cannot be executed in the Playground.
## Start & End Nodes vs. Other Nodes
| Feature | Start & End Nodes | Other Nodes |
|---------|-------------------|-------------|
| Instances per workflow | Exactly one each | Multiple allowed |
| Can be duplicated | No | Yes |
| Visual style | Capsule-shaped | Card-shaped |
| Purpose | Workflow boundaries | Data processing |
| Created automatically | Yes, as a pair | No |
Start and End Nodes are essential for creating functional apps that accept user input and deliver processed results.
# Text Node (/en/glossary/text-node)
---
title: Text Node
description: "Learn how the Text Node in Giselle allows you to store and manage plain text, such as prompts, instructions, or data, directly within your workflows."
---
## Text Node in Giselle
The **Text Node** is one of the simplest yet most versatile "Source" nodes in Giselle. It is designed to hold and manage plain text content directly within your workflow, making it an essential tool for a wide range of applications. Unlike the File Node, which handles uploaded files, the Text Node stores its content inline, ensuring it is always immediately available without any loading or processing time.
### Key Features
* **Direct Text Input**: You can write or paste any text directly into the node's built-in editor.
* **Inline Storage**: The content is stored as a simple string within the node itself, making your workflow self-contained and portable.
* **Instant Availability**: Since there are no file uploads or external storage, the text is instantly available as an output for other nodes.
### How to Use a Text Node
1. **Add the Node**: From the toolbar at the bottom of the canvas, click the **Source** icon and select **Plain Text** to add the node to your workspace.
2. **Configure the Content**: Select the node to open its configuration panel on the right.
3. **Enter Text**: Type or paste your content directly into the text editor, which displays the placeholder "Write or paste text here...". The content is saved automatically as you type.
### Common Use Cases
The Text Node is ideal for:
* **Storing Prompts**: Write and store reusable prompts for Generator Nodes.
* **Creating Templates**: Keep text templates for various content generation tasks.
* **Writing Instructions**: Document workflow-specific instructions or guidelines for your team.
* **Holding Data**: Store small, structured datasets like JSON or CSV content for processing.
* **Quick Notes**: Use it for temporary text storage or as a scratchpad during workflow development.
### Text Node vs. File Node
While a **File Node** can also handle text files (like `.txt` or `.md`), the **Text Node** is fundamentally different and often more convenient:
* **Storage**: The Text Node stores content *directly* in the workflow. The File Node requires you to *upload* a file, which is stored separately.
* **Editing**: Content in a Text Node can be edited instantly within the Giselle interface. To change the content of a File Node, you would need to upload a new file.
* **Overhead**: The Text Node has no file management overhead (no size tracking, upload states, or potential upload failures).
* **Best For**: The Text Node is better suited for dynamic or frequently edited content, while the File Node is ideal for using large, static text files as a data source.
### Output of the Node
The **output** of a Text Node is the raw text content you have entered into its editor. This output can be connected to the input of any compatible node. For example, you can connect it to a Generator Node to use the text as a prompt, or to an Action Node to pass the text as a parameter to an external service.
# Trigger Node (/en/glossary/trigger-node)
---
title: Trigger Node
description: Learn about Trigger Nodes, the starting points for workflows in Giselle. Use GitHub Triggers to initiate your AI workflow sequences.
---
## Trigger Node in Giselle
The **Trigger Node** is the starting point for running the workflow built in the Giselle App. It initiates the execution of the connected nodes in a sequence.
### GitHub Trigger Node
The **GitHub Trigger Node** enables you to automatically start your Giselle workflows based on specific events occurring in your GitHub repositories. This allows for seamless integration between your code management and AI-powered tasks.
#### Setting up a GitHub Trigger
#### 1. Select GitHub Account/Organization
When you add a GitHub Trigger node, you'll first need to choose the GitHub account or organization where your target repository resides (e.g., `giselles-ai`, `liam-hq`).
If you're missing a GitHub account connection or need to adjust permissions, click on "Adjust GitHub App Permissions".
#### 2. Choose a Repository
A list of repositories available under the selected account/organization will be displayed (e.g., `docs`, `giselle`).
Click the **Set up** button next to the desired repository (e.g., `giselle`).
If your repository isn't listed, you might need to "Adjust GitHub App Permissions" to grant Giselle access to it.
#### 3. Configure the Trigger Event
Once a repository is selected (e.g., `giselles-ai/giselle`), you need to specify which GitHub event will trigger the workflow.
Click on the dropdown menu labeled "Choose when you want to trigger the flow."
Select an event from the list, such as:
* **Issue Created**: Triggers the flow when a new issue is created in the repository.
* **Issue Closed**: Triggers when an issue is closed.
* **Issue Labeled**: Triggers when a specific label is added to an issue.
* **Issue Comment Created**: Triggers when a new comment is made on an issue.
* **Pull Request Comment Created**: Triggers on a new pull request comment.
* **Pull Request Opened**: Triggers when a new pull request is opened.
* **Pull Request Ready for Review**: Triggers when a pull request is marked as ready for review.
* **Pull Request Closed**: Triggers when a pull request is closed.
* **Pull Request Labeled**: Triggers when a specific label is added to a pull request.
#### 4. Configure Callsign (for Comment Events)
For some events, like "Issue Comment Created" or "Pull Request Comment Created," you can specify a **Callsign**.
A Callsign is a specific string or command (e.g., `/code-review`, `/deep-research`) that must be present in the comment for the trigger to activate. This prevents the flow from running on every single comment.
Enter your desired Callsign in the provided field. The example shows `/code-review`.
Click **Set up** after configuring the Callsign.
#### 5. Configure Labels (for Label Events)
For some events, like "Issue Labeled" or "Pull Request Labeled," you can specify one or more **Labels**.
When multiple labels are added, the workflow will trigger if *any* of the specified labels are added to the issue or pull request (OR condition). This allows for flexible triggering based on labeling conventions.
Enter your desired labels in the provided input fields. You can add multiple labels using the "Add label" button.
Click **Set up** after configuring the Labels.
#### 6. Enable the Trigger
After configuring the event and any associated options (like Callsign or Labels), the trigger will initially be in a "Disabled" state. The node on the canvas will show "Requires Setup" or display the repository and event type with a "Disabled" status.
On the configuration panel for the trigger (e.g., "On Issue Created" or "On Issue Comment Created"), you will see the current **State** as "Disable".
Click on **Enable** to activate the trigger.
Once enabled, the **State** will change to "Enable", and you will see an option to **Disable Trigger**. The node on the canvas will also reflect its "Enabled" status.
#### 7. Configure In-Progress Comment (Optional)
Once your trigger is set up, you can configure whether Giselle posts an "in-progress" comment to GitHub when the workflow starts executing.
By default, this option is **enabled**, meaning Giselle will automatically post a comment to the issue or pull request indicating that the workflow is running.
To disable in-progress comments, toggle off the **Post In-Progress Comment** option in the trigger's properties panel.
This setting is useful when you want to reduce noise in GitHub discussions or prefer silent workflow execution.
#### 8. Run in the Workspace
For GitHub Trigger Nodes, clicking the "Run" button allows you to test your workflow without waiting for an actual GitHub webhook. You can enter values in a form that simulates the GitHub event, enabling you to verify that your workflow functions correctly before enabling it for real GitHub events.
**Example Workflow after Setup:**
On Issue Created:
* **Trigger**: "On Issue Created" for repository `giselles-ai/giselle`.
* **State**: Enabled.
* **Action**: When a new issue is created in the `giselles-ai/giselle` repository, this Giselle workflow will automatically start.
On Pull Request Comment Created:
* **Trigger**: "On Pull Request Comment Created" for repository `giselles-ai/giselle` with Callsign `/code-review`.
* **State**: Enabled.
* **Action**: When a comment containing `/code-review [enter your request...]` is posted on a pull request in `giselles-ai/giselle`, this workflow will start. The subsequent nodes can then access information like the comment body, pull request number, the pull request's diff content, etc.
On Issue Labeled:
* **Trigger**: "On Issue Labeled" for repository `giselles-ai/giselle` with label `bug`.
* **State**: Enabled.
* **Action**: When the label `bug` is added to an issue in `giselles-ai/giselle`, this Giselle workflow will automatically start. The subsequent nodes can access information like the issue number, title, body, and the name of the label that triggered the event.
On Pull Request Labeled:
* **Trigger**: "On Pull Request Labeled" for repository `giselles-ai/giselle` with labels `feature` or `enhancement`.
* **State**: Enabled.
* **Action**: When either the `feature` or `enhancement` label is added to a pull request in `giselles-ai/giselle`, this workflow will start. The subsequent nodes can access information like the pull request number, title, body, and the name of the label that triggered the event.
Stay tuned for more updates and functionalities for Giselle's nodes!
# Vector Query Node (/en/glossary/vector-query-node)
---
title: Vector Query Node
description: Learn how the Vector Query Node in Giselle executes queries against vector store data sources to enable Retrieval-Augmented Generation (RAG).
---
## Vector Query Node in Giselle
The **Vector Query Node** is a powerful component in Giselle designed to search and retrieve information from connected vector store data sources. Its primary function is to execute a query (such as a question or a search term) against a vectorized dataset and return the most relevant results.
The Vector Query Node works with the following vector store nodes, making it a crucial building block for creating Retrieval-Augmented Generation (RAG) applications directly within your Giselle workflows:
- **[GitHub Vector Store Node](github-vector-store-node)**: Search through vectorized GitHub repository content including code, issues, and pull requests.
- **[Document Vector Store Node](document-vector-store-node)**: Search through your uploaded documents such as PDFs, text files, and markdown files.
### How to Use the Vector Query Node
Setting up a Vector Query Node involves adding it to your canvas, connecting a data source, and running a query.
#### 1. Add a Vector Query Node
From the node toolbar at the bottom of the canvas, select the **Vector Query Node**, which is identifiable by its magnifying glass icon, and place it in your workspace.
#### 2. Connect a Data Source
The Vector Query Node requires an input from a vector store data source to function. You must connect the `Output` of a vector store node (GitHub Vector Store Node or Document Vector Store Node) to the `Input` of the Vector Query Node. Until a data source is connected, the node will indicate that it is waiting for a connection.
#### 3. Write and Run a Query
Once a data source is connected, you can configure the Vector Query Node:
* **Enter a Query**: In the configuration panel, type your question or search term into the "Query" input field.
* **Run the Query**: Click the **Run Query** button to execute the search against the connected data source.
#### 4. Review the Results
After the query runs, the results will be displayed directly in the node's panel. The results typically include:
* A summary of the number of results found.
* A list of relevant "chunks" of text retrieved from the source documents.
* A similarity score (e.g., 58%) for each chunk, indicating its relevance to your query.
You can expand each chunk to view its content and metadata.
### Core Use Case: Retrieval-Augmented Generation (RAG)
The primary purpose of the Vector Query Node is to enable **Retrieval-Augmented Generation (RAG)** workflows. RAG enhances the capabilities of Large Language Models (LLMs) by providing them with relevant, up-to-date information from your own data sources before they generate a response.
A typical RAG workflow in Giselle looks like this:
1. **Data Source (Vector Store Node)**: Ingests and vectorizes your content from a GitHub repository or uploaded documents, making it searchable.
2. **Vector Query Node**: Takes a user's question (the query) and retrieves the most relevant text chunks from the vector store.
3. **Generator Node**: Receives the original question *and* the retrieved information from the Vector Query Node's output. It uses this combined context to generate a more accurate, detailed, and factually grounded answer.
### Output of the Vector Query Node
The `Result` output of the Vector Query Node contains the collection of retrieved data chunks. This structured data can be passed to subsequent nodes—most commonly a **Generator Node**—to serve as dynamic context for text generation.
For more information on how to set up a data source for querying, see our documentation on the [GitHub Vector Store Node](github-vector-store-node) and [Document Vector Store Node](document-vector-store-node).
# Web Page Node (/en/glossary/webpage-node)
---
title: Web Page Node
description: "Learn how the Web Page Node in Giselle allows you to fetch and use content from web pages as static inputs in your AI workflows."
---
## Web Page Node in Giselle
The **Web Page Node** is used to fetch and hold content from web pages. You can input one or more URLs, and Giselle will attempt to retrieve the content from these pages. Currently, the fetched content is processed and made available primarily in **Markdown format**. This allows you to use web content as a static input source for AI models or other processing nodes within your workflow, enabling tasks like summarization, analysis, or content generation based on information from the web.
The Web Page Node functions as an independent variable node, providing a streamlined way to integrate web-based information into your Giselle applications.
### Setting up a Web Page Node:
1. **Add a Web Page Node**:
* Drag and drop a "Web Page" node from the toolbar at the bottom of the canvas onto your workspace.
2. **Configure URLs**:
* Select the Web Page node on the canvas to open its configuration panel on the right.
* In the text area labeled "URLs (one per line)", enter the full web addresses (URLs) of the pages from which you want to fetch content. If you have multiple URLs, enter each one on a new line.
```
https://example.com/
https://docs.giselles.ai/glossary/node
```
3. **Add URLs**:
* After entering the desired URLs, click the blue **Add** button.
* Giselle will then attempt to fetch the content from the specified URLs.
* Once the URLs are processed, the configuration panel will update to list the added pages, often displaying their titles or a reference to the URL. The "URLs (one per line)" input area and the **Add** button will remain, allowing you to add more URLs if needed.
### Output of the Web Page Node:
* **Content**: After successfully fetching data from the provided URLs, the Web Page Node makes this content available as its **output**.
* **Format**: The fetched content is primarily delivered in **Markdown format**. This standardized format makes it easy to use in subsequent text-processing nodes.
* **Connectivity**: The output of the Web Page Node can be connected to other nodes in your workflow. For instance, you can feed the Markdown content into a **Generator Node** to summarize an article, extract specific information, or use it as context for generating new content.
The Web Page node on the canvas will have an "Output" port, which you can drag to connect to an input port of another node.
### Example: Summarizing a Web Article
1. **Configure Web Page Node**:
* Add a Web Page Node.
* Input the URL of an online blog article (e.g., `https://giselles.ai/blog/transforming-product-development-human-ai-collaboration`).
* Click **Add**.
2. **Connect to Generator Node**:
* Add a Generator Node.
* Connect the "Output" of the Web Page Node to an input (e.g., a context or document input) of the Generator Node.
3. **Configure Generator Node**:
* Instruct the Generator Node to summarize the provided text. For example, use a prompt like: "Please summarize the following article concisely:"
4. **Run Workflow**:
* When the workflow runs, the Web Page Node fetches the article content as Markdown, and the Generator Node produces a summary.
### Future Updates
The Web Page Node's user interface and functionality, including supported output formats, may be updated incrementally in future Giselle releases.
# About Giselle (/en/guides/introduction)
---
title: About Giselle
description: 'Welcome to the home of Giselle documentation!'
---
Giselle is a platform that enables anyone to intuitively build AI applications. With drag-and-drop operations, you can build and run AI apps without any programming knowledge.
Giselle is designed as an execution platform to reliably complete complex, long-running AI tasks as business operations. Engineers, designers, product managers, marketers, sales, and back-office professionals—everyone can create AI apps tailored to their work and start using them immediately.
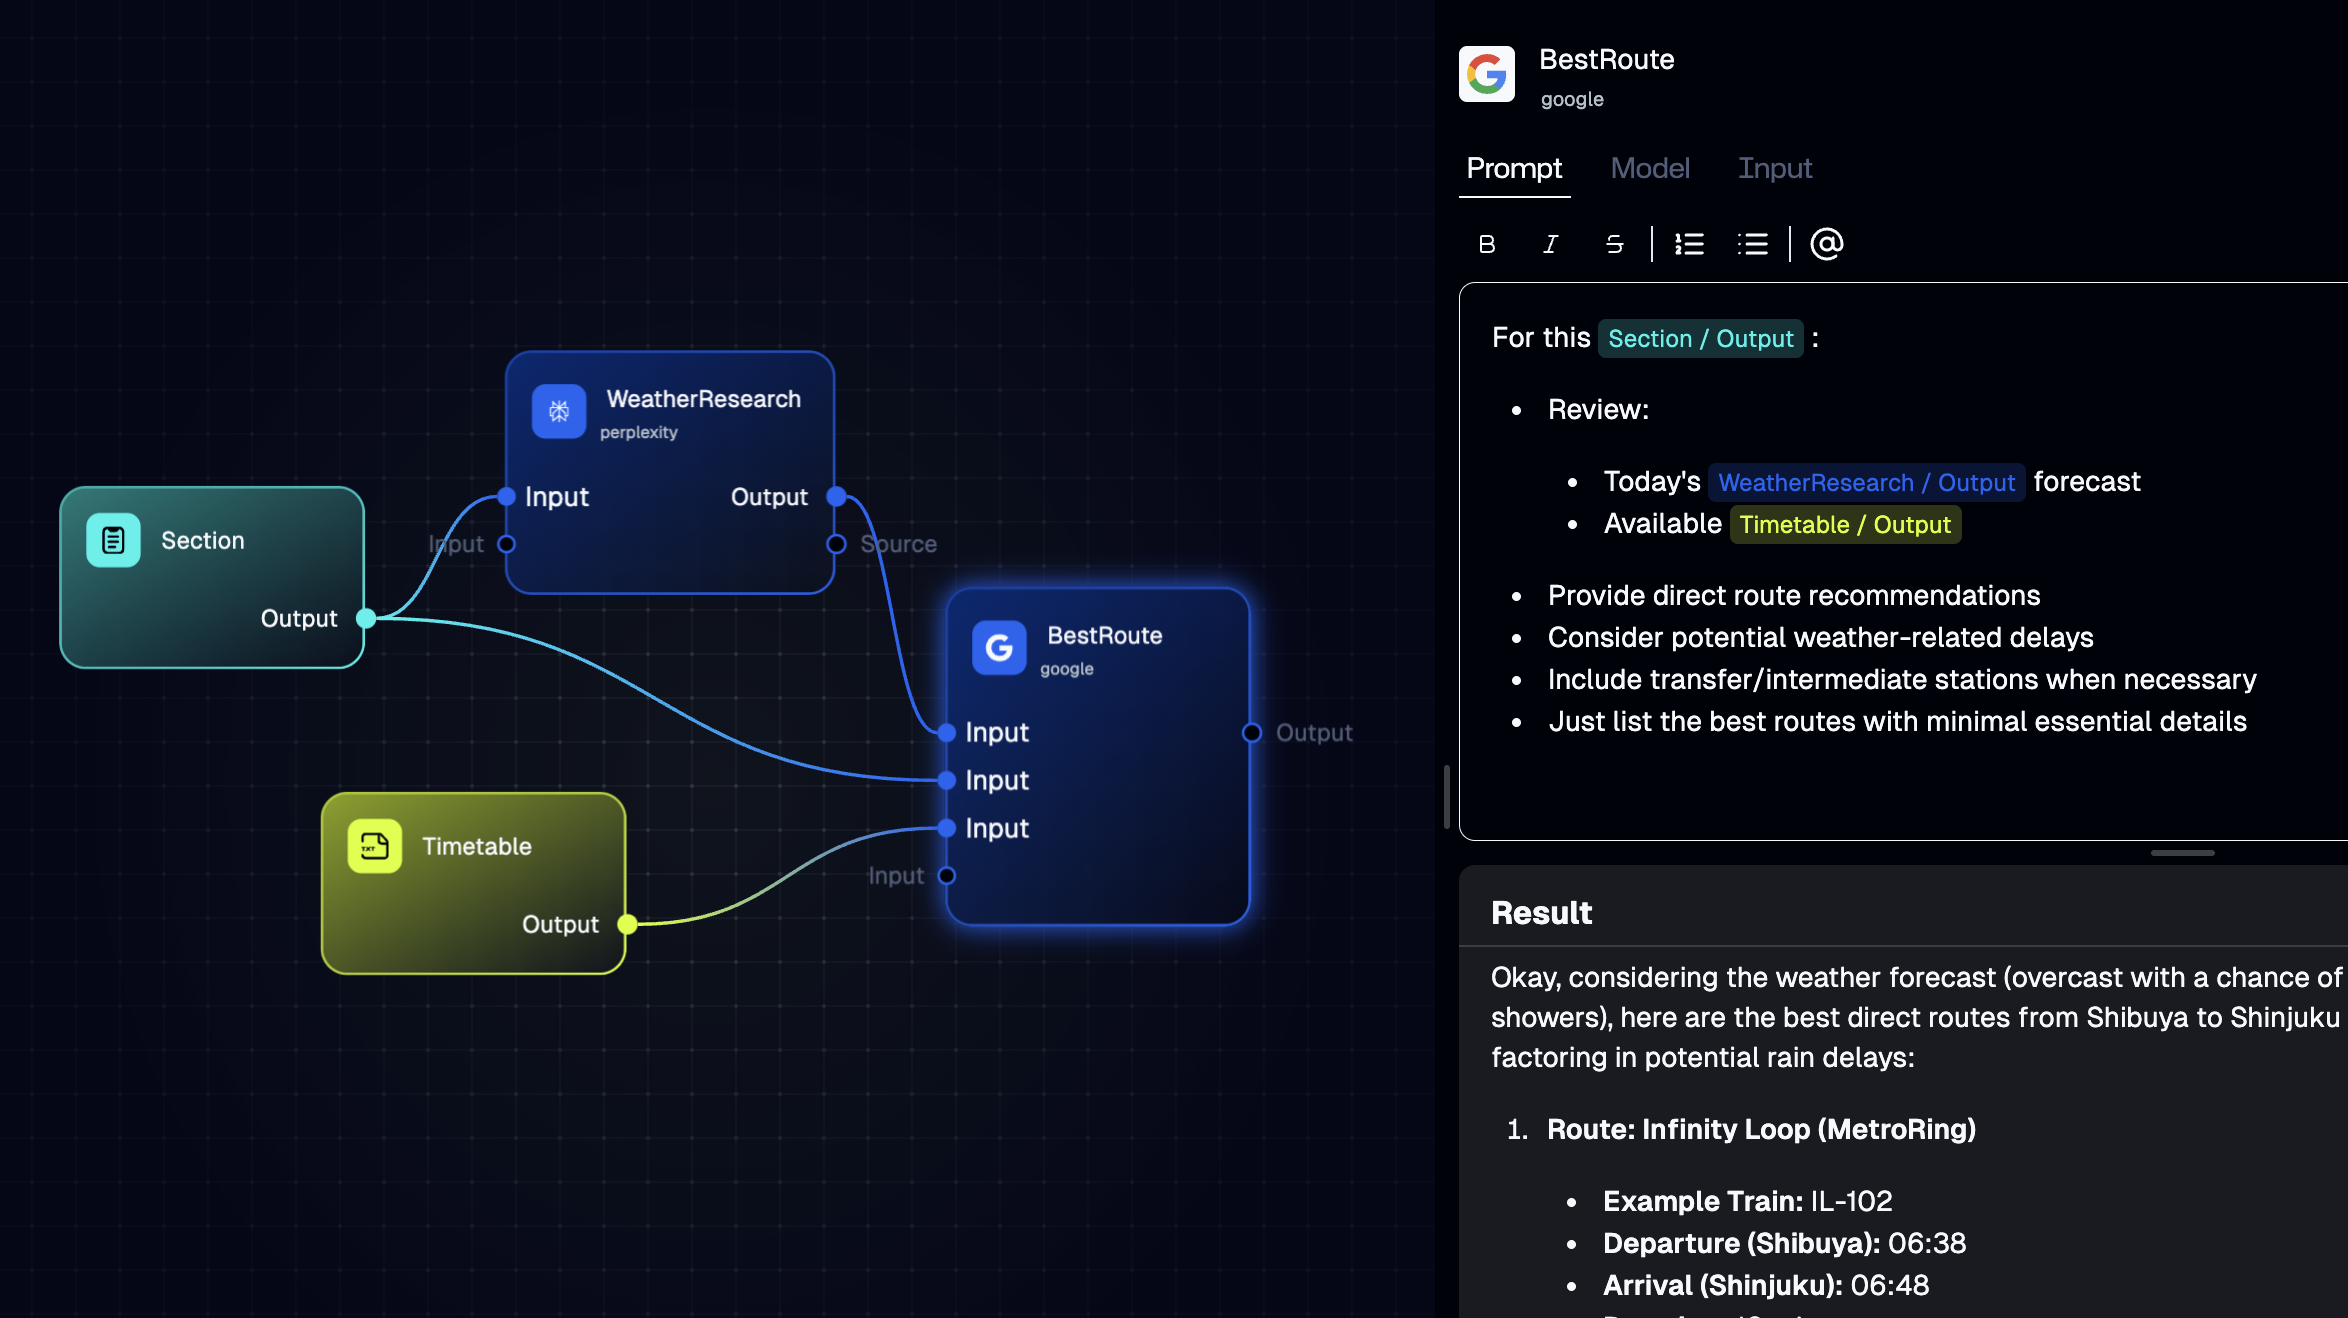
---
## Core Features
### Visual Node Editor
Design AI workflows by placing and connecting nodes with drag-and-drop, just like drawing a flowchart. Build complex AI processes visually without any programming experience.
### Long-Running Task Execution
Run your AI apps in a dedicated execution environment separate from the build environment. Monitor real-time progress of long-running AI apps, with clear display of multiple outputs and lengthy results.
### Multi-Model AI Collaboration
Freely combine world-leading AI models like OpenAI (GPT-5.2), Anthropic (Claude Opus 4.5), and Google (Gemini 3 Flash) within a single workflow. Assign roles that leverage each model's strengths for consistent results even on complex tasks.
### GitHub Integration
Automatically trigger AI apps based on GitHub events like Issues, Pull Requests, and comments. Enable processing that understands the context and intent of PRs and Issues—context-aware code reviews, documentation generation, issue classification, and more.
### Custom Knowledge
Incorporate your own data—PDFs, documents, GitHub repository code, Issues, and PRs—as knowledge for your AI apps. Achieve answers based on organization-specific information that general AI cannot provide. Leverage advanced technologies like RAG and Vector Store without specialized knowledge.
# Playground (/en/guides/playground)
---
title: 'Playground'
description: 'Run your AI applications in the Playground'
---
The Playground is where you run AI applications built in Giselle. It provides an intuitive interface for executing apps, entering inputs, and viewing results.
## Accessing the Playground
Navigate to [Playground](https://studio.giselles.ai/playground) from the sidebar under "Stage - Run Apps".
## Interface Overview
### App Selection
The Playground displays available apps organized by source:
- **Sample app**: Pre-built example applications provided by Giselle
- **Your team app**: Apps created by members of your team
Each app card shows:
- App name and description
- LLM providers used (OpenAI, Anthropic, Google, etc.)
- Creator information
- Source badge
Use the search bar to filter apps by name when you have many apps to choose from.
### Input Area
Once you select an app, you can provide inputs:
**Text Input**
Enter your task description or prompt in the text area. This is the main input that tells the app what you want it to do.
**File Attachments**
Click the paperclip icon to attach files. Supported file types:
- PDF documents
- Images (PNG, JPG, JPEG, GIF, BMP, WEBP, SVG, TIFF, HEIC, HEIF)
You can also drag and drop files directly onto the input area.
### Running an App
To run an app:
1. Select an app from the available options
2. Enter your task description in the text input
3. Optionally attach relevant files
4. Press **Enter** or click the send button to start
The Playground will show an overlay indicating the app is running, then redirect you to the task results page.
## Viewing Results
After running an app, you'll be redirected to the task page where you can view:
- The generated output
- Execution details
- Any intermediate steps or processing information
## Task History
Access your previous runs from [Task History](https://studio.giselles.ai/tasks) in the sidebar. This allows you to:
- Review past task results
- Compare different runs
- Track your app usage over time
## Tips for Using the Playground
- **Start with sample apps** to understand how different workflows operate
- **Use descriptive prompts** to get better results from your apps
- **Attach relevant files** when your task requires document analysis or image processing
- **Check the app description** to understand what inputs each app expects
# Tasks (/en/guides/tasks)
---
title: 'Tasks'
description: 'View and manage your AI application execution history'
---
Tasks is where you view all your executed AI applications and their results. It provides a comprehensive overview of past runs and detailed execution information for each task.
## Accessing Tasks
Navigate to [Tasks](https://studio.giselles.ai/tasks) from the sidebar under "Stage - Run Apps".
## Task History
The Task History page displays a list of all executed tasks with the following information:
- **Task ID**: Unique identifier for each task (click to view details)
- **Status**: Current state of the task
- Running (blue): Task is currently executing
- Completed (green): Task finished successfully
- Failed (red): Task encountered an error
- Cancelled (gray): Task was cancelled
- **Origin**: Where the task was triggered from (App name)
- **Timestamp**: When the task was started
Tasks are displayed in chronological order with the most recent tasks first. Use the Previous/Next buttons to navigate through your task history.
## Task Execution Result Page
When you run an app from the Playground or click on a task in the Task History, you are taken to the task execution result page. This page shows the complete execution details of a single task.
### Header Section
The task header displays:
- Task status badge
- Task title (workspace name and task ID)
- App description
- "Edit in Studio" button to open the app in the workspace editor
### Steps Section
The steps section shows the execution flow of your task:
- **Progress indicator**: Shows completion status (e.g., "Step 2 of 5")
- **Progress bar**: Visual representation of execution progress
- **Step list**: Each step shows its status and can be expanded to view details
Step statuses:
- Queued: Waiting to execute
- Running: Currently executing
- Completed: Finished successfully
- Failed: Encountered an error
### Output Section
Once a task completes, the output section displays the generated results:
- **Single output**: Displayed directly with action buttons
- **Multiple outputs**: Organized in tabs for easy navigation
Output actions:
- **Copy**: Copy the output to clipboard
- **Download**: Save the output as a text file
### Real-time Updates
While a task is running, the page automatically updates to show the current status. You can watch the execution progress in real-time as each step completes.
### Running New Tasks
From the task execution result page, you can run new tasks using the input area at the bottom. This allows you to quickly iterate on your workflows without returning to the Playground.
## Tips for Using Tasks
- **Monitor long-running tasks**: Keep the task execution result page open to watch execution progress
- **Review failed tasks**: Check the error message and use "Edit in Studio" to debug your app
- **Compare results**: Use task history to compare outputs from different runs
- **Download important outputs**: Save generated content for later use
# Workspaces (/en/guides/workspaces)
---
title: 'Workspaces'
description: 'Learn how to build AI workflows visually in the Workspace editor'
---
## Overview
A **Workspace** is a visual canvas-based editor where you design AI workflows by connecting nodes together. Each node performs a specific function, and data flows between nodes through connections.
## The Workspace Editor
The Workspace editor consists of several key components:
- **Canvas**: The main area where you build your workflow by placing and connecting nodes
- **Toolbar**: Located at the bottom, provides access to all available node types
- **Properties Panel**: Appears on the right when a node is selected, allowing you to configure its settings
## Adding Nodes
To add a node to your workflow:
1. Click a category in the toolbar at the bottom of the screen
2. Select the desired node type from the menu
3. The node appears on the canvas
4. Drag the node to position it where you want
### Available Node Types
Nodes are organized into categories:
**App**
- **[Start Node](/en/glossary/start-end-nodes#start-node)**: Defines the workflow entry point and input parameters
- **[End Node](/en/glossary/start-end-nodes#end-node)**: Marks the workflow completion and output
**Model**
- **[Generator Node](/en/glossary/generator-node)**: Performs AI text or image generation using various LLM providers
**Context**
- **[Text Node](/en/glossary/text-node)**: Stores static text content
- **[File Node](/en/glossary/file-node)**: Attaches files (PDF, text, images) to your workflow
- **[Web Page Node](/en/glossary/webpage-node)**: Fetches and provides web page content
- **[Document Vector Store Node](/en/glossary/document-vector-store-node)**: Creates searchable indexes from documents
- **[GitHub Vector Store Node](/en/glossary/github-vector-store-node)**: Creates searchable indexes from GitHub repositories
- **[Vector Query Node](/en/glossary/vector-query-node)**: Searches vector stores for relevant content
**Integration**
- **[Trigger Node](/en/glossary/trigger-node)**: Starts workflows from external events (e.g., GitHub webhooks)
- **[Action Node](/en/glossary/action-node)**: Executes external actions (e.g., GitHub operations)
## Connecting Nodes
To connect nodes and create data flow:
1. Hover over a node to see its output port (right side)
2. Click and drag from the output port
3. Drop the connection on another node's input port (left side)
4. A connection line appears showing the data flow direction
Connections define how data passes between nodes. The output of one node becomes available as input to the connected node.
## Configuring Nodes
To configure a node:
1. Click on a node to select it
2. The Properties Panel opens on the right side
3. Edit the node name in the header if needed
4. Configure node-specific settings:
- **Generator Node**: Select an AI model, write prompts, enable tools
- **Text Node**: Enter your text content
- **File Node**: Upload files
- **Trigger/Action Nodes**: Configure integration settings
## Running Your Workflow
You can run your workflow directly in the Workspace to test it:
1. Click the **Run** button in the upper right corner
2. Enter any required input values
3. The workflow executes and you're redirected to the task execution result page
On the result page, you can see:
- Execution progress and status for each step
- Generated outputs from each node
- Token usage and execution duration
This allows you to quickly test and iterate on your workflow during development.
## Creating an App
By connecting a [Start Node](/en/glossary/start-end-nodes#start-node) and [End Node](/en/glossary/start-end-nodes#end-node), your workflow becomes an **App** that can be run from the [Playground](https://studio.giselles.ai/playground).
1. Add a Start Node
2. Build your workflow with the nodes you need
3. Add an End Node to define the output
4. Connect all nodes in your workflow
Once configured, your app appears in the Playground where you and your team can run it without accessing the Workspace editor.
## Next Steps
- Learn about [Generator Node](/en/glossary/generator-node) configuration
- Explore [AI Parameters](/en/glossary/ai-parameters) for fine-tuning generation
- Set up [Integrations](/en/guides/settings/team/integrations) for external services
# Product Notes (/en/releases/product-notes)
---
title: Product Notes
description: This document outlines key updates, improvements, and future prospects of our product.
---
## Latest Product Updates
### Public Beta
Giselle is currently available as a public beta, allowing users to test and provide feedback on our AI app building platform.
We're excited to announce that we will be officially launching on Product Hunt soon at [https://www.producthunt.com/products/giselle](https://www.producthunt.com/products/giselle).
This launch will introduce our open-source visual editor for building custom AI applications to a wider audience.
Stay tuned for the official launch date and be among the first to explore the full capabilities of Giselle.
# Roadmap (/en/releases/roadmap)
---
title: Roadmap
description: Discover our product development plans and upcoming milestones.
---
Our roadmap is currently under active development. We are working to provide a clear vision of our future plans and milestones.
## Community-Driven
We believe in building with our community. Your feedback and suggestions are essential to shaping our product direction.
We actively welcome:
- Feature requests
- Improvement suggestions
- Bug reports
- Use case scenarios
Please share your thoughts through:
- [GitHub Issues](https://github.com/giselles-ai/giselle)
- [GitHub Discussions](https://github.com/giselles-ai/giselle/discussions)
## What's Next
Stay tuned as we formalize our roadmap with specific timelines and feature sets. We'll be updating this page regularly as our plans evolve.
Note: This roadmap is subject to change without notice based on user feedback and development priorities.
# Examples (/en/cookbooks/prompts/examples)
---
title: Examples
description: 'Effective Prompt Examples in Giselle’s Generator Nodes.'
---
This document provides effective and concrete prompt examples tailored specifically for Giselle's Generator Nodes, leveraging various multimodal AI models including Anthropic's Claude, Google's Gemini, and OpenAI's GPT series.
## Basic Examples
### 1. Technical Query using GPT-5.2
```plaintext
Role: Experienced programmer
Task:
Explain the most efficient way to extract unique elements from a Python list.
Output Format:
- Brief explanation
- Python code example demonstrating the method clearly
```
**Why this prompt is effective:**
- Clear role definition aligns the AI’s perspective.
- Explicit instruction and clear output expectations.
- Specifies programming language explicitly.
### 2. Image Generation with Gemini
```plaintext
Role: Graphic designer
Task:
Generate a high-quality, minimalist logo for a technology startup named "QuantumLeap."
Constraints:
- Model: Gemini 2.5 Flash Image
- Color scheme: Blue and white
- Style: Modern, minimalistic
Output Format:
- PNG image (1024x1024)
```
**Why this prompt is effective:**
- Clearly defines role and creative constraints.
- Utilizes Gemini's image generation capabilities for high-quality outputs.
- Precise output format suitable for immediate use.
## Advanced Examples
### 1. Multimodal Analysis with Gemini
```plaintext
Role: Industry analyst
Task:
Analyze the attached PDF industry report and the accompanying infographic image.
Steps:
1. Summarize key findings from the PDF.
2. Identify and explain trends visible in the infographic.
3. Recommend strategic actions based on combined insights.
Constraints:
- Model: Gemini 2.5 Pro
Output Format:
- Concise summary
- Clearly explained visual trends
- Strategic recommendations as bullet points
```
**Why this prompt is effective:**
- Clearly utilizes Gemini’s multimodal capabilities.
- Sequential and structured instructions.
- Explicitly states the model to ensure precise capability usage.
### 2. Ethical Analysis and Content Structuring with Claude
```plaintext
Role: Ethics consultant
Task:
Review the provided research paper on AI surveillance technologies.
Steps:
1. Identify ethical implications.
2. Suggest practical ethical guidelines for deployment.
Constraints:
- Model: Claude Sonnet 4.5
Output Format:
- Ethical implications listed clearly
- Practical guidelines structured as actionable points
```
**Why this prompt is effective:**
- Aligns task specifically with Claude's strengths in nuanced understanding.
- Structured clearly to maximize Claude's reasoning and analytical capabilities.
## Integrated Workflow Examples
### 1. Comprehensive Market Research Workflow
```plaintext
Step 1 (Claude Sonnet 4.5):
Role: Market researcher and sustainability analyst
Task: Research sustainable food packaging trends and analyze their ethical and sustainability implications.
Output Format: Analysis summary and recommendations.
Step 2 (GPT-5.2):
Role: Technical writer
Task: Format the insights and recommendations into a structured industry report.
Output Format: Professional document in markdown format.
Step 3 (Gemini 2.5 Flash Image):
Role: Graphic designer
Task: Generate a compelling visual cover image for the final report.
Constraints: Sustainability theme, professional style
Output Format: High-quality cover image (PNG, 1200x800)
```
**Why this prompt is effective:**
- Clearly leverages strengths of multiple AI models sequentially.
- Structured, integrated steps with explicit model assignments.
- Produces comprehensive, ready-to-use workflow outputs.
## Key Effective Elements in Giselle Prompts
Effective Giselle Generator Node prompts typically include:
- **Explicit Role Definitions**
- **Clear Constraints and Context**
- **Structured Output Formats**
- **Sequential or Stepwise Instructions**
- **Specific Model Selections for Capabilities**
For additional guidance and practical tips on creating impactful prompts, refer to [tips](./tips).
# Overview (/en/cookbooks/prompts/overview)
---
title: Overview
description: 'Prompt Engineering in Giselle’s Node-Based UI.'
---
Prompt engineering involves crafting and refining prompts—structured instructions designed to guide AI models toward precise and high-quality outputs. Giselle enhances this practice through a rich node-based UI called Generator Nodes, enabling intuitive, visual, and efficient prompt construction.
## What is a Prompt in Giselle?
In Giselle, prompts are carefully structured instructions provided individually within each Generator Node through a rich text editor. Unlike conversational interfaces, Giselle primarily uses one-shot prompting, allowing each node to independently deliver precise instructions and receive AI-generated outputs tailored to specific tasks.
Each prompt typically includes:
- **Role Definition**: Specifies the AI model’s intended expertise or persona.
- **Task Instructions**: Clearly states the task the model needs to perform.
- **Context**: Provides relevant background information and supporting data.
- **Input Data**: Delivers specific information or data sources for processing.
- **Output Format**: Defines the required format and structure of the AI’s response.
## Why Effective Prompts Matter
Creating effective prompts in Giselle's Generator Nodes significantly enhances AI-driven workflows by:
- **Improving Output Quality**: Clearly articulated prompts result in accurate and relevant responses.
- **Minimizing Errors**: Reduces the likelihood of misunderstandings or incorrect outputs.
- **Ensuring Consistency**: Promotes uniformity and reliability in outputs, crucial for downstream tasks.
- **Optimizing Resources**: Well-crafted prompts reduce token consumption and processing time, enhancing cost efficiency.
## Leveraging Giselle’s Generator Nodes
Giselle’s Generator Nodes provide a robust platform for prompt engineering, allowing teams to:
- **Adjust Model Parameters**: Fine-tune various LLM settings to suit specific task requirements.
- **Integrate Diverse Data Sources**: Incorporate multiple data inputs and seamlessly manage them across nodes.
- **Share Data Between Nodes**: Reuse outputs generated in one node as inputs for subsequent nodes, enabling sophisticated workflow automation.
- **Visualize Workflows**: Clearly map out intellectual production processes for improved transparency, collaboration, and understanding within teams.
## Recommended Practices
To maximize the effectiveness of Giselle’s Generator Nodes, adhere to the following practices:
- **Clearly Define Roles**: Explicitly establish the AI’s expected perspective or expertise.
- **Write Precise Instructions**: Avoid ambiguity by providing clear, concise task descriptions.
- **Provide Relevant Context**: Supply comprehensive background information to enhance understanding.
- **Specify Structured Outputs**: Always include detailed output formatting to maintain consistency.
- **Iteratively Refine Prompts**: Regularly test and refine prompts within the node-based UI to continuously improve outputs.
Understanding the fundamentals of prompt engineering is crucial, as effectively designed prompts significantly influence the quality and reliability of AI-generated outputs.
For detailed prompt examples, see [examples](./examples). For additional practical tips, refer to [tips](./tips).
# Tips (/en/cookbooks/prompts/tips)
---
title: Tips
description: 'Practical Tips for Effective Prompt Creation in Giselle’s Generator Nodes.'
---
This document provides concrete, actionable tips tailored specifically for creating effective prompts within Giselle’s Generator Nodes. Unlike conversational UIs, Giselle uses a single-shot prompting model, meaning each prompt must be precise and complete on its own. While direct iterative refinement through conversation within a single node isn't possible, strategically chaining multiple nodes can significantly elevate the output quality through careful node integration and diverse data sourcing.
## Essential Principles
### 1. Ensure Clarity and Precision
- Clearly define the AI model’s role.
- Provide explicit, focused instructions without ambiguity.
```plaintext
❌ Poor example:
"Describe a useful invention."
✅ Good example:
"Role: Technology historian
Task: Provide a concise summary (100 words max) of the invention of the telephone, highlighting its historical significance and modern impact.
Output Format:
- Summary paragraph
- Clearly stated historical context and modern relevance"
```
### 2. Include Comprehensive Context
- Provide necessary background and purpose clearly in your prompt.
- Explicitly state constraints or expectations relevant to the task.
### 3. Specify Structured Outputs
- Clearly outline the desired response structure, length, and style.
- Define formats explicitly (e.g., bullet points, structured paragraphs, JSON, image dimensions).
You can also set the **Output Format** to **JSON** in the Generator Node's **Advanced options** and define a Structured Output schema via the UI to reliably control the actual output format.
See the [Generator Node documentation](/en/glossary/generator-node#advanced-options) for more details.
## Advanced Node Integration Techniques
### 1. Effective Role Definition
Defining roles guides the AI to produce contextually accurate outputs:
```plaintext
✅ Example:
"Role: UX Designer
Task: Evaluate the provided web interface design for usability issues.
Output Format:
- List identified issues clearly
- Provide specific recommendations for improvements"
```
### 2. Sequential Node Chaining
Although Giselle nodes are single-shot, you can achieve iterative refinement by chaining multiple nodes:
1. **Ideation Node**: Generate initial ideas or concepts.
2. **Drafting Node**: Develop detailed drafts from initial concepts.
3. **Review Node**: Critically evaluate drafts and suggest improvements.
### 3. Leveraging Multi-Node Workflows
Combine diverse AI models across nodes to maximize output quality:
- **Claude** for nuanced analysis and ethical considerations.
- **GPT-5.2** for structured and creative content creation.
- **Gemini** for high-quality image and visual content generation.
## Common Pitfalls to Avoid
### 1. Overly Restrictive Instructions
Avoid excessively rigid constraints:
```plaintext
❌ Avoid:
"Create a detailed report exactly 200 words, including exactly four examples."
```
### 2. Contradictory or Confusing Instructions
Ensure instructions remain logically consistent:
```plaintext
❌ Avoid:
"Provide a highly detailed yet simple explanation using advanced terminology."
```
### 3. Ambiguous or Incomplete Prompts
Avoid vague instructions that lead to unclear outputs:
```plaintext
❌ Avoid:
"Explain something useful."
```
## Optimizing Giselle Workflows
### 1. Iterative Node Refinement
- Regularly review outputs from each node to optimize subsequent prompts.
- Use multiple nodes strategically to iteratively refine concepts, drafts, and final outputs.
### 2. Strategic Use of Templates
Leverage prompt templates for consistent, effective outputs:
```plaintext
✅ Giselle Template:
Role: [Defined AI role]
Task: [Explicit, precise task description]
Constraints:
- [Specific constraint or limitation]
- [Additional constraints as necessary]
Input Data:
- [Clearly referenced or provided data]
Output Format:
- [Detailed expected structure of response]
```
## Giselle-Specific Recommendations
### 1. Select Appropriate AI Models
Choose AI models carefully according to task requirements and capabilities:
- **Claude**: nuanced, ethical analyses.
- **Gemini**: complex multimodal inputs and image generation.
- **GPT-5.2**: structured outputs and creative content.
### 2. Visualize and Collaborate
- Clearly map your workflows visually within Giselle’s UI.
- Share your workflows with teams to enhance collaboration and clarity.
- Experiment with node combinations to achieve advanced, high-quality results beyond standard conversational interfaces.
## Key Points for Effective Giselle Prompts
- **Role Definition**: Clearly articulate the AI model’s role.
- **Precision**: Provide exact, detailed instructions.
- **Contextual Completeness**: Include essential context and constraints.
- **Output Structure**: Clearly define response formats.
- **Workflow Optimization**: Strategically chain multiple nodes to enhance output quality.
# Account FAQ (/en/faq/account-billing/accounts)
---
title: 'Account FAQ'
description: 'Frequently asked questions about Giselle accounts'
---
## How do I create a Giselle account?
You can create a Giselle account using one of the following methods:
- **Email and Password**: Sign up at [studio.giselles.ai/signup](https://studio.giselles.ai/signup) with your email address and create a password
- **Google**: Sign up directly using your Google account
- **GitHub**: Sign up directly using your GitHub account
After signing up with email, you'll receive a verification email to confirm your account.
## How do I log in to my account?
Visit [studio.giselles.ai/login](https://studio.giselles.ai/login) and log in using:
- Email and password
- Google account
- GitHub account
## Can I connect multiple login methods to my account?
Yes. You can connect Google and GitHub accounts to your Giselle account from [Account Settings > Authentication](https://studio.giselles.ai/settings/account/authentication). This allows you to log in using any of your connected methods.
## How do I disconnect a login method?
Go to [Account Settings > Authentication](https://studio.giselles.ai/settings/account/authentication) and click "Disconnect" next to the provider you want to remove. Note that you must maintain at least one login method.
## How do I update my profile information?
Go to [Account Settings > General](https://studio.giselles.ai/settings/account/general) where you can:
- Update your display name
- Upload or change your profile picture (JPG, PNG, GIF, or WebP)
## How do I delete my account?
To delete your account, please contact our support team at [support@giselles.ai](mailto:support@giselles.ai).
## What is a team?
A team is a shared workspace where you and your colleagues can collaborate on AI apps. Each user can create and belong to multiple teams.
## How do I create a new team?
Go to [Account Settings](https://studio.giselles.ai/settings/account) and click "Create New Team". Enter a name for your team to get started.
## What are the team member roles?
- **Admin**: Can manage team settings, billing, and team members
- **Member**: Can use team resources but cannot manage settings, billing, or members
## How do I invite team members?
Team admins can invite new members from [Team Settings > Members](https://studio.giselles.ai/settings/team/members). Enter the email address of the person you want to invite, and they'll receive an invitation email. Note that adding team members requires a Pro plan.
## How do I remove a team member?
Team admins can remove members from [Team Settings > Members](https://studio.giselles.ai/settings/team/members). Click the menu next to the member you want to remove and select "Remove".
## Can I leave a team?
Yes, you can leave a team as long as you belong to at least one other team. If it's your only team, you'll need to create or join another team first.
## How do I delete a team?
Only teams on the Free plan can be deleted. Go to [Team Settings > General](https://studio.giselles.ai/settings/team/general) and look for the delete option. Note that you must have at least one other team before deleting.
# Billing FAQ (/en/faq/account-billing/billing)
---
title: 'Billing FAQ'
description: 'Frequently asked questions about billing and payments for Giselle'
---
## What payment methods are accepted?
Giselle uses Stripe for payment processing, which supports major credit cards and other payment methods available in your region.
## How do I access my billing information?
Pro plan team admins can access billing information from [Team Settings](https://studio.giselles.ai/settings/team). Click the "Manage Subscription" button to open the Stripe billing portal where you can:
- View and update payment methods
- View billing history and invoices
- Manage Subscription billing information
## How does billing work?
Giselle Pro plan uses a combination of:
- **Base subscription fee**: A fixed monthly or annual fee for the Pro plan
- **Usage-based billing**: Charged based on AI model usage
## When am I charged?
You are charged at the beginning of each billing period. Usage-based charges from the previous period are included in your invoice.
## How do I view my invoices?
Access the Stripe billing portal from [Team Settings](https://studio.giselles.ai/settings/team) by clicking "Manage Subscription". Your complete invoice history is available there.
## How do I update my payment method?
1. Go to [Team Settings](https://studio.giselles.ai/settings/team)
2. Click "Manage Subscription" to open the Stripe billing portal
3. Manage Subscription your payment method in the portal
## What happens if my payment fails?
If a payment fails, Stripe will automatically retry the payment. You can also update your payment method in the billing portal to resolve payment issues.
## How do I cancel my subscription?
To cancel your Pro subscription:
1. Go to [Team Settings](https://studio.giselles.ai/settings/team)
2. Click "Manage Subscription" to open the Stripe billing portal
3. Cancel your subscription in the portal
Your subscription will remain active until the end of the current billing period.
## What happens when I cancel my subscription?
When you cancel:
- Your subscription remains active until the end of the current billing period
- A final invoice is generated for any usage during the last billing cycle
- After cancellation, your team reverts to the Free plan
- Team membership is adjusted (only the earliest admin remains)
## Can I get a refund?
For refund requests, please contact our support team at [support@giselles.ai](mailto:support@giselles.ai).
## How is usage-based billing calculated?
AI model usage (text generation, image generation) is metered and reported to Stripe throughout your billing period. Your invoice will reflect the actual usage during the billing period.
## Where can I see my current usage?
You can view your usage from [Team Settings > Usage](https://studio.giselles.ai/settings/team/usage).
## Where can I see pay-as-you-go charges for AI models?
You can view the detailed breakdown of pay-as-you-go charges for additional AI model usage in the Stripe billing portal. Access it by clicking "Manage Subscription" in [Team Settings](https://studio.giselles.ai/settings/team). The portal shows your usage-based billing details alongside your subscription charges.
# Plan FAQ (/en/faq/account-billing/plan)
---
title: 'Plan FAQ'
description: 'Frequently asked questions about Giselle plans and features'
---
## What plans are available?
Giselle offers two plans:
- **Free**: Get started at no cost with basic features
- **Pro**: Full access to all features with usage-based pricing
For detailed pricing information, visit [giselles.ai/pricing](https://giselles.ai/pricing).
## What's included in the Free plan?
The Free plan includes:
- Access to the Workspace editor
- Basic AI model usage
- Single team member
## What's included in the Pro plan?
The Pro plan includes:
- All Free plan features
- Unlimited team members
- Full AI model usage (usage-based billing)
- Team collaboration features
- Priority support
## How do I upgrade to Pro?
1. Go to [Team Settings](https://studio.giselles.ai/settings/team)
2. Click "Upgrade to Pro"
3. Complete the checkout process with Stripe
4. Your team is upgraded immediately
## Can I try Pro before committing?
For trial options, please contact our support team at [support@giselles.ai](mailto:support@giselles.ai).
## How do I downgrade from Pro to Free?
To downgrade, cancel your Pro subscription through the Stripe billing portal:
1. Go to [Team Settings](https://studio.giselles.ai/settings/team)
2. Click "Manage Subscription" to open the billing portal
3. Cancel your subscription
Your Pro features remain active until the end of the current billing period, after which your team reverts to the Free plan.
## What happens to my team when I downgrade?
When your Pro subscription ends:
- Your team reverts to the Free plan
- Team membership is adjusted to fit Free plan limits
- Your apps and data are preserved
## Can I switch teams between plans?
Each team has its own plan. You can have multiple teams on different plans. To upgrade a specific team, make sure you've selected that team before upgrading.
## Is there an annual plan?
For annual billing options, please contact our support team at [support@giselles.ai](mailto:support@giselles.ai) or check [giselles.ai/pricing](https://giselles.ai/pricing).
## How does usage-based billing work?
AI model usage (text generation, image generation) is metered and billed based on actual usage. You can monitor your usage from [Team Settings > Usage](https://studio.giselles.ai/settings/team/usage).
## Are there usage limits?
The Pro plan uses pay-as-you-go billing for AI model usage, so there are no hard limits. You're billed for what you use.
## How do I check my current plan?
Go to [Team Settings](https://studio.giselles.ai/settings/team) to see your current plan status and subscription details.
# AI Models FAQ (/en/faq/application/ai-models)
---
title: 'AI Models FAQ'
description: 'Frequently asked questions about AI models and their usage in Giselle'
---
## What AI providers are available in Giselle?
Giselle integrates with multiple AI providers:
- **Anthropic**: Claude models for nuanced understanding and safe outputs
- **Google AI**: Gemini models with multimodal capabilities and large context windows
- **OpenAI**: GPT models for code generation, creative content, and structured outputs
- **Fal AI**: Image generation models (Open Source version only)
## What models are available on the Free plan?
The following models are available on the Free plan:
- **Anthropic**: Claude Haiku 4.5
- **Google**: Gemini 2.5 Flash Lite
- **OpenAI**: GPT-5-nano
## What additional models are available on the Pro plan?
Pro plan users have access to all Free plan models plus:
- **Anthropic**: Claude Opus 4.6, Claude Opus 4.5, Claude Sonnet 4.6, Claude Sonnet 4.5
- **Google**: Gemini 3.1 Pro Preview, Gemini 3 Flash Preview, Gemini 3 Pro Preview, Gemini 2.5 Pro, Gemini 2.5 Flash, Gemini 2.5 Flash Image, Gemini 3.1 Flash Image Preview
- **OpenAI**: GPT-5.4, GPT-5.3-codex, GPT-5.2, GPT-5.2-codex, GPT-5.1-thinking, GPT-5.1-codex, GPT-5, GPT-5-mini
## How do I select an AI model?
In the Workspace, add a [Generator Node](/en/glossary/generator-node) and click on it to open the Properties Panel. You can select your preferred AI model from the model dropdown menu.
## Which model should I choose?
Here are general recommendations:
- **For coding and complex reasoning**: Claude Opus 4.6, GPT-5.4 or GPT-5.2, Gemini 3.1 Pro Preview or Gemini 2.5 Pro
- **For large context needs**: Claude Sonnet 4.6 or Claude Opus 4.6, GPT-5.4
- **For balanced performance and cost**: Claude Sonnet 4.6 or Claude Sonnet 4.5, Gemini 2.5 Flash
- **For speed and cost-efficiency**: Claude Haiku 4.5, GPT-5-nano, or Gemini 2.5 Flash Lite
- **For image generation**: Gemini 3.1 Flash Image Preview (preview) or Gemini 2.5 Flash Image (stable)
## What is the context window?
The context window is the maximum amount of text (measured in tokens) that a model can process in a single request. Larger context windows allow you to include more information in your prompts.
- **Anthropic models**: Varies by model. Claude Opus 4.6 and Claude Sonnet 4.6 have 1M tokens; other current Claude models typically have 200k tokens.
- **Google Gemini models**: Most have 1M tokens (may vary by model).
- **OpenAI models**: GPT-5.4 has approximately 1.05M tokens; other GPT-5 series text models typically have 400k tokens.
## Do the models support image input?
Yes, most models support image input:
- **Anthropic Claude**: All Claude models support image and PDF input
- **Google Gemini**: All Gemini models support image, PDF, audio, and video input
- **OpenAI GPT**: GPT-5 series models support image input
## What is the Reasoning capability?
Reasoning (also called Extended Thinking) allows models to spend more time thinking through complex problems before responding. This improves accuracy for multi-step reasoning tasks. Models with reasoning capability include:
- Claude Opus 4.6, Claude Opus 4.5, Claude Sonnet 4.6, Claude Sonnet 4.5, Claude Haiku 4.5
- Gemini 3.1 Pro Preview, Gemini 3 Flash Preview, Gemini 3 Pro Preview, Gemini 2.5 Pro, Gemini 2.5 Flash, Gemini 2.5 Flash Lite
- GPT-5.4, GPT-5.3-codex, GPT-5.2, GPT-5.2-codex, GPT-5.1-thinking
## What is Web Search?
Web Search allows models to access real-time information from the internet. You can enable this feature from the Generator Node's Tools tab. Models supporting web search include most Claude, Gemini, and GPT models.
## How is AI model usage billed?
AI model usage is billed based on the number of tokens processed (input and output). Different models have different pricing. You can view your usage from [Team Settings > Usage](https://studio.giselles.ai/settings/team/usage).
## Can I use multiple models in one workflow?
Yes! One of Giselle's strengths is combining different AI providers in a single workflow. You can use different models at different stages to optimize for cost, speed, or capability.
## Where can I learn more about each model?
For detailed model specifications, visit the [Models documentation](/en/models/providers/overview) or the official provider documentation:
- [Anthropic Documentation](https://docs.anthropic.com/)
- [Google AI for Developers](https://ai.google.dev/)
- [OpenAI Documentation](https://platform.openai.com/docs)
# Build Apps FAQ (/en/faq/application/build-apps)
---
title: 'Build Apps FAQ'
description: 'Frequently asked questions about building apps in Giselle'
---
## What is a Workspace?
A Workspace is a visual canvas-based editor where you design AI workflows by connecting nodes together. Each node performs a specific function, and data flows between nodes through connections.
## How do I create a new app?
Click "+ Create App" in the left menu. Enter a name and description for your app, and you'll be taken to the Workspace editor where you can build your workflow.
## What are nodes?
Nodes are the building blocks of your workflow. Each node performs a specific function:
- **Start/End Nodes**: Define the entry point and output of your app
- **Generator Node**: Performs AI text or image generation
- **Text/File/Web Page Nodes**: Provide content to your workflow
- **Vector Store/Query Nodes**: Enable semantic search with RAG
- **Trigger/Action Nodes**: Connect to external services like GitHub
For more details, see the [Workspaces guide](/en/guides/workspaces).
## How do I connect nodes?
1. Hover over a node to see its output port (right side)
2. Click and drag from the output port
3. Drop the connection on another node's input port (left side)
## How do I run my workflow?
Click the **Run** button in the upper right corner of the Workspace. You'll be redirected to the task execution result page where you can see the output.
## What's the difference between running in Workspace vs Playground?
- **Workspace**: Run your workflow directly to test during building. Useful for iterating and debugging.
- **Playground**: Run completed apps with a simple interface. Best for regular use by you and your team.
## How do I turn my workflow into an app?
Connect a [Start Node](/en/glossary/start-end-nodes#start-node) and [End Node](/en/glossary/start-end-nodes#end-node) to your workflow. Once these are connected, your app will appear in the [Playground](https://studio.giselles.ai/playground).
## Can I duplicate a workflow?
Yes. You can copy an existing app to create a new one based on it. This is useful for creating variations of your workflows.
## How do I delete an app?
Navigate to the app settings and look for the delete option. Note that deleted apps cannot be recovered.
## Can team members edit the same workspace?
Team members with access to the team can view and edit apps within that team. Changes are saved automatically.
## What file types can I upload to a File Node?
File Nodes support PDF, text files, and images (JPG, PNG, GIF, WebP).
## How do I use external data in my workflow?
You can bring external data into your workflow using:
- **File Node**: Upload documents directly
- **Web Page Node**: Fetch content from URLs
- **GitHub Vector Store Node**: Index GitHub repositories
- **Trigger Node**: Receive data from external events
## What happens if my workflow fails?
If a workflow fails, you can see the error details on the task execution result page. Common issues include:
- Missing required inputs
- Invalid node configuration
- API errors from AI providers
Check the error message and update your workflow accordingly.
## Where can I learn more about building workflows?
See the [Workspaces guide](/en/guides/workspaces) for detailed instructions on building workflows, and the [Glossary](/en/glossary/node) for information about each node type.
# Run Apps FAQ (/en/faq/application/run-apps)
---
title: 'Run Apps FAQ'
description: 'Frequently asked questions about running apps in Giselle'
---
## How do I run an app?
There are two ways to run an app:
- **[Playground](https://studio.giselles.ai/playground)**: Select an app, enter your input, and press Enter
- **Workspace**: Click the **Run** button in the upper right corner
## What is the Playground?
The [Playground](https://studio.giselles.ai/playground) is where you run completed apps with a simple interface. It displays all apps available to you, including your own apps and team apps.
## What is the Workspace?
The Workspace is a visual canvas-based editor where you design AI workflows by connecting nodes together. You can also run and test your workflows directly from the Workspace. For more details, see the [Workspaces guide](/en/guides/workspaces).
## What is the Tasks page?
The [Tasks](https://studio.giselles.ai/tasks) page shows your execution history. You can see all past runs, their status, and results.
## How do I view my execution history?
Go to [Tasks](https://studio.giselles.ai/tasks) to see a list of all your past executions. Click on any task to view its details.
## What information is shown on the task result page?
The task execution result page shows:
- **Status**: Whether the task completed, failed, or is still running
- **Steps**: Each node's execution progress
- **Output**: The generated results from each node
- **Duration**: How long the execution took
- **Token Usage**: AI model token consumption
## Can I re-run a previous task?
You can run the same app again from the Playground with new inputs. The original task results are preserved in your history.
## How do I share an app with my team?
Apps created within a team are automatically available to all team members in the Playground. Team members can run the app without accessing the Workspace editor.
## What happens if an app fails?
If an app fails during execution:
1. Check the task result page for error details
2. Look at which step failed
3. Open the app in Workspace to fix the issue
4. Run the app again
## Can I cancel a running task?
Currently, once a task starts, it will run until completion or failure.
## How is app usage billed?
App executions consume AI model tokens, which are billed based on usage. You can check your billing amount from [Team Settings](https://studio.giselles.ai/settings/team) by clicking "Manage Subscription" to access the Stripe portal.
## Where can I learn more?
- [Playground guide](/en/guides/playground) - How to use the Playground
- [Tasks guide](/en/guides/tasks) - Understanding task history and results
# Privacy & Security FAQ (/en/faq/security-support/privacy-security)
---
title: 'Privacy & Security FAQ'
description: 'Frequently asked questions about Giselle privacy and security measures'
---
## Is my data used for AI model training?
**No.** When you use Giselle, your data is sent to AI providers (Anthropic, OpenAI, Google) via their APIs. All of these providers explicitly state that API data is **not used for model training** by default.
### Anthropic
Anthropic's Commercial Terms of Service clearly states:
> "Anthropic may not train models on Customer Content from Services."
This means your inputs and outputs when using Claude models through Giselle are not used to train Anthropic's models.
Additionally, Anthropic's Privacy Center states:
> "Anthropic does not use Customer Content to train our models."
**Sources:**
- [Commercial Terms of Service](https://www.anthropic.com/legal/commercial-terms) (Section B. Customer Content)
- [Is my data used for model training?](https://privacy.claude.com/en/articles/7996868-is-my-data-used-for-model-training)
### OpenAI
OpenAI's official documentation states:
> "By default, we do not train on any inputs or outputs from our products for business users, including ChatGPT Business, ChatGPT Enterprise, and the API. We offer API customers a way to opt-in to share data with us, such as by providing feedback in the Playground, which we then use to improve our models. Unless they explicitly opt-in, organizations are opted out of data-sharing by default."
**Sources:**
- [How your data is used to improve model performance](https://help.openai.com/en/articles/5722486-how-your-data-is-used-to-improve-model-performance)
- [Data controls in the OpenAI platform](https://platform.openai.com/docs/guides/your-data)
### Google
Giselle uses Gemini models through Google Cloud's Vertex AI. The Vertex AI documentation states:
> "Google does not use your data, including your prompts, inputs, and outputs, to train foundation models without your permission."
>
> "By default, Google Cloud does not use your data for training."
This applies to all managed models on Vertex AI, including Gemini models used through Giselle.
**Note:** For those using the Gemini API directly via Google AI Studio (not through Giselle), the terms differ. With paid services:
> "Google doesn't use your prompts (including associated system instructions, cached content, and files such as images, videos, or documents) or responses to improve our products"
**Sources:**
- [Data governance for Generative AI on Vertex AI](https://cloud.google.com/vertex-ai/generative-ai/docs/data-governance)
- [Vertex AI Zero Data Retention](https://cloud.google.com/vertex-ai/generative-ai/docs/vertex-ai-zero-data-retention)
- [Google API Service Terms (Generative AI)](https://ai.google.dev/gemini-api/terms)
## Summary
| Provider | Data Used for Training | Source |
|----------|----------------------|--------|
| Anthropic | No | [Commercial Terms](https://www.anthropic.com/legal/commercial-terms) |
| OpenAI | No | [Data Usage Policy](https://help.openai.com/en/articles/5722486-how-your-data-is-used-to-improve-model-performance) |
| Google | No | [Data Governance](https://cloud.google.com/vertex-ai/generative-ai/docs/data-governance) |
Giselle uses these providers' APIs, so your data benefits from the same protections. Your prompts, inputs, and outputs are processed to generate responses but are not used to train or improve the AI models.
# Support FAQ (/en/faq/security-support/support)
---
title: 'Support FAQ'
description: 'Frequently asked questions about Giselle support services'
---
## How do I report a security vulnerability?
If you discover a security vulnerability in Giselle, please report it through our [GitHub Security page](https://github.com/giselles-ai/giselle/security). We take security reports seriously and will respond promptly to investigate and address the issue.
## What should I do if I suspect unauthorized access to my account?
If you suspect unauthorized access to your Giselle account:
1. Change your password immediately
2. Review your recent activity in Task History
3. Contact our support team at [support@giselles.ai](mailto:support@giselles.ai)
## How can I contact support for security-related questions?
For security-related inquiries, please contact us at [support@giselles.ai](mailto:support@giselles.ai). We handle security matters with priority and confidentiality.
## Does Giselle have a security disclosure policy?
Yes. Our Security Policy is available on [GitHub](https://github.com/giselles-ai/giselle/security). We encourage responsible disclosure of security vulnerabilities. When you report a security issue:
- We will acknowledge receipt of your report
- We will investigate and work to resolve the issue
- We will keep you informed of our progress
- We appreciate your help in keeping Giselle secure
## Where can I find more information about Giselle's security practices?
For information about how Giselle handles your data and our security measures, please see our [Privacy & Security FAQ](/en/faq/security-support/privacy-security).
# API Keys (/en/guides/api/api-keys)
---
title: API Keys
description: Learn how to create and manage API keys to access the Giselle API programmatically.
---
This feature is currently in **Private Preview**. Access is limited to selected users. Features and APIs may change without notice.
You can manage API keys by navigating to [Settings > Team > API Keys](https://studio.giselles.ai/settings/team/api-keys).
## Overview
API keys allow you to access the Giselle API programmatically to run your apps from external applications, scripts, or services. API keys are scoped to your team, meaning all team members share access to the same set of API keys.
## Creating an API Key
Go to [Settings > Team > API Keys](https://studio.giselles.ai/settings/team/api-keys) in the Giselle.
Click the **Create new secret key** button to open the creation dialog.
Enter a descriptive label for your API key (e.g., "Production Server", "CI/CD Pipeline"). This helps you identify the key's purpose later.
Labels can be up to 128 characters long.
After creation, your API key will be displayed **once**. Copy it immediately and store it securely.
The full API key is only shown once at creation time. If you lose it, you'll need to create a new key.
## API Key Format
API keys follow the format:
```
gsk_.
```
For example: `gsk_abc123xyz.secret_value_here`
When viewing your API keys in the settings, you'll see a redacted version showing only the first few and last few characters (e.g., `gsk_abc...xyz`).
## Managing API Keys
### Viewing API Keys
The API Keys page displays all keys for your team with the following information:
- **Label**: The descriptive name you assigned
- **Redacted Value**: A shortened version of the key for identification
- **Created At**: When the key was created
- **Last Used At**: When the key was last used for an API request
### Revoking API Keys
To revoke an API key:
1. Navigate to [Settings > Team > API Keys](https://studio.giselles.ai/settings/team/api-keys)
2. Find the key you want to revoke
3. Click the **Revoke** button
4. Confirm the revocation
Revoking an API key is immediate and permanent. Any applications or services using that key will immediately lose access to the API.
## Using API Keys
When making requests to the Giselle API, include your API key in the `Authorization` header:
```bash
curl -X POST https://studio.giselles.ai/api/apps/{appId}/run \
-H "Authorization: Bearer gsk_your_api_key_here" \
-H "Content-Type: application/json" \
-d '{"text": "Your input text"}'
```
For a better developer experience, consider using the [Giselle SDK](/en/guides/api/sdk) which handles authentication automatically.
## Security Best Practices
Never expose API keys in client-side code, public repositories, or logs. Use environment variables or secure secret management systems.
Label your keys by their use case (e.g., "Production", "Development", "CI/CD") to easily track and manage them.
Periodically create new keys and revoke old ones, especially if you suspect a key may have been compromised.
Only share API keys with team members and systems that genuinely need API access.
## Rate Limits
API requests are rate-limited based on your team's plan:
| Plan | Requests per Minute |
|------|---------------------|
| Free | 60 |
| Pro | 300 |
| Team | 600 |
| Enterprise | 3,000 |
When you exceed the rate limit, the API returns a `429 Too Many Requests` response. Rate limit information is included in response headers:
- `RateLimit-Limit`: Maximum requests allowed per minute
- `RateLimit-Remaining`: Remaining requests in the current window
- `RateLimit-Reset`: Unix timestamp when the rate limit resets
- `Retry-After`: Seconds to wait before retrying (when rate limited)
## Troubleshooting
### Unauthorized (401) Error
If you receive a 401 error, check that:
- Your API key is correct and complete
- The key hasn't been revoked
- The `Authorization` header is formatted correctly: `Bearer `
### Rate Limited (429) Error
If you're being rate limited:
- Check the `Retry-After` header for when you can retry
- Consider upgrading your plan for higher limits
- Implement exponential backoff in your application
## Next Steps
- Learn how to use the [Giselle SDK](/en/guides/api/sdk) for easier API integration
- Explore the [Playground](/en/guides/playground) to test your apps before integrating via API
# Giselle SDK (/en/guides/api/sdk)
---
title: Giselle SDK
description: Learn how to use the Giselle SDK to integrate your apps with external applications and services.
---
This feature is currently in **Private Preview**. Access is limited to selected users. Features and APIs may change without notice.
## Overview
The Giselle SDK (`@giselles-ai/sdk`) provides a simple, type-safe way to interact with the Giselle API from your Node.js applications. It handles authentication, request formatting, and polling for task completion automatically.
The SDK is designed for server-side use only. Never use it in client-side code (browsers) as this would expose your API key.
## Installation
The Giselle SDK is published on npm at [@giselles-ai/sdk](https://www.npmjs.com/package/@giselles-ai/sdk).
Install the SDK using your preferred package manager:
```bash
npm install @giselles-ai/sdk
```
```bash
yarn add @giselles-ai/sdk
```
```bash
pnpm add @giselles-ai/sdk
```
## Quick Start
```typescript
import Giselle from "@giselles-ai/sdk";
// Initialize the client
const client = new Giselle({
apiKey: process.env.GISELLE_API_KEY,
});
// Run an app and wait for results
const { task } = await client.apps.runAndWait({
appId: "app_xxxxx",
input: { text: "Hello, Giselle!" },
});
console.log(task.status); // "completed"
console.log(task.outputs); // Array of output results
```
## Configuration
### Constructor Options
```typescript
const client = new Giselle({
apiKey: string; // Required: Your API key
baseUrl?: string; // Optional: API base URL (default: "https://studio.giselles.ai")
fetch?: typeof fetch; // Optional: Custom fetch implementation
});
```
| Option | Required | Default | Description |
|--------|----------|---------|-------------|
| `apiKey` | Yes | - | Your Giselle API key. Get one from [API Keys settings](/en/guides/api/api-keys). |
| `baseUrl` | No | `https://studio.giselles.ai` | The base URL for API requests. |
| `fetch` | No | Global `fetch` | Custom fetch implementation for specific runtime environments. |
### Environment Variables
We recommend storing your API key in an environment variable:
```bash
# .env
GISELLE_API_KEY=gsk_your_api_key_here
```
```typescript
const client = new Giselle({
apiKey: process.env.GISELLE_API_KEY,
});
```
Never commit API keys to version control. Use environment variables or a secrets manager.
## API Reference
### `client.apps.run()`
Starts an app execution and returns immediately with a task ID. Use this when you want to handle polling yourself or don't need to wait for results.
```typescript
const { taskId } = await client.apps.run({
appId: "app_xxxxx",
input: { text: "Your input text" },
});
console.log(taskId); // "tsk_xxxxx"
```
**Parameters:**
| Parameter | Type | Required | Description |
|-----------|------|----------|-------------|
| `appId` | `string` | Yes | The ID of the app to run (format: `app_xxxxx`) |
| `input.text` | `string` | Yes | The text input for the app |
**Returns:**
```typescript
{
taskId: string; // The ID of the created task
}
```
### `client.apps.runAndWait()`
Starts an app execution and polls until the task completes. This is the recommended method for most use cases.
```typescript
const { task } = await client.apps.runAndWait({
appId: "app_xxxxx",
input: { text: "Your input text" },
pollIntervalMs: 1000, // Optional: polling interval (default: 1000ms)
timeoutMs: 60000, // Optional: timeout (default: 1200000ms / 20 minutes)
});
```
**Parameters:**
| Parameter | Type | Required | Default | Description |
|-----------|------|----------|---------|-------------|
| `appId` | `string` | Yes | - | The ID of the app to run |
| `input.text` | `string` | Yes | - | The text input for the app |
| `pollIntervalMs` | `number` | No | `1000` | How often to check for completion (ms) |
| `timeoutMs` | `number` | No | `1200000` | Maximum time to wait (ms) |
| `schema` | `StandardSchemaV1` | No | - | Validation schema for the output. [Standard Schema v1](https://standardschema.dev/) compatible (Zod, Valibot, etc.). Only applied when the End Node has JSON (Structured Output) configured. |
**Returns:**
The `task` type in the return value differs depending on the End Node's Output Format setting.
**Raw (passthrough):**
```typescript
{
task: {
id: string;
workspaceId: string;
name: string;
status: "completed" | "failed" | "cancelled";
outputType: "passthrough";
steps: Array<{
title: string;
status: string;
items: Array<{
id: string;
title: string;
status: string;
generationId: string;
outputs?: unknown[];
error?: string;
}>;
}>;
outputs: Array<{
title: string;
generationId: string;
outputs: unknown[];
}>;
};
}
```
**JSON (object):**
```typescript
{
task: {
id: string;
workspaceId: string;
name: string;
status: "completed" | "failed" | "cancelled";
outputType: "object";
output: T; // Typed by schema if provided, otherwise Record
steps: Array<{
title: string;
status: string;
items: Array<{
id: string;
title: string;
status: string;
generationId: string;
outputs?: unknown[];
error?: string;
}>;
}>;
};
}
```
## Finding Your App ID and Code Snippet
The easiest way to get your App ID and a ready-to-use code snippet is from the Workspace:
1. Open your app in the Workspace
2. Click the **Run** button in the top-right corner
3. In the dialog that appears, select the **Code** tab
4. You'll see a complete code snippet with your `appId` already filled in. Simply copy this code and use it in your application.
5. If the End Node has JSON (Structured Output) enabled, the Code tab also displays a code snippet with schema definitions and a preview of the Response JSON structure
The App ID format is `app_` followed by a unique identifier (e.g., `app_abc123xyz`).
## Error Handling
The SDK throws specific error types for different failure scenarios:
```typescript
import Giselle, {
ConfigurationError,
ApiError,
TimeoutError,
UnsupportedFeatureError,
SchemaValidationError,
} from "@giselles-ai/sdk";
try {
const { task } = await client.apps.runAndWait({
appId: "app_xxxxx",
input: { text: "Hello" },
});
} catch (error) {
if (error instanceof ConfigurationError) {
// Missing or invalid configuration (e.g., no API key)
console.error("Configuration error:", error.message);
} else if (error instanceof ApiError) {
// API request failed
console.error("API error:", error.status, error.responseText);
} else if (error instanceof TimeoutError) {
// Task didn't complete within the timeout
console.error("Task timed out:", error.message);
} else if (error instanceof UnsupportedFeatureError) {
// Attempted to use an unsupported feature
console.error("Unsupported feature:", error.message);
} else if (error instanceof SchemaValidationError) {
// Schema validation failed
console.error("Schema validation error:", error.message);
}
}
```
### Error Types
| Error Type | Description |
|------------|-------------|
| `ConfigurationError` | Missing or invalid configuration (e.g., API key not provided) |
| `ApiError` | HTTP request to the API failed. Includes `status` and `responseText` properties. |
| `TimeoutError` | Task didn't complete within the specified timeout |
| `UnsupportedFeatureError` | Attempted to use a feature not yet supported (e.g., file inputs) |
| `SchemaValidationError` | Schema validation failed for the output |
## Examples
### Basic Usage
```typescript
import Giselle from "@giselles-ai/sdk";
const client = new Giselle({
apiKey: process.env.GISELLE_API_KEY,
});
async function runMyApp(userInput: string) {
const { task } = await client.apps.runAndWait({
appId: "app_xxxxx",
input: { text: userInput },
});
if (task.status === "completed") {
return task.outputs;
} else {
throw new Error(`Task failed: ${task.status}`);
}
}
```
### Receiving Structured Output
When the End Node has JSON (Structured Output) enabled, `task.outputType === "object"` and `task.output` contains the structured result.
Pass a [Standard Schema v1](https://standardschema.dev/) compatible schema to the `schema` parameter to automatically validate the output and get type inference.
Supported libraries: Zod (3.24+), Valibot (1.0+), ArkType (2.0+), Yup (1.7+), Effect Schema (3.13+)
```typescript
import { z } from "zod";
const BlogCardSchema = z.object({
title: z.string(),
summary: z.string(),
tags: z.array(z.string()),
});
async function runMyAppWithStructuredOutput(userInput: string) {
const { task } = await client.apps.runAndWait({
appId: "app_xxxxx",
input: { text: userInput },
schema: BlogCardSchema,
});
if (task.status === "completed" && task.outputType === "object") {
// task.output is typed based on BlogCardSchema
return task.output;
}
throw new Error(`Task failed: ${task.status}`);
}
```
### With Custom Timeout
```typescript
const { task } = await client.apps.runAndWait({
appId: "app_xxxxx",
input: { text: "Complex query that may take time" },
timeoutMs: 300000, // 5 minutes
pollIntervalMs: 2000, // Check every 2 seconds
});
```
### Fire and Forget
```typescript
// Start the task but don't wait for completion
const { taskId } = await client.apps.run({
appId: "app_xxxxx",
input: { text: "Background processing" },
});
console.log(`Task started: ${taskId}`);
// You can check the task status later via the API or in the Giselle
```
### Express.js Integration
```typescript
import express from "express";
import Giselle from "@giselles-ai/sdk";
const app = express();
const client = new Giselle({
apiKey: process.env.GISELLE_API_KEY,
});
app.use(express.json());
app.post("/api/process", async (req, res) => {
try {
const { task } = await client.apps.runAndWait({
appId: "app_xxxxx",
input: { text: req.body.text },
timeoutMs: 60000,
});
res.json({
success: true,
outputs: task.outputs,
});
} catch (error) {
res.status(500).json({
success: false,
error: error.message,
});
}
});
app.listen(3000);
```
## Current Limitations
- **Text input only**: Currently, only text input is supported. File inputs will be supported in a future release.
- **Server-side only**: The SDK should only be used in server-side environments to protect your API key.
## Next Steps
- [Create an API key](/en/guides/api/api-keys) to get started
- Test your apps in the [Playground](/en/guides/playground) before integrating
- Check out [Cookbooks](/en/cookbooks/overview) for example apps and workflows
# Quickstart (/en/guides/get-started/quickstart)
---
title: Quickstart
description: "Get started with Giselle in minutes! This quick start guide covers signup to running your first AI app."
---
## Get Started with Giselle
Get up and running with Giselle in minutes! This quick start guide walks you through trying sample apps, exploring how they work, and creating your own custom app.
If you're joining us for the first time, create your account on the [sign up](https://studio.giselles.ai/signup) page. If you're already part of the Giselle community, [log in](https://studio.giselles.ai/login) to jump right in.
After signing up, navigate to [Playground](https://studio.giselles.ai/playground). This is where you can run AI apps and see them in action.
In the Playground, you'll find sample apps provided by Giselle. Select one, enter your task description in the input area, and press Enter to run it.
After running the app, you'll be redirected to the task execution result page. Here you can see the generated output, execution steps, and progress. You can also access all your past runs from [Tasks](https://studio.giselles.ai/tasks).
From the task execution result page, click the "Edit in Studio" button to open the app in the Workspace editor. This lets you see how the app is built.
In the Workspace, you'll see the app's workflow visualized as connected nodes. Each node performs a specific function, and data flows from one node to another through connections.
Click on any node to see its settings in the right panel. You can view the prompt, selected AI model, and other configurations that define how the node works.
Click "+ Create App" in the left menu to start creating your own app. Give it a name and description.
In the Workspace, drag nodes from the toolbar at the bottom onto the canvas. Connect them by dragging from the Output port of one node to the Input port of another.
Select each node and configure its settings in the right panel. Set prompts, choose AI models, and adjust parameters to customize the behavior.
Click the "Run" button in the upper right corner to execute your workflow. Congratulations, you've created and run your first custom app in Giselle!
# Billing (/en/guides/learn-about/billing)
---
title: 'Billing'
description: 'Manage your personal account billing and payments'
---
## Payment Guide
This guide explains how Giselle's pricing system works, including subscription management, billing cycles, and secure payments. Giselle uses [Stripe](https://stripe.com) for simplified billing to ensure safe and reliable transactions.
---
## How to Access Billing Settings
After logging in, you can access [Settings > Team > Billing](https://studio.giselles.ai/settings/team/billing) by selecting "Billing" from the sidebar menu.
From this page, you can:
- View your current subscription details, including AI model usage rates
- Cancel your subscription
- Access the Stripe billing portal for payment management
In the Stripe billing portal, you can:
- Update your payment method
- View invoice history
- Check pay-as-you-go charges for additional AI model usage
---
## About the Billing Cycle
- Subscriptions are billed on a monthly recurring basis, starting from your subscription date
- Your subscription automatically renews on the same day each month (e.g., May 5)
- Payments are processed automatically through your registered payment method
---
## Current Plans and Pricing
For detailed information about our current plans and pricing options, please visit [Our Pricing page](https://giselles.ai/pricing)
Alternatively, you can refer to our documentation at [Plan](plans) for comprehensive plan details and feature comparisons.
For any specific pricing questions not covered on these pages, please contact our support team.
---
## How AI Model Usage is Billed
- The Free Plan includes 30 minutes of AI usage per month (limited-time offer)
- The Pro Plan includes $20 of AI credits per month. Additional usage is billed at cost plus 10% markup
---
## How to View and Download Invoices
You can view and download your invoice history in the Stripe billing portal. Each invoice shows:
- Date of payment
- Amount charged
- Payment status
- Description of services
From the Stripe portal, you can download both invoices and receipts for your records or accounting purposes. Simply locate the invoice you need and use the download options provided.
---
## How to Update Payment Method
To update your payment information:
1. Go to the [Billing section](https://studio.giselles.ai/settings/team/billing) in Settings
2. Access the Stripe billing portal
3. Look for the "Payment Method" section
4. Modify your payment details, where you can:
- Update your credit card information
- Change to a different payment method
All changes to your payment information will be securely processed and stored by Stripe.
---
## How to Cancel a Subscription
To cancel your subscription:
1. Go to [Billing settings](https://studio.giselles.ai/settings/team/billing)
2. Click "Cancel subscription"
3. Review the cancellation information
4. Click the "Cancel subscription" button to confirm
Once confirmed, your cancellation will be scheduled for the end of your current billing period. You will see a "Cancels [date]" message on the billing page showing when your subscription will end.
Your subscription will remain fully active until the scheduled cancellation date. If you change your mind before the end date, you can resubscribe to continue your service.
---
## Payment Processing
- All payments are processed securely through Stripe
- Supported payment methods include major credit cards
- Payment information is stored securely by Stripe, not by Giselle
If you have questions not covered in this guide or encounter any billing-related issues, please contact: **support@giselles.ai**
Include your account information and a description of your issue for prompt assistance.
# Open Source License (/en/guides/learn-about/open-source-license)
---
title: Open Source License
description: Learn about Giselle's open-source license and how it applies to your usage
---
Giselle Community Edition is open-source and released under the [Apache License 2.0](https://www.apache.org/licenses/LICENSE-2.0). This allows you to freely use, modify, and distribute the software, with certain conditions. For complete terms, please refer to the [`LICENSE`](https://github.com/giselles-ai/giselle/blob/main/LICENSE) file in the GitHub repository.
This license grants you:
- Commercial and non-commercial usage
- Modification and redistribution
- Use in proprietary products (with attribution)
However, it **does not** grant use of Giselle's **name, logo, or trademarks** without explicit permission, as outlined in section 6 of the license.
If you have any questions or concerns regarding licensing or usage rights, please contact: **support@giselles.ai**
Giselle is developed by the core team, and we do not accept unsolicited external Pull Requests. That said, there are still many valuable ways to get involved—such as reporting bugs or sharing ideas. For details, please refer to our [Contributing Guide](https://github.com/giselles-ai/giselle/blob/main/CONTRIBUTING.md).
# Plans (/en/guides/learn-about/plans)
---
title: 'Plans'
description: 'Understand your Giselle subscription.'
---
## Available Plans
For the latest information about our plans and pricing options,please visit [Our Pricing page](https://giselles.ai/pricing)
### Free Plan
Ideal for solo developers exploring AI agents.
- **30 minutes** of AI model usage per month (limited-time offer)
- Access to basic AI models
- Create and deploy agents with no-code builder
- Single-user account
- Managed cloud deployment
### Pro Plan
Built for individual power users.
- **$20/month**
- **$20 of AI credits** included each month
- Additional usage billed at cost plus 10% markup
- Access to all premium AI models
- All Free plan features included
- Document & GitHub Vector Stores
- Single-user account
- Managed cloud deployment
- Email support
### Team Plan
Designed for teams collaborating on AI agents. (Coming soon)
- Contact sales for pricing
- All Pro plan features included
- Team collaboration with multiple users
- Member invitation and role management
- Advanced team administration
- Priority email support
## Monthly AI Model Usage Details
Each Giselle subscription includes monthly AI credits:
- **Free Plan:** Limited-time offer of 30 minutes of AI usage per month. Once the monthly limit is reached, AI usage pauses until the next billing cycle.
- **Pro Plan:** Includes $20 of AI credits each month. Additional usage beyond the included credits is billed at cost plus 10% markup.
AI model usage credits are refreshed monthly and unused credits do not roll over.
## Vector Store Quotas
Each plan has limits on the number of Vector Stores you can create and GitHub Repositories you can register.
### Quotas by Plan
| Plan | Document Vector Stores | GitHub Repositories |
|------|----------------------|-------------------|
| Free | Unavailable | Unavailable |
| Pro | Up to 5 | Up to 3 |
| Team | Up to 20 | Up to 10 |
- **Document Vector Stores**: Upload PDF, TXT, and Markdown files to build knowledge bases that can be utilized in your AI workflows
- **GitHub Repositories**: Ingest code, Issues, and Pull Requests from GitHub repositories to make them searchable
For more details about Vector Stores, see [Vector Stores Settings](/en/guides/settings/team/vector-stores).
### Managing Plan Limits
#### Free Plan
- To use Vector Stores, you need to upgrade to the Pro or Team plan
#### Pro Plan
- **Document Vector Stores**: When you reach the 5-store limit, you can delete existing Vector Stores or consider upgrading to the Team plan
- **GitHub Repositories**: When you reach the 3-repository limit, you can delete existing repositories or consider upgrading to the Team plan
#### Team Plan
- **Document Vector Stores**: When you reach the 20-store limit, you need to delete existing Vector Stores
- **GitHub Repositories**: When you reach the 10-repository limit, you need to delete existing repositories
## Plan Changes & Billing Information
### Upgrading from Free to Pro
- When upgrading, Free plan unused usage is discarded.
- Pro plan benefits become immediately available upon upgrade.
### Downgrading from Pro to Free
- Downgrades take effect at the end of the current billing cycle.
- Pro benefits remain available until the downgrade takes effect.
### Team Membership
- **Free Plan:** Limited to a single user, with membership to only one Free team.
- **Pro Plan:** Single-user account. Allows multiple team memberships but each team is limited to one user.
- **Team Plan:** Allows multiple team memberships with unlimited team size. Contact sales for pricing details.
### Additional Usage Costs (Pro Plan)
- Pro plan users exceeding the $20 monthly AI credits incur additional charges at cost plus 10% markup, billed automatically at the next subscription payment cycle.
---
For detailed pricing and further information, visit the [Giselle Pricing page](https://giselles.ai/pricing) or contact support@giselles.ai.
# Privacy & Security (/en/guides/learn-about/privacy-security)
---
title: 'Privacy & Security'
description: 'Manage your account security and privacy settings'
---
A guide to Giselle’s privacy settings, data handling, security practices, and our commitment to information protection.
Giselle is developed and operated by [ROUTE06, Inc.](https://route06.com), a company that has obtained **ISO/IEC 27001:2013 (JIS Q 27001:2014)** [certification(IS 779274)](https://www.bsigroup.com/en-US/products-and-services/assessment-and-certification/validation-and-verification/client-directory-profile/ROUTE0-0047877345-000) for its **Information Security Management System (ISMS)**. This means your data is protected not only by modern infrastructure and encryption standards but also by strict organizational policies that meet global compliance benchmarks.
---
## Quick Links
- [Privacy Policy](https://giselles.ai/legal/privacy)
- [Terms of Service](https://giselles.ai/legal/terms)
- [Billing Portal](https://studio.giselles.ai/settings/team/billing)
- [ROUTE06 ISMS Certification Announcement](https://route06.com/news/isms)
---
## ISMS Certification
ROUTE06 is officially certified under the **ISO/IEC 27001** standard by **BSI Group Japan K.K.**
- **Certification ID**: IS 779274
- **Scope**: Enterprise software provision, digital product design and development, DX consulting, and more
- **Date of Initial Certification**: February 12, 2023
> This certification demonstrates ROUTE06’s commitment to **confidentiality, integrity, and availability** of data. We continually monitor and improve our systems to maintain high standards of information security.
---
## Security Overview
Giselle benefits from ROUTE06’s ISMS-backed security infrastructure, including:
### Organizational Security
- ISMS certification under **ISO/IEC 27001:2013**
- Role-based access control for internal staff
- Regular audits, internal self-assessments, and third-party penetration tests
### Administrative Measures
- Confidentiality agreements and security training for employees
- Defined procedures for incident reporting and escalation
- Data protection roles clearly defined
### Technical Safeguards
- TLS encryption in transit
- Strict access controls and API rate limiting
- Secure cloud infrastructure (AWS, Supabase, Vercel)
### Physical Safeguards
- Secure facilities via our cloud providers
- Hardware and device-level protection policies for remote-first teams
---
Submit requests via your account or by emailing support@giselles.ai.
# Usage (/en/guides/learn-about/usage)
---
title: Usage
description: Monitor and manage your team's resource usage
---
## Usage Overview
Giselle monitors and manages your team's use of its features and resources to ensure optimal performance and availability.
### Resource Metrics
Giselle internally tracks detailed metrics related to AI model utilization, distinguishing between Free and Pro plan allocations.
## Usage Limits
Each subscription plan has defined usage limits to maintain consistent service levels.
### Current Plan Limits
Subscription plans include:
- **Free plan**: Limited-time offer of 30 minutes of AI model usage
- **Pro plan**: $20/month with $20 of AI credits included each month. Additional usage is billed at cost plus 10% markup
- **Team plan**: Contact sales for pricing. All Pro plan features plus team collaboration capabilities
- **Team member seats**: 1 user for Free and Pro plans; multiple users available with Team plans (contact sales for pricing)
## Usage Reports
Giselle generates detailed internal reports on resource usage for analysis and planning.
## Usage Monitoring
Giselle regularly reviews usage data to ensure accuracy. The usage information displayed in the system is updated throughout the day, but discrepancies may occur due to API issues or other technical factors affecting the AI model.
If Giselle detects significant inconsistencies or unusual patterns in your usage data, the support team may contact you directly. Likewise, if you notice any discrepancies or have questions about your reported usage, please don't hesitate to reach out to the support team at support@giselles.ai.
Giselle is continuously improving its monitoring systems to provide you with the most accurate and up-to-date information possible.
# Anthropic (/en/models/providers/anthropic)
---
title: Anthropic
description: 'Available Anthropic AI Models Overview.'
---
## Claude Models
The following Claude models are available in the Anthropic workspace. Each model offers specific capabilities and features tailored to match your use case requirements. The "Reasoning" (Extended Thinking) capability is supported in Giselle for applicable models.
| Models | Generate Text | Web Search | Reasoning | Input PDF | Input Image | Context Window | Max Output | Plan@Giselle |
| :--- | :--- | :--- | :--- | :--- | :--- | :--- | :--- | :--- |
| **claude-opus-4.6** | ✅ | ✅ | ✅ | ✅ | ✅ | 1M tokens | 128k tokens | Pro |
| **claude-opus-4.5** | ✅ | ✅ | ✅ | ✅ | ✅ | 200k tokens | 32k tokens | Pro |
| **claude-sonnet-4.5** | ✅ | ✅ | ✅ | ✅ | ✅ | 200k tokens | 64k tokens | Pro |
| **claude-sonnet-4.6** | ✅ | ✅ | ✅ | ✅ | ✅ | 1M tokens | 64k tokens | Pro |
| **claude-haiku-4.5** | ✅ | ✅ | ✅ | ✅ | ✅ | 200k tokens | 64k tokens | Free |
Please note that some features may not be available within Giselle even if they are offered in the official API. Extended thinking mode and other Anthropic API features will be gradually implemented within Giselle.
### claude-opus-4.6
Claude Opus 4.6 is Anthropic's most intelligent model, purpose-built for building agents and coding. It delivers state-of-the-art performance on agentic coding tasks, deep search, financial analysis, and legal reasoning. The model features enhanced planning capabilities, stronger error detection in code reviews, and more reliable operation in larger codebases. With a 1M token context window and up to 128k output tokens, Opus 4.6 significantly reduces "context rot" performance degradation in long conversations. It supports text, PDF, and image inputs, and its reasoning capability makes it particularly powerful for multi-step thought processes.
### claude-opus-4.5
Claude Opus 4.5 is Anthropic's newest and most capable model, described as "intelligent, efficient, and the best model in the world for coding, agents, and computer use." It achieves state-of-the-art performance on SWE-bench Verified and leads on 7 of 8 programming languages in SWE-bench Multilingual, with a 10.6% improvement over Sonnet 4.5 on Aider Polyglot benchmarks. The model excels at multi-step reasoning tasks that combine information retrieval, tool use, and deep analysis. With improved vision, mathematics skills, and agentic capabilities, Opus 4.5 handles ambiguity and reasons about tradeoffs effectively. It features a 200k token context window and supports text, PDF, and image inputs.
### claude-sonnet-4.5
Claude Sonnet 4.5 is one of Anthropic's latest and most powerful models, offering balanced high performance. It excels at complex coding tasks, advanced reasoning, and content generation, delivering frontier-level performance with an optimal cost-performance balance. It features a 200k token context window, can output up to 64k tokens, and supports text, PDF, and image inputs. The reasoning capability makes it particularly powerful for tasks requiring multi-step thought processes.
### claude-sonnet-4.6
Claude Sonnet 4.6 is the latest model in the Sonnet series, featuring a 1 million token context window and up to 64k output tokens. It supports text, PDF, and image inputs, with configurable temperature and thinking (extended thinking) settings in Giselle. Well-suited for workflows that handle long documents or conversations, and tasks requiring a balance of coding and reasoning capabilities. Requires a Pro plan.
### claude-haiku-4.5
Claude Haiku 4.5 is optimized for speed and cost-efficiency while also supporting reasoning capabilities. It handles rapid text generation, PDF and image inputs, making it ideal for scenarios requiring real-time responsiveness. With a 200k token context window and the ability to output up to 64k tokens, it balances fast interactions with detailed responses. The extended thinking capability enables it to handle complex tasks as well.
## Model Selection Guide
Guidelines for selecting the optimal Claude model:
* **For the most intelligent agents, coding, and complex reasoning**: `claude-opus-4.6`
* **For advanced coding, agents, and creative tasks**: `claude-opus-4.5`
* **For large context and balanced high-performance (latest Sonnet)**: `claude-sonnet-4.6`
* **For balanced high-performance, everyday coding, and cost-effective workflows**: `claude-sonnet-4.5`
* **For speed, cost-efficiency, with reasoning capabilities**: `claude-haiku-4.5`
## Practices for Giselle
We recommend `claude-opus-4.6`, `claude-sonnet-4.6` (when a 1M context is needed), or `claude-sonnet-4.5` as your primary models in Giselle, especially for tasks involving advanced coding, complex problem-solving, and in-depth analysis. These models feature hybrid reasoning modes, automatically switching between instant responses and extended thinking based on task complexity.
`claude-haiku-4.5` excels at speed and cost-efficiency while also supporting reasoning capabilities, making it capable of handling complex thought processes even when fast responses are needed. These models excel not only at code generation, architectural design, and technical reviews but also produce remarkably natural text. Their "Reasoning" (Extended Thinking) capability, supported in Giselle, makes them particularly powerful for tasks requiring multi-step thought processes. These versatile models can be effectively utilized across a broad spectrum of tasks, from creating engaging blog articles to writing complex code implementations and performing detailed analytical work.
### Anthropic Web Search Tool
For supported Claude models, Giselle integrates the Anthropic Web Search tool, which can be configured directly from a Generator Node's **Tools** tab. This feature allows Claude to access real-time information from the web, enabling it to answer questions and generate content based on the most up-to-date data, complete with source citations.
#### Configuration
In the Generator Node, navigate to the **Tools** tab and click **Configure** next to "Anthropic Web Search." You can then:
* **Enable Tool**: Toggle the web search functionality on or off.
* **Set Maximum Uses**: Limit the number of web searches the model can perform in a single run (from 1 to 10).
* **Filter Domains**: Control the search scope by either:
* **Allowing Specific Domains**: Restricting searches to a whitelist of trusted sources.
* **Blocking Specific Domains**: Excluding certain websites from the search results.
For detailed specifications, performance benchmarks, or additional assistance, please refer to the [Anthropic API Documentation](https://docs.anthropic.com/en/docs/about-claude/models/all-models) and the [Claude Opus 4.6 announcement](https://www.anthropic.com/news/claude-opus-4-6).
# fal.ai (/en/models/providers/fal)
---
title: fal.ai
description: 'Overview of Available fal.ai Image Generation Models.'
---
## fal.ai Image Generation Models
> **Note:** fal.ai models are currently only available in the Open Source version of Giselle.
The following image generation models are available in the fal.ai workspace. Each model provides distinct features suited to different use cases, balancing speed, detail, and artistic fidelity.
| Models | Text-to-Image | Speed | Detail & Fidelity | Typography | Inference Steps | Safety Checker | Plan@Giselle |
|------------------------------------|---------------|-----------|-------------------|------------|-----------------|----------------|----------------|
| flux-pro/v1.1 | ✅ | ⚡️ High | ⭐️⭐️⭐️⭐️⭐️ | ✅ | Optimized | ✅ (Tolerance levels 1-6) | Free |
| flux/schnell | ✅ | ⚡️⚡️ Turbo | ⭐️⭐️⭐️⭐️ | ✅ | 1-4 steps | ✅ | Pro |
| stable-diffusion-v3-medium | ✅ | Moderate | ⭐️⭐️⭐️⭐️⭐️ | ✅ (Enhanced) | Default 28 steps | ✅ | Pro |
Please note that some features may not be available within Giselle even if they are offered in the official API.
### flux-pro/v1.1
Enhanced version of FLUX.1, offering superior composition, detail, and artistic fidelity. With significantly accelerated speeds (up to 10x), it provides excellent results for professional-grade visual content. Includes adjustable safety tolerance levels, detailed typography support, and optimized inference steps for efficiency.
### flux/schnell
A highly efficient 12-billion-parameter model, optimized for extremely fast image generation (1-4 steps). Ideal for use-cases requiring rapid image production without significant compromise on quality. Suitable for both personal and commercial purposes, with built-in safety checking.
### stable-diffusion-v3-medium
An advanced Multimodal Diffusion Transformer (MMDiT) model that significantly improves image quality, typography handling, prompt comprehension, and overall efficiency. Provides excellent balance between quality and speed with enhanced typography capabilities and standard inference steps.
## Model Selection Guide
Guidelines for selecting the optimal fal.ai model:
- **For highest artistic fidelity and professional results**: flux-pro/v1.1
- **For fastest image generation**: flux/schnell
- **For balanced image quality, typography, and efficiency**: stable-diffusion-v3-medium
## Practices for Giselle
We recommend flux-pro/v1.1 as your primary choice when exceptional detail, artistic accuracy, and overall superior image quality are essential. For real-time applications or projects requiring quick visual feedback, flux/schnell provides the necessary speed. When needing a versatile balance of quality, efficiency, and typographic precision, stable-diffusion-v3-medium is highly recommended.
For detailed specifications, integration guides, and further assistance, please refer to the [fal.ai API Documentation](https://fal.ai/models).
# Google (/en/models/providers/google)
---
title: Google
description: 'Available Google AI Models Overview.'
---
## Gemini
The following Gemini models are available in the Giselle workspace. Each model offers specific capabilities and features to match your use case requirements.
| Models | Generate Text | Web Search | Reasoning | Input PDF | Input Image | Input Audio | Input Video | Context Window | Plan@Giselle |
| --------------------------------- | --------------| ------------ | ----------- | ----------- | ------------- | ------------ | ------------ | ----------------- | --------------- |
| gemini-3.1-pro-preview | ✅ | ✅ | ✅ | ✅ | ✅ | ✅ | ✅ | 1M tokens | Pro |
| gemini-3-flash-preview | ✅ | ✅ | ✅ | ✅ | ✅ | ✅ | ✅ | 1M tokens | Pro |
| gemini-3-pro-preview | ✅ | ✅ | ✅ | ✅ | ✅ | ✅ | ✅ | 1M tokens | Pro |
| gemini-2.5-pro | ✅ | ✅ | ✅ | ✅ | ✅ | ✅ | ✅ | 1M tokens (2M soon) | Pro |
| gemini-2.5-flash | ✅ | ✅ | ✅ | ✅ | ✅ | ✅ | ✅ | 1M tokens | Pro |
| gemini-2.5-flash-lite | ✅ | ✅ | ✅ | ✅ | ✅ | ✅ | ✅ | 1M tokens | Free |
*Note: Some features may not be available within Giselle even if they are offered in the Google official API. Features marked 'Free' or 'Pro' refer to the Giselle subscription plan required to access them.*
### gemini-3.1-pro-preview
Gemini 3.1 Pro Preview is an upgrade to Gemini 3 Pro Preview, with improved SWE/agentic capabilities, better token efficiency, and expanded thinking level controls (`low`, `medium`, `high`, default: `high`). It supports text generation, web search, reasoning, and multimodal inputs (PDF, images, audio, video), as well as URL context. With a 1 million token context window and approximately 65K max output tokens, it is designed for complex tasks requiring deep analytical thinking. Requires a Pro plan.
### gemini-3-flash-preview
The latest Gemini 3 Flash model, combining Pro-level intelligence with the speed and pricing of Flash. It uses dynamic thinking by default to reason through prompts, with configurable thinking levels (`minimal`, `low`, `medium`, `high`) to control latency and reasoning depth. Supports text generation, web search, advanced reasoning, and multimodal inputs (PDF, images, audio, video). With a 1 million token context window and 64K max output tokens, it's ideal for complex tasks requiring both speed and analytical depth. Requires a Pro plan.
### gemini-3-pro-preview
The latest Gemini 3 series preview model, offering enhanced reasoning capabilities and improved performance. It supports text generation, web search, advanced reasoning, and multimodal inputs (PDF, images, audio, video). With a 1 million token context window, it's designed for complex tasks requiring deep analytical thinking. Requires a Pro plan.
### gemini-2.5-pro
The next-generation comprehensive model. It provides state-of-the-art capabilities, including text generation, web search, advanced reasoning, and robust coding features. It supports a wide range of input formats (PDF, images, audio, video) and has a 1 million token context window (expansion to 2 million tokens planned). Ideal for users wanting to experiment with the latest advancements for complex problems and deep multimodal understanding. Requires a Pro plan.
### gemini-2.5-flash
The next-generation Flash model, optimized for speed *and* reasoning. It offers fast text generation, web search, reasoning capabilities, and supports various inputs (PDF, images, audio, video). With a 1 million token context window, it's ideal for tasks requiring quick responses combined with analytical depth and multimodal understanding. Requires a Pro plan.
### gemini-2.5-flash-lite
The next-generation Flash Lite model, `gemini-2.5-flash-lite` is designed for maximum efficiency and the quickest possible responses. It supports text generation, web search, and multimodal inputs (PDF, image, audio, video). With a 1M token context window, it's ideal for high-throughput tasks and applications where immediate feedback is paramount. Available on the Free plan.
## Image Generation Models
These models are specialized in generating images from text and image inputs.
### gemini-2.5-flash-image
Gemini 2.5 Flash Image is Google's image generation model optimized for image understanding and generation, offering a balance of price and performance. It accepts both text and image inputs and produces image outputs.
* **Inputs:** Text, Image
* **Outputs:** Image
* **Maximum images per prompt:** 3
* **Maximum output images:** 10
* **Context Window:** 32,768 tokens
* **Max Output Tokens:** 32,768 tokens
* **Supported image formats:** PNG, JPEG, WebP, HEIC, HEIF
* **Supported aspect ratios:** 1:1, 3:2, 2:3, 3:4, 4:3, 4:5, 5:4, 9:16, 16:9, 21:9
* **Availability:** Pro Plan
### gemini-3.1-flash-image-preview
Gemini 3.1 Flash Image Preview is a preview image generation model that delivers improved text rendering accuracy and image quality at Flash-tier speed and pricing. It accepts text and image inputs and produces image outputs.
* **Pricing (reference):** Input $0.50 / Output $60.00 per 1M tokens (based on [Gemini Developer API pricing](https://ai.google.dev/gemini-api/docs/pricing))
* **Inputs:** Text, Image
* **Outputs:** Image
* **Availability:** Pro Plan
> **Note:** The stable (non-preview) image model `gemini-2.5-flash-image` remains available as the default option.
## Model Selection Guide
Guidelines for selecting the optimal model based on your needs and plan:
**Free Plan Models:**
* **For extremely fast responses and efficiency**: `gemini-2.5-flash-lite` (Maximum speed)
**Pro Plan Models:**
* **For cutting-edge 3.1 preview with expanded thinking**: `gemini-3.1-pro-preview` (SWE/agentic improvements, thinking `low` / `medium` / `high`)
* **For Pro-level intelligence at Flash speed**: `gemini-3-flash-preview` (Latest 3-series Flash, dynamic thinking)
* **For cutting-edge reasoning and complex tasks**: `gemini-3-pro-preview` (Enhanced reasoning)
* **For proven stability and comprehensive features**: `gemini-2.5-pro` (Stable, full-featured)
* **For fast responses with reasoning**: `gemini-2.5-flash` (Speed + Reasoning balance)
* **For image generation and editing (latest preview)**: `gemini-3.1-flash-image-preview` (Improved text rendering and quality)
* **For image generation and editing (stable)**: `gemini-2.5-flash-image` (Text-to-image, image editing)
## Practices for Giselle
We recommend `gemini-2.5-pro` (Pro plan) as your primary model in Giselle due to its proven power and stability for complex tasks. It is capable of processing large volumes of data, executing complex code reviews, and handling a wide variety of business tasks.
For users prioritizing speed on the Free plan, `gemini-2.5-flash-lite` is an excellent option. Pro users seeking a balance of speed and reasoning might consider the `gemini-2.5-flash`.
By enabling the **Search grounding** feature with these models (where applicable), you can access web search functionality, allowing you to supplement your workflows with the most current information available.
For image generation needs, the latest preview **gemini-3.1-flash-image-preview** and the stable **gemini-2.5-flash-image** are available. Gemini 2.5 Flash Image supports multiple aspect ratios and can process up to 3 images per prompt while generating up to 10 output images.
For detailed specifications, performance benchmarks, or additional assistance, please check [Google AI for Developers](https://ai.google.dev/gemini-api/docs/models).
# OpenAI (/en/models/providers/openai)
---
title: OpenAI
description: 'Overview of available OpenAI Models within the Giselle workspace.'
---
Explore the OpenAI models available in the Giselle workspace. These models are categorized based on their primary strengths and use cases, reflecting OpenAI's platform structure.
## Quick Comparison
The following table summarizes the key features of the OpenAI models available in Giselle.
| Models | Generate Text | Input Image | Web Search | Reasoning | Context Window | Max Output Tokens | Pricing (Input/Output per 1M tokens) | Availability |
|---|---|---|---|---|---|---|---|---|
| gpt-5.4 | ✅ | ✅ | ✅ | ✅ (Highest) | 1.05M tokens | 128k tokens | $2.50 / $15.00 | Pro |
| gpt-5.3-codex | ✅ | ✅ | ✅ | ✅ (Highest) | 400k tokens | 128k tokens | $1.75 / $14.00 | Pro |
| gpt-5.2 | ✅ | ✅ | ✅ | ✅ (Highest) | 400k tokens | 128k tokens | $1.75 / $14.00 | Pro |
| gpt-5.2-codex | ✅ | ✅ | ✅ | ✅ (Highest) | 400k tokens | 128k tokens | $1.75 / $14.00 | Pro |
| gpt-5.1-thinking | ✅ | ✅ | ✅ | ✅ (Highest) | 400k tokens | 128k tokens | $1.25 / $10.00 | Pro |
| gpt-5.1-codex | ✅ | ✅ | ✅ | ✅ (Highest) | 400k tokens | 128k tokens | $1.25 / $10.00 | Pro |
| gpt-5 | ✅ | ✅ | ✅ | ✅ (Highest) | 400k tokens | 128k tokens | $1.25 / $10.00 | Pro |
| gpt-5-mini | ✅ | ✅ | ✅ | ✅ (High) | 400k tokens | 128k tokens | $0.25 / $2.00 | Pro |
| gpt-5-nano | ✅ | ✅ | ❌ | ✅ (Medium) | 400k tokens | 128k tokens | $0.05 / $0.40 | Free |
| gpt-image-1 | ❌ | ✅ | ❌ | ❌ | Unknown | N/A | $5.00 / $40.00 | Open Source |
*Please note that some features listed (like specific API functionalities e.g., fine-tuning, batch processing, specific tool use like audio or transcription) may not be directly exposed or available within the Giselle interface even if supported by the underlying OpenAI model.*
## GPT-5.4
GPT-5.4 is a model in the OpenAI GPT-5 family, featuring an approximately 1.05 million token context window and up to 128k output tokens. It supports configurable reasoning effort (`none`, `low`, `medium`, `high`, `xhigh`) and text verbosity (`low`, `medium`, `high`) for general-purpose and agentic workflows. The default reasoning effort is `none` for lower-latency interactions.
### gpt-5.4
* **Key Features:** Large context window, advanced reasoning options, multimodal input (text, image), web search
* **Context Window:** ~1,050,000 tokens (based on OpenAI official specification)
* **Max Output Tokens:** 128,000 tokens
* **Inputs:** Text, Image
* **Reasoning Effort:** `none` (default), `low`, `medium`, `high`, `xhigh`
* **Text Verbosity:** `low`, `medium` (default), `high`
* **Availability:** Pro Plan
## GPT-5.3 Series Models
GPT-5.3-Codex combines the coding performance of GPT-5.2-Codex with the reasoning capabilities of the GPT-5.2 series. It is designed for long-horizon agentic coding and is available at the same pricing as GPT-5.2-Codex (input $1.75 / output $14.00 per 1M tokens).
### gpt-5.3-codex
* **Key Features:** Agentic coding, reasoning, image input, text generation, optional search grounding
* **Context Window:** 400,000 tokens
* **Max Output Tokens:** 128,000 tokens
* **Inputs:** Text, Image
* **Reasoning Effort:** `low`, `medium`, `high`, `xhigh`
* **Text Verbosity:** `medium` (fixed)
* **Availability:** Pro Plan
## GPT-5.2 Series Models
GPT-5.2 is OpenAI's best general-purpose model, part of the GPT-5 flagship model family. It is the most intelligent model yet for both general and agentic tasks, showing significant improvements over the previous GPT-5.1 in general intelligence, instruction following, accuracy and token efficiency, multimodality (especially vision), code generation (especially front-end UI creation), tool calling and context management, and spreadsheet understanding and creation.
### gpt-5.2
GPT-5.2 is OpenAI's flagship model for coding and agentic tasks across industries. It replaces the previous GPT-5.1 model and delivers state-of-the-art performance in complex reasoning, broad world knowledge, and code-heavy or multi-step agentic tasks. The model supports configurable reasoning effort levels (`none`, `low`, `medium`, `high`, `xhigh`) with `none` as the default for lower-latency interactions, and text verbosity control (`low`, `medium`, `high`) with `medium` as the default.
* **Key Features:** Enhanced general intelligence, superior instruction following, improved vision capabilities, advanced code generation, configurable reasoning effort (including `xhigh` for deepest reasoning)
* **Context Window:** 400,000 tokens
* **Max Output Tokens:** 128,000 tokens
* **Knowledge Cutoff:** August 31, 2025
* **Inputs:** Text, Image
* **Reasoning Effort:** `none` (default), `low`, `medium`, `high`, `xhigh`
* **Text Verbosity:** `low`, `medium` (default), `high`
* **Availability:** Pro Plan
### gpt-5.2-codex
GPT-5.2-Codex is an upgraded version of GPT-5.2 optimized for long-horizon, agentic coding tasks. It is OpenAI's most intelligent coding model, designed for use in Codex or similar coding environments. GPT-5.2-Codex supports reasoning effort levels (`low`, `medium`, `high`, `xhigh`) for controlling the depth of reasoning, with text verbosity restricted to `medium` only to ensure optimal code output quality.
* **Key Features:** Optimized for agentic coding, long-horizon tasks, enhanced code generation, reasoning token support
* **Context Window:** 400,000 tokens
* **Max Output Tokens:** 128,000 tokens
* **Knowledge Cutoff:** August 31, 2025
* **Inputs:** Text, Image
* **Reasoning Effort:** `low`, `medium`, `high`, `xhigh`
* **Text Verbosity:** `medium` (fixed)
* **Availability:** Pro Plan
## GPT-5.1 Series Models
The GPT-5.1 series represents the latest evolution of OpenAI's GPT-5 models, delivering meaningful improvements in both intelligence and communication style. These models are smarter and more natural in tone, with enhanced instruction following capabilities.
### gpt-5.1-thinking
GPT-5.1 Thinking is OpenAI's advanced reasoning model, designed for complex problem-solving tasks. It features **adaptive thinking time**—spending more time on complex problems while responding more quickly to simpler ones. This results in more thorough answers for difficult requests and less waiting for simpler ones. The model's responses are clearer, with less jargon and fewer undefined terms, making it more approachable for complex tasks at work and explaining technical concepts.
* **Key Features:** Adaptive reasoning, clearer explanations, improved math and coding performance
* **Context Window:** 400,000 tokens
* **Max Output Tokens:** 128,000 tokens
* **Inputs:** Text, Image
* **Availability:** Pro Plan
### gpt-5.1-codex
GPT-5.1 Codex is specialized for coding and software development tasks. Building on GPT-5.1's improvements in intelligence and instruction following, it provides enhanced code generation, debugging, refactoring, and technical documentation capabilities. This model is the optimal choice for developers and engineering workflows requiring precise, reliable code output.
* **Key Features:** Enhanced code generation, improved debugging, better instruction following
* **Context Window:** 400,000 tokens
* **Max Output Tokens:** 128,000 tokens
* **Inputs:** Text, Image
* **Availability:** Pro Plan
## GPT-5 Series Models
The GPT-5 series offers a range of models balancing performance, speed, and cost-efficiency for various use cases.
### gpt-5
GPT-5 is OpenAI's flagship model, setting a new standard for coding, complex reasoning, and agentic tasks across various domains. It features built-in expert-level intelligence and a deeper reasoning engine, making it exceptionally capable for multi-step problems, technical writing, and analyzing text, code, and images. It supports web search functionality.
* **Context Window:** 400,000 tokens
* **Max Output Tokens:** 128,000 tokens
* **Knowledge Cutoff:** October 1, 2024
* **Inputs:** Text, Image
* **Availability:** Pro Plan
### gpt-5-mini
GPT-5 mini is a faster, more cost-efficient version of GPT-5, optimized for well-defined tasks. It balances intelligence, speed, and affordability while maintaining strong reasoning capabilities. It supports image inputs and web search, making it a versatile choice for many common use cases.
* **Context Window:** 400,000 tokens
* **Max Output Tokens:** 128,000 tokens
* **Knowledge Cutoff:** May 31, 2024
* **Inputs:** Text, Image
* **Availability:** Pro Plan
### gpt-5-nano
GPT-5 nano is the fastest and most cost-effective model in the GPT-5 series. It is designed for high-throughput tasks like summarization and classification, providing quick and efficient performance. It supports text and image inputs but does not include web search functionality.
* **Context Window:** 400,000 tokens
* **Max Output Tokens:** 128,000 tokens
* **Knowledge Cutoff:** May 31, 2024
* **Inputs:** Text, Image
* **Availability:** Free Plan
## Image Generation Models
These models are specialized in generating high-quality images from text and image inputs.
### gpt-image-1
OpenAI's state-of-the-art image generation model. It is a natively multimodal language model that accepts both text and image inputs and produces image outputs. The model offers different quality levels (Low, Medium, High) and supports various image dimensions, allowing for flexible generation based on use case requirements.
> **Note**: This model is currently available only on the Open Source plan.
* **Pricing:** Input text: $5.00 per 1M tokens, Input images: $10.00 per 1M tokens, Output images: $40.00 per 1M tokens
* **Quality Options:** Low, Medium, High
* **Supported Dimensions:** 1024x1024, 1024x1536, 1536x1024
* **Knowledge Cutoff:** April 2025 (estimate based on release date)
* **Inputs:** Text, Image
* **Outputs:** Image
* **Availability:** Open Source
## Model Selection Guide
Guidelines for selecting the optimal OpenAI model within Giselle:
* **For the largest context and latest GPT-5 generation**: `gpt-5.4` (Pro)
* **For best overall performance, coding, agentic tasks, and highest reasoning**: `gpt-5.2` (Pro) - OpenAI's most capable model
* **For long-horizon agentic coding (latest Codex)**: `gpt-5.3-codex` (Pro)
* **For long-horizon agentic coding tasks**: `gpt-5.2-codex` (Pro) - OpenAI's most intelligent coding model
* **For deep reasoning and complex problem-solving**: `gpt-5.1-thinking` (Pro)
* **For coding and software development**: `gpt-5.1-codex` (Pro)
* **For reliable general-purpose tasks**: `gpt-5` (Pro)
* **For a faster, cost-efficient version of GPT-5 for well-defined tasks**: `gpt-5-mini` (Pro)
* **For the fastest, most cost-effective version of GPT-5 for summarization and classification**: `gpt-5-nano` (Free)
* **For high-quality image generation from text or image inputs**: `gpt-image-1` (Pro)
## Practices for Giselle
For Pro users, we recommend **gpt-5.4** when an approximately 1.05M token context is needed, and **gpt-5.2** for other general-purpose workloads as the primary model in Giselle. GPT-5.2 is one of OpenAI's most capable models, offering state-of-the-art performance in general intelligence, instruction following, accuracy, multimodality (especially vision), code generation, tool calling, and spreadsheet understanding. GPT-5.2 is designed to be highly reliable and accurate, with 30% fewer errors compared to GPT-5.1 Thinking.
**Configuring GPT-5.4:**
* **Reasoning Effort:** `none` (default), `low`, `medium`, `high`, `xhigh`. Use `none` for low-latency interactions, and `medium` or higher for deeper reasoning.
* **Text Verbosity:** `low`, `medium` (default), `high` to control output length.
**Configuring GPT-5.2:**
* **Reasoning Effort:** GPT-5.2 supports five reasoning effort levels: `none` (default), `low`, `medium`, `high`, and `xhigh`. Use `none` for low-latency interactions, and increase to `medium` or higher for tasks requiring deeper reasoning. The new `xhigh` level provides the deepest reasoning for complex problems.
* **Text Verbosity:** Control output length with `low`, `medium` (default), or `high`. Use `low` for concise answers and simple code generation (like SQL queries), and `high` for thorough explanations and extensive code refactoring.
For users who need proven stability, **gpt-5** remains an excellent choice with strong overall performance, coding, and agentic capabilities.
For Pro users requiring a balance of speed and cost-efficiency for well-defined tasks, **gpt-5-mini** is an excellent choice, maintaining strong reasoning and multimodal capabilities.
For Free plan users or those prioritizing the fastest and most cost-effective solution for high-throughput tasks like summarization and classification, **gpt-5-nano** is the recommended model.
**Automatic Fallback for Deprecated Models:**
Giselle now automatically maps previously available OpenAI models to the new GPT-5 series to ensure a seamless transition for existing workflows.
* **Models now mapping to `gpt-5` (Pro)**: `gpt-4o`, `o3`, `gpt-4.1`, `o1`, `gpt-4-turbo`, `gpt-4`, `gpt-3.5-turbo`
* **Models now mapping to `gpt-5-mini` (Pro)**: `o4-mini`, `gpt-4.1-mini`, `o3-mini`, `o1-mini`, `gpt-4o-mini`
* **Models now mapping to `gpt-5-nano` (Free)**: `gpt-4.1-nano`
For image generation needs, **gpt-image-1** provides high-quality results and supports both text and image inputs. The model offers different quality tiers to balance cost and detail based on specific requirements.
For developers and teams working on complex, long-horizon coding projects, **gpt-5.3-codex** or **gpt-5.2-codex** are well-suited choices. They are specifically optimized for agentic coding tasks in Codex-like environments, with text verbosity fixed to `medium`. GPT-5.3-Codex is available at the same pricing as GPT-5.2-Codex.
By combining these models in workflows, you can leverage their specific strengths. For example, use `gpt-5.4` for tasks requiring a large context, `gpt-5.2` for state-of-the-art reasoning and general capabilities, `gpt-5.3-codex` or `gpt-5.2-codex` for agentic coding tasks, `gpt-5-mini` for cost-efficient tasks, or `gpt-5-nano` for rapid, high-volume operations.
For detailed specifications and the full range of models offered directly by OpenAI, please check the [Official OpenAI Documentation](https://platform.openai.com/docs/models).
# Overview (/en/models/providers/overview)
---
title: Overview
description: 'AI Model Providers.'
---
This document provides an overview of the AI providers available through Giselle's Generator Nodes. Giselle integrates with multiple AI providers' APIs to offer you a diverse range of capabilities for your workflows.
## Provider Overview
### Anthropic
Anthropic focuses on developing AI systems that are reliable, interpretable, and steerable. Their Claude models are designed with an emphasis on helpfulness, harmlessness, and honesty, making them excellent for applications requiring nuanced understanding and safe outputs.
**Key models:**
- Claude Opus 4.6 - Most intelligent model for building agents and coding (1M context)
- Claude Opus 4.5 - Advanced coding powerhouse with complex reasoning capabilities
- Claude Sonnet 4.6 - Latest Sonnet model (1M context, balanced)
- Claude Sonnet 4.5 - Balanced high-performance model with latest reasoning features
- Claude Haiku 4.5 - Cost-efficient model with speed and reasoning capabilities (available on Free plan)
### Google AI
Google's Gemini models represent their most capable and versatile AI systems. These models excel at multimodal tasks and offer extensive context windows, making them suitable for complex, context-rich applications and varied input types.
**Key models:**
- Gemini 3.1 Pro Preview - Upgraded Gemini 3 Pro with SWE/agentic improvements and expanded thinking
- Gemini 3 Flash Preview - Pro-level intelligence at Flash speed and pricing
- Gemini 2.5 Pro - Stable, comprehensive model with multimodal capabilities and web search
- Gemini 2.5 Flash - Speed and reasoning balance
- Gemini 2.5 Flash Lite - Lightweight model for Free plan
- Gemini 3.1 Flash Image Preview - Latest image generation preview model
- Gemini 2.5 Flash Image - Stable image generation and editing model
### OpenAI
OpenAI provides a range of powerful models with particular strengths in code generation, creative content, and structured outputs. Their models feature robust function calling capabilities and strong performance across diverse domains.
**Key models:**
- GPT-5.4 - Latest model with advanced reasoning options
- GPT-5.3-codex - Latest Codex coding model
- GPT-5.2 - Flagship model for general-purpose tasks
- GPT-5.2-codex - Long-horizon agentic coding model
- GPT-5 - Reliable general-purpose model
- GPT-5-mini - Cost-efficient lightweight model
- GPT-5-nano - Fast, low-cost model available on Free plan
### Fal AI
Fal AI focuses on image generation models that balance quality, speed, and versatility. Their models are designed for various creative and commercial applications, offering different optimization profiles to suit diverse needs.
> **Note:** Fal AI models are currently only available in the Open Source version of Giselle.
**Key models:**
- flux-pro/v1.1 - High-quality image generation with superior composition and detail
- flux/schnell - Ultra-fast image generation for time-sensitive applications
- stable-diffusion-v3-medium - Balanced model with enhanced typography capabilities
## Use Cases in Giselle
### Content Creation Workflows
- **Anthropic (Claude)**: Ideal for drafting nuanced business documents, creating policy content, and generating well-reasoned explanations in Giselle workflows. Claude models are particularly effective when handling sensitive subject matter or when ethical considerations are paramount.
- **Google (Gemini)**: Perfect for Giselle workflows involving mixed media inputs. Use Gemini models when your workflow processes documents containing text, images, and other media formats simultaneously. Their large context window makes them excellent for analyzing extensive documentation or research materials.
- **OpenAI (GPT)**: Excellent choice in Giselle for technical documentation workflows, code generation pipelines, and creative content production. The structured output capabilities make GPT models particularly useful when your Giselle workflow needs to generate content in specific formats or extract structured data.
### Visual Content Workflows
- **Fal AI**: Essential for Giselle workflows involving image generation tasks. Use flux-pro for high-quality marketing visuals, flux/schnell for rapid prototyping and iterative design processes, and stable-diffusion for balanced results with typography requirements.
### Multi-Provider Workflows
One of Giselle's strengths is the ability to combine different providers in a single workflow:
- Use different models to gather information, analyze implications, and format the findings into structured documentation
- Combine Gemini's multimodal analysis with Fal AI's image generation to create visual content based on document analysis
- Leverage different models' strengths in sequential nodes to optimize cost/performance at each workflow stage
## Future Roadmap
At Giselle, we're committed to continuously expanding our provider integrations and updating our supported models as the AI landscape evolves. We regularly assess new models and capabilities to ensure you have access to cutting-edge AI technology that best serves your needs.
We value your input on which models and providers you'd like to see added to our platform. If you have specific requests or feedback about our current offerings, please don't hesitate to contact us.
## Additional Resources
For detailed specifications and documentation on each provider's models:
- [Anthropic Documentation](https://docs.anthropic.com/)
- [Google AI for Developers](https://ai.google.dev/)
- [OpenAI Documentation](https://platform.openai.com/docs)
- [Fal.ai Models](https://fal.ai/models)
# October 17, 2024 (/en/releases/release-notes/2024-10-17)
---
title: October 17, 2024
description: Giselle Goes Open Source
---
**Giselle is now open source!**
We're excited to announce that Giselle has been released as an open source project. This marks the beginning of our journey to build AI workflow automation tools together with the community.
## Open Source Launch
Giselle is now available on GitHub under an open source license. We believe in transparency and community-driven development, and we're inviting developers worldwide to contribute, explore, and build with us.
## What's Included
- **Full source code**: Complete access to the Giselle codebase
- **Documentation**: Contributing guidelines, code of conduct, and security policy
- **Community infrastructure**: Issue templates, pull request workflows, and code review processes
## Get Involved
We welcome contributions of all kinds:
- **Feature development**: Help build new capabilities
- **Bug fixes**: Identify and resolve issues
- **Documentation**: Improve guides and references
- **Feedback**: Share your ideas and use cases
Visit our [GitHub repository](https://github.com/giselles-ai/giselle) to get started.
---
*This is the initial open source release [v0.0.14](https://github.com/giselles-ai/giselle/releases/tag/v0.0.14)*
# November 5, 2024 (/en/releases/release-notes/2024-11-05)
---
title: November 5, 2024
description: Workflow Execution and GitHub Login
---
This update introduces the first workflow execution capabilities and adds GitHub authentication for seamless login.
## Workflow Execution
The first **workflow execution** feature is here! Workflows built with the editor can now be executed, marking a major milestone in Giselle's evolution from a design tool to a complete AI workflow automation platform.
- **Execute workflows**: Run your designed workflows and see results
- **Real-time feedback**: Monitor execution progress
- **Foundation for automation**: The beginning of automated AI workflows
## GitHub Login
New **GitHub Login** integration for quick and easy authentication. Sign in with your GitHub account to get started immediately.
## GitHub App Integration
Early **GitHub App integration** groundwork for connecting Giselle to your GitHub repositories and workflows.
## Model Configuration
- **Temperature and Top-P parameters**: Fine-tune AI model behavior with configurable parameters
- **Model provider support**: Foundation for multiple AI model providers
---
*This release includes [v0.0.15](https://github.com/giselles-ai/giselle/releases/tag/v0.0.15) through [v0.2.2](https://github.com/giselles-ai/giselle/releases/tag/v0.2.2)*
# December 18, 2024 (/en/releases/release-notes/2024-12-18)
---
title: December 18, 2024
description: Redesigned Workflow Editor, Google Gemini, Google OAuth, and Team Management
---
This major update introduces a completely redesigned workflow editor, Google Gemini model support, Google OAuth login, and comprehensive team management features.
## Redesigned Workflow Editor
Completely redesigned **workflow editor** with powerful new capabilities:
- **Graph-based workflow editor**: Visual node-based design for building AI workflows
- **Real-time execution tracking**: Monitor workflow progress as it runs
- **Keyboard shortcuts**: Quick actions for common operations
- **Versioned graph persistence**: Save and manage workflow versions
- **Flow retry capability**: Retry failed executions with state preservation
- **Agent duplication**: Copy agents with all settings and files
## Google Gemini Support
Added **Google Gemini** model support including **Gemini 2.0 Flash Exp**, expanding your AI model options for text generation.
## Google OAuth Login
New **Google OAuth** login option for easier account access alongside existing GitHub authentication.
## Team Management
Comprehensive **team management** system:
- **Team creation and settings**: Create and configure teams
- **Member management**: Add, remove, and manage team members with roles
- **Activity logs**: View detailed agent activity history
- **Usage tracking**: Monitor team usage and limits
## Multi-File Upload
**Multi-file upload** support with processing capabilities, allowing you to work with multiple documents in your workflows.
## Agent Improvements
- **Customizable system prompts**: Configure system prompts for text generation
- **Agent name management**: Easily rename and organize agents
- **Loading states**: Visual feedback during operations
---
*This release includes [v0.2.3](https://github.com/giselles-ai/giselle/releases/tag/v0.2.3) through [v0.4.0](https://github.com/giselles-ai/giselle/releases/tag/v0.4.0)*
# February 17, 2025 (/en/releases/release-notes/2025-02-17)
---
title: February 17, 2025
description: Pro Plan and Free Plan Launch
---
This update marks a major milestone with the launch of both Pro and Free plans, making Giselle accessible to everyone.
## Pro Plan Launch
The **Pro plan** is now available with time-based pricing for AI agent usage. Access premium features and higher usage limits with flexible subscription options.
Learn more: [Introducing Time-Based Pricing: Giselle's Approach to AI Agents](https://giselles.ai/blog/time-based-pricing-ai-agents)
## Free Plan Launch
**Free plan** released, making Giselle accessible to everyone. Start building AI workflows at no cost with generous usage limits.
## Monorepo Migration
Migrated to a **monorepo architecture** for better code organization and development workflow.
---
*This release includes [v0.5.0](https://github.com/giselles-ai/giselle/releases/tag/v0.5.0) through [v0.6.16](https://github.com/giselles-ai/giselle/releases/tag/v0.6.16)*
# March 14, 2025 (/en/releases/release-notes/2025-03-14)
---
title: March 14, 2025
description: Image Generation Node, GitHub Webhooks, Gemini Search Grounding, and New Playground UI
---
This update introduces the Image Generation Node, GitHub webhook integration for workflow automation, Gemini Search Grounding, and a completely new Playground UI.
## Image Generation Node
New **Image Generation Node** for creating AI-generated images directly in your workflows. Configure image size, style, and other parameters to generate visuals on demand.
## GitHub Webhook Integration
Powerful **GitHub webhook integration** for automated workflows:
- **Workflow execution via webhooks**: Trigger workflows automatically from GitHub events
- **GitHub data injection**: Access GitHub context data (diffs, PR details) in your workflows
- **Issue and PR events**: Respond to repository activity automatically
## Gemini Search Grounding
**Gemini 2.0 Search Grounding** support allows AI to search and cite real-time information, providing more accurate and up-to-date responses with source references.
## New Playground UI
Completely redesigned **Playground interface** with:
- **Builder/Preview toggle**: Switch between building and testing modes
- **Improved canvas gestures**: Better trackpad support for navigation
- **Sample workspace creation**: Get started quickly with pre-built examples
## File Nodes
New file handling capabilities:
- **Image File Node**: Upload and use images in workflows
- **Text File Node**: Upload and process text files
## Language Model Access Control
**Subscription-based model access** with clear tier distinctions. Pro models now require appropriate subscription levels, with upgrade dialogs guiding users to the right plan.
## Settings Redesign
Complete overhaul of **settings pages**:
- Team settings and member management
- Billing and usage tracking
- Account and authentication settings
- Integration configuration
---
*This release includes [v0.7.0](https://github.com/giselles-ai/giselle/releases/tag/v0.7.0) through [v0.21.0](https://github.com/giselles-ai/giselle/releases/tag/v0.21.0)*
# April 16, 2025 (/en/releases/release-notes/2025-04-16)
---
title: April 16, 2025
description: OpenAI Web Search, Team Invitations, and Enhanced GitHub Integration
---
This update introduces OpenAI Web Search integration, team invitation system, and enhanced GitHub integration features.
## OpenAI Web Search Tool
New **OpenAI Web Search Tool** integration for text generation, allowing AI to search the web in real-time while generating responses.
## OpenAI o3 and o4-mini Models
Added support for **OpenAI o3** and **o4-mini** models with advanced reasoning capabilities. Claude 3.7 Sonnet now includes a reasoning option for enhanced problem-solving.
## Team Invitations
Complete **team invitation system** for collaboration:
- **Invite team members**: Send invitations to join your team
- **Join via invitation**: Accept invitations to join teams
- **Duplicate prevention**: System prevents duplicate invitations
## GitHub Integration Enhancements
- **GitHub App installation flow**: Streamlined setup for GitHub integration
- **Additional GitHub tools**: Expanded capabilities for GitHub operations
- **Pull request events**: Workflow triggers for PR opened, ready_for_review, and closed events
- **Issue events**: Workflow triggers for issues opened and closed
## Pro Model Access
New **upgrade dialog** for Pro language models, making it easy to access premium AI capabilities with clear upgrade paths.
## Gemini Updates
- Added **Gemini 2.5 Flash Preview** (04-17) model
- Added **Gemini 2.5 Pro Preview** (03-25) model
---
*This release includes [v0.22.0](https://github.com/giselles-ai/giselle/releases/tag/v0.22.0) through [v0.29.2](https://github.com/giselles-ai/giselle/releases/tag/v0.29.2)*
# April 30, 2025 (/en/releases/release-notes/2025-04-30)
---
title: April 30, 2025
description: GitHub Trigger Node, GitHub Action Node, and PR/Issue event triggers
---
This update introduces GitHub Trigger and Action nodes for powerful GitHub automation and expands PR and Issue event support.
## GitHub Trigger Node
New **GitHub Trigger Node** enables workflow automation based on GitHub events:
- **Pull request triggers**: opened, ready_for_review, closed, and comment events
- **Issue triggers**: comment and closed events
- **Reactions support**: Add reactions to GitHub items via GraphQL API
## GitHub Action Node
New **GitHub Action Node** for performing GitHub operations from your workflows:
- **Create issues**: Automatically create GitHub issues
- **Post comments**: Add comments to issues and pull requests
- **Action results**: View action outcomes directly in the workflow
## Workflow Execution Improvements
- **Animated completion status**: Visual feedback showing workflow node completion
- **Manual Trigger execution**: Start flows with Manual Trigger as the entry point
- File removal now works for files stuck in uploading or failed status
---
*This release includes [v0.30.0](https://github.com/giselles-ai/giselle/releases/tag/v0.30.0) through [v0.35.1](https://github.com/giselles-ai/giselle/releases/tag/v0.35.1)*
# May 23, 2025 (/en/releases/release-notes/2025-05-23)
---
title: May 23, 2025
description: Query Node for RAG, Web Page Node, Claude 4 support, and GitHub PR comment triggers
---
This update introduces the Query Node for RAG capabilities, Web Page Node for fetching web content, Claude 4 model support, and expanded GitHub integration with PR comment triggers.
## Query Node
New **Query Node** with full RAG (Retrieval-Augmented Generation) capabilities. Connect your vector stores and let AI retrieve relevant context before generating responses.
## Web Page Node
Added **Web Page Node** to fetch and process web content directly in your workflows. Extract text from web pages and use it as input for AI generation.
## Claude 4 Support
Added support for the **Claude 4** model series from Anthropic, bringing the latest Claude capabilities to your workflows.
## GitHub PR Comment Triggers & Actions
- **Pull request comment triggers**: Start workflows when comments are added to pull requests
- **Pull request comment action**: Post comments to pull requests from your workflows
- **GitHub Discussion support**: Get discussion content with the new getDiscussion function
## Workflow Cancellation
New **workflow cancellation** support with toast feedback. Stop running workflows when needed with clear visual confirmation.
## Execution Insights
Enhanced text generation panel now displays **execution time and token usage**, helping you monitor and optimize your workflows.
---
*This release includes [v0.36.0](https://github.com/giselles-ai/giselle/releases/tag/v0.36.0) through [v0.39.0](https://github.com/giselles-ai/giselle/releases/tag/v0.39.0)*
# June 13, 2025 (/en/releases/release-notes/2025-06-13)
---
title: June 13, 2025
description: PostgreSQL tools, GitHub Vector Store, clipboard paste for images, and workflow run button
---
This update introduces PostgreSQL tool support for text generation, enables GitHub Vector Store by default, adds clipboard paste for images, and brings the workflow run button for easier execution.
## PostgreSQL Tool Support
Added **PostgreSQL tool support** to text generation nodes. Connect your PostgreSQL databases and let AI agents query and analyze your data directly within workflows.
## GitHub Vector Store
**GitHub Vector Store** is now enabled by default for all users. Index your GitHub repositories and use them as knowledge bases for AI-powered code assistance and documentation.
## Clipboard Paste for Images
You can now **paste images directly from clipboard** into Image File Nodes. Simply copy an image and paste it into your workflow for faster image handling.
## Workflow Run Button
New **Run Button** for workflow execution. Start your workflows with a single click directly from the workflow designer.
## Team Member Management
Team members can now **leave teams** themselves, giving users more control over their team memberships.
## Differential Ingestion
Implemented **differential ingestion with version tracking** for GitHub repositories. Only changed files are re-indexed, making repository updates faster and more efficient.
---
*This release includes [v0.40.0](https://github.com/giselles-ai/giselle/releases/tag/v0.40.0) through [v0.42.0](https://github.com/giselles-ai/giselle/releases/tag/v0.42.0)*
# July 2, 2025 (/en/releases/release-notes/2025-07-02)
---
title: July 2, 2025
description: Vector Store settings, GitHub Trigger UI, and OpenAI Web Search for o3/o4-mini
---
This update introduces Vector Store settings UI, new GitHub Trigger components, and Web Search support for OpenAI o3 and o4-mini models.
## Vector Store Settings
New **Vector Store settings** UI for managing your knowledge bases. Configure and organize your vector stores directly from the settings panel.
## GitHub Trigger UI
Added **GitHub Trigger UI components** with event selection workflow. Set up GitHub-based automation triggers with an intuitive interface for selecting events and configuring trigger behavior.
## OpenAI Web Search for o3 & o4-mini
**Web Search** is now enabled for OpenAI **o3** and **o4-mini** models, allowing these models to search the web for real-time information during generation.
## Enhanced Dropdown Menu
The **DropdownMenu component** now supports group functionality, making it easier to organize menu items into logical categories.
---
*This release includes [v0.43.0](https://github.com/giselles-ai/giselle/releases/tag/v0.43.0) through [v0.43.9](https://github.com/giselles-ai/giselle/releases/tag/v0.43.9)*
# July 16, 2025 (/en/releases/release-notes/2025-07-16)
---
title: July 16, 2025
description: V2 Workflow Designer, GitHub Pull Request loader, redesigned UI, and PostgreSQL validation
---
This major update introduces the V2 Workflow Designer with a completely redesigned interface, adds GitHub Pull Request loading for RAG/vector search, and brings numerous UI improvements and internal architecture updates.
## V2 Workflow Designer
Replaced the legacy UI with the **V2 Workflow Designer**, featuring:
- Completely redesigned workflow interface
- Improved node organization and grouping
- Simplified properties panel UI
- Redesigned GitHub Action properties panel with icon support
- New dropdown menu components
## GitHub Pull Request Loader
Added **GitHub Pull Request loader** for RAG/vector search. Load and index pull requests from your repositories to enable AI-powered code review and documentation workflows.
## PostgreSQL Tools Enhancement
**Connection string validation** now available for PostgreSQL tools, helping you catch configuration errors before running queries.
## Team-Based Flow Selection
New **team-based flow selection** component on the stage page, making it easier to organize and access workflows across your teams.
## Internal Improvements
- Improved error handling with early return after step failures
- Skip remaining sequences after failure and update act status accordingly
- Simplified Act navigation UI and aligned status terminology
- Better run button logic with visibility control
## Bug Fixes
- Fixed inconsistent column names in studio
- Fixed import issues and updated tests
- Hide run button when no runnable items exist
---
*This release includes [v0.44.0](https://github.com/giselles-ai/giselle/releases/tag/v0.44.0) through [v0.44.15](https://github.com/giselles-ai/giselle/releases/tag/v0.44.15)*
# August 8, 2025 (/en/releases/release-notes/2025-08-08)
---
title: August 8, 2025
description: GPT-5 series, Claude Opus 4.1, Anthropic Web Search, keyboard shortcuts, and embedding profile selection
---
This update introduces GPT-5 model series and Claude Opus 4.1 support, adds Anthropic's web search tool, enhances keyboard shortcuts in the workflow designer, and provides embedding profile selection for better vector store management.
## GPT-5 Model Series
Added support for the **GPT-5 model series** from OpenAI, bringing the latest reasoning capabilities to your workflows. This includes structured GPT-5 models optimized for various use cases.
## Claude Opus 4.1 Support
Added **Claude Opus 4.1** (claude-opus-4-1-20250805), Anthropic's powerful model for complex reasoning and creative tasks.
## Anthropic Web Search Tool
New **Anthropic Web Search** tool integration allows your AI agents to search the web and incorporate real-time information into their responses.
## Enhanced Keyboard Shortcuts
Implemented **robust keyboard shortcuts** with focus management for the workflow designer. Navigate and edit your workflows more efficiently with keyboard commands.
## Embedding Profile Selection
- Select embedding profiles in **VectorStoreNode** for customized search behavior
- New **embedding profile selection UI** in team settings
- Multi-embedding backend support for improved search accuracy
## Team & User Features
- **Team avatar registration** with header dropdown integration
- Display avatar images on team members page
- Create multiple sample workspaces for onboarding
## Download Functionality
Implemented **download functionality** for desktop and mobile act details, allowing you to export your workflow execution results.
## Bug Fixes
- Fixed staged triggers appearing after app duplication
- Fixed workflow not running with only a Generator Node
- Ensured avatars always render as perfect circles
- Fixed unique ID generation for sample workspace elements
---
*This release includes [v0.45.0](https://github.com/giselles-ai/giselle/releases/tag/v0.45.0) through [v0.45.13](https://github.com/giselles-ai/giselle/releases/tag/v0.45.13)*
# September 1, 2025 (/en/releases/release-notes/2025-09-01)
---
title: September 1, 2025
description: GitHub Trigger improvements, multi-embedding enabled by default, and internal architecture updates
---
This update brings improvements to GitHub Trigger configuration, enables multi-embedding by default, and includes significant internal architecture updates for better performance and stability.
## GitHub Trigger Improvements
**GitHub Trigger Node** now supports more flexible configuration:
- **Label-based triggering**: Trigger workflows based on specific labels
- **Repository modification**: Change connected repositories after initial configuration
- **Improved credential handling**: Update GitHub credentials without resetting tool selections
## Multi-Embedding Now Default
The **multi-embedding feature** is now enabled by default for all users. This allows you to use multiple embedding models simultaneously for better search accuracy across your knowledge bases.
## Enhanced Error Handling
- Unified error tracing across the generation pipeline
- Better error logging for failed AI SDK generations
- Improved failure details display including error messages
## UI Improvements
- Redesigned sidebar with navigation rail for easier access
- Toast notifications now auto-dismiss for cleaner experience
- Enhanced properties panel layout
- Unified text generation select components
## Bug Fixes
- Fixed workspace access for all user's teams
- Fixed multi-image paste upload and duplicate handling
- Resolved default filter alignment issues
---
*This release includes [v0.46.0](https://github.com/giselles-ai/giselle/releases/tag/v0.46.0) through [v0.46.7](https://github.com/giselles-ai/giselle/releases/tag/v0.46.7)*
# September 16, 2025 (/en/releases/release-notes/2025-09-16)
---
title: September 16, 2025
description: Gemini image generation, image editing, and cancelable text generation
---
This update brings Gemini-powered image generation, image editing capabilities, and the ability to cancel long-running text generations.
## Gemini Image Generation (Nano Banana)
Added **Gemini 2.5 Flash Image** (codenamed Nano Banana) for text-to-image generation. You can now create images using Google's Gemini models directly in your workflows.
## Image Editing
The image generation capabilities now include **image editing** support. Edit and modify existing images as part of your AI workflows.
## Cancelable Text Generation
You can now **cancel text generation** while it's in progress. This is especially useful for:
- Stopping long-running generations
- Testing and iterating faster
- Managing resource usage
## Long-Running Task Support
Redesigned the text generation pipeline to support **durable execution** beyond the previous 800-second limit. Complex, long-running AI tasks now complete reliably.
## Bug Fixes
- Fixed duplicate and delete dialog issues on apps list
- Fixed prompt references missing after connecting inputs
- Added validation for empty prompts before generation
- Improved error handling for GitHub Trigger configuration
- Fixed open redirect vulnerability in OAuth callback
---
*This release includes [v0.47.0](https://github.com/giselles-ai/giselle/releases/tag/v0.47.0) through [v0.47.5](https://github.com/giselles-ai/giselle/releases/tag/v0.47.5)*
# September 26, 2025 (/en/releases/release-notes/2025-09-26)
---
title: September 26, 2025
description: Document Vector Store, GPT-5-codex model, @ mentions in prompts, and PDF support
---
This update introduces Document Vector Store for uploading your own documents, the GPT-5-codex model, @ mention functionality in prompts, and PDF text extraction.
## Document Vector Store
We've added **Document Vector Store**, allowing you to upload and manage your own documents as a searchable knowledge base:
- Upload documents directly to your workspace
- Your AI agents can reference uploaded documents when generating responses
- Integrated with Query nodes for seamless document retrieval
- Metadata tracking and version management for uploads
## GPT-5-codex Model
Added **GPT-5-codex** to the available OpenAI models. This model is optimized for code generation and understanding, making it ideal for:
- Code explanation and documentation
- Code review assistance
- Programming-related workflows
## @ Mentions in Prompts
You can now use **@ mentions** to reference other nodes directly in your prompts:
- Type `@` in the prompt editor to see available nodes
- Select a node to insert a reference
- The referenced node's output will be included as context
This makes it easier to build connected workflows where outputs from one node inform another.
## PDF Support
Document Vector Store now supports **PDF text extraction**:
- Upload PDF files directly
- Text content is automatically extracted and indexed
- Search and reference PDF content in your workflows
## UI Improvements
- Redesigned login page with improved styling
- Updated settings pages with better visual consistency
- Improved usage and team pages interface
## Bug Fixes
- Fixed node copy behavior—pasted nodes are now automatically selected
- Fixed connection handling in graph slicing
---
*This release includes [v0.48.0](https://github.com/giselles-ai/giselle/releases/tag/v0.48.0) through [v0.48.13](https://github.com/giselles-ai/giselle/releases/tag/v0.48.13)*
# October 17, 2025 (/en/releases/release-notes/2025-10-17)
---
title: October 17, 2025
description: GitHub Discussion triggers, improved node designs, and UI refinements
---
This update brings GitHub Discussion support, redesigned nodes, and various UI improvements across the platform.
## GitHub Discussion Triggers and Actions
You can now trigger workflows from **GitHub Discussions** and take actions on them. This enables you to:
- Automatically respond to new discussions in your repositories
- Build AI-powered community support workflows
- Create discussion summaries and insights
## GitHub Trigger Customization
GitHub Triggers now support customizable **callsigns and labels** after configuration. Change how your triggers appear and are identified without reconfiguring them from scratch.
## Node Design Improvements
We've improved the design of several node types:
- **Image Generation Node** — Redesigned with unified headers and improved image display
- **File Upload Node** — Improved layout for better file management
- **Query Node** — Replaced tabs with a scrollable layout for easier navigation
## GitHub Tools Configuration
The GitHub Tools configuration panel has been polished with:
- Cleaner interface for setting up GitHub integrations
- Better organization of configuration options
- Improved visual consistency
## Bug Fixes
- Fixed modal dialog layout issues in settings
- Fixed duplicate connections handling in workflow builds
- Fixed Workspaces header highlight
---
*This release includes [v0.49.0](https://github.com/giselles-ai/giselle/releases/tag/v0.49.0) through [v0.49.11](https://github.com/giselles-ai/giselle/releases/tag/v0.49.11)*
# November 4, 2025 (/en/releases/release-notes/2025-11-04)
---
title: November 4, 2025
description: Apps renamed to Workspaces, new Claude 4.5 models, Document Vector Store for all users, and redesigned navigation
---
This major update brings a clearer naming convention, the latest Claude AI models, Document Vector Store for everyone, and a refreshed navigation experience.
## Apps Renamed to Workspaces
We've renamed **Apps** to **Workspaces** throughout the application. This change better reflects how you organize and manage your AI projects. Your existing projects remain exactly where they are—this is just a clearer name for the same great functionality.
## New Claude AI Models
We've upgraded our Anthropic model offerings with the latest Claude 4.5 and 4.1 series:
- **Claude Sonnet 4.5** — Anthropic's newest balanced model offering excellent performance for most tasks
- **Claude Haiku 4.5** — A faster, more efficient model ideal for quick tasks and cost-effective workflows
The older Claude 3.x models have been retired. Existing workflows will automatically use the new Claude 4.x equivalents.
## Document Vector Store Now Available for Everyone
The **Document Vector Store** feature is now available to all users. This powerful capability allows you to:
- Upload your own documents to create a searchable knowledge base
- Let your AI agents reference your documents when generating responses
- Build more informed and context-aware workflows
Previously available as a preview feature, Document Vector Store is now a core part of Giselle.
## Redesigned Navigation
The global navigation has been completely redesigned with a new **Navigation Rail** that makes it easier to:
- Switch between teams with clear team context
- Access your workspaces quickly
- Navigate to settings and other features
## Team Plans & Quotas
We've introduced team-based plans with quota management:
- Plan-based seat limits for team members
- Quota controls for Document Vector Stores
- Quota controls for GitHub Vector Stores
## Improved Email Experience
- New team invitation emails with a refreshed design
- Updated authentication emails (sign-in, password reset, etc.)
## Bug Fixes & Improvements
- Improved account settings page navigation
- Fixed GitHub vector store display issues
- Various UI refinements and stability improvements
---
*This release includes [v0.50.0](https://github.com/giselles-ai/giselle/releases/tag/v0.50.0) through [v0.51.4](https://github.com/giselles-ai/giselle/releases/tag/v0.51.4)*
# November 14, 2025 (/en/releases/release-notes/2025-11-14)
---
title: November 14, 2025
description: Enterprise plan, GitHub Issues Vector Store, and mobile navigation
---
This update introduces an Enterprise plan for organizations, GitHub Issues Vector Store, and mobile-friendly navigation.
## Enterprise Plan
Introducing the **Enterprise plan** for organizations with advanced needs:
- Higher usage quotas for AI model calls
- Team-based access control with workspace validation
- Enhanced billing and subscription management
Contact us to learn more about Enterprise features.
## GitHub Issues Vector Store
The **GitHub Issues Vector Store** is now available by default. You can now:
- Index your GitHub repository issues as a searchable knowledge base
- Let your AI agents reference issue discussions, bug reports, and feature requests
- Build context-aware workflows that understand your project history
## Mobile Navigation
We've added a **mobile drawer menu** for better navigation on smaller screens. Access all your workspaces and settings from anywhere, on any device.
## UI Improvements
- New email templates with refreshed design
- Enhanced node styling with gradients and shadows
- Workspace list now shows execution counts
- Tooltips for truncated repository and file names
- Improved Document Vector Store interface
## Bug Fixes
- Fixed file upload node copy behavior
- Fixed double file selector trigger in document vector store
- Fixed team dropdown menu navigation issues
- Improved log out menu item click area
---
*This release includes [v0.52.0](https://github.com/giselles-ai/giselle/releases/tag/v0.52.0) through [v0.52.9](https://github.com/giselles-ai/giselle/releases/tag/v0.52.9)*
# November 27, 2025 (/en/releases/release-notes/2025-11-27)
---
title: November 27, 2025
description: Claude Opus 4.5 support, enhanced content generation, and subscription management improvements
---
This update introduces Claude Opus 4.5 support, significant enhancements to content generation capabilities, and improved subscription management features.
## Claude Opus 4.5 Now Available
We've added support for **Claude Opus 4.5**, Anthropic's most capable model. Claude Opus 4.5 excels at complex reasoning tasks, creative writing, and nuanced analysis. You can now select Claude Opus 4.5 in your Generator nodes to leverage its advanced capabilities.
## Enhanced Content Generation
We've made several improvements to content generation:
- **Streaming UI** — Watch your AI-generated content appear in real-time as it's being created
- **Copy to clipboard** — Easily copy generated content with a single click
- **Tool integrations** — Content generation nodes can now use tools like GitHub actions directly
- **Improved tool results display** — See tool execution results in a clear, organized format
## Subscription Management
- Added subscription cancellation UI for easier plan management
- Improved billing portal with better subscription support
## Bug Fixes & Improvements
- Fixed orphaned inputs when source nodes are deleted
- Improved GitHub App installation error handling
- Enhanced connector animations in the workflow designer
- Various toolbar and layout adjustments
---
*This release includes [v0.53.0](https://github.com/giselles-ai/giselle/releases/tag/v0.53.0), [v0.53.1](https://github.com/giselles-ai/giselle/releases/tag/v0.53.1), [v0.53.2](https://github.com/giselles-ai/giselle/releases/tag/v0.53.2), and [v0.53.3](https://github.com/giselles-ai/giselle/releases/tag/v0.53.3)*
# December 5, 2025 (/en/releases/release-notes/2025-12-05)
---
title: December 5, 2025
description: Official Vector Stores now available to all users, improved team navigation, and various bug fixes
---
This update brings official vector stores accessible to everyone, enhanced team navigation, and several quality-of-life improvements.
## Official Vector Stores Now Available to All Users
We're excited to announce that **official vector stores** are now accessible to all Giselle users:
- **Official Document Vector Stores** — Pre-built document knowledge bases that you can use in your workflows without any setup
- **Official GitHub Vector Stores** — Ready-to-use GitHub repository knowledge bases available as read-only resources
These official vector stores allow you to quickly leverage curated knowledge in your AI workflows, making it easier to get started with powerful context-aware AI applications.
## Improved Team Navigation
- Added team avatar icons to the workspaces list for easier team identification
- Team links now navigate directly to your workspaces
- Fixed an issue where the "Create team" button in the header was not working
## GitHub Integration Improvements
- Improved detection and error handling for GitHub integrations
- Added reconnection UI for expired GitHub credentials — you'll now see a clear prompt to reconnect when needed
- Vector store setup links now open in a new tab for a smoother workflow
## Bug Fixes
- Fixed GitHub tools configuration issues
- Resolved display issues with vector store status cards
- Improved settings visibility when no repository is selected
---
*This release includes [v0.54.0](https://github.com/giselles-ai/giselle/releases/tag/v0.54.0), [v0.54.1](https://github.com/giselles-ai/giselle/releases/tag/v0.54.1), and [v0.54.2](https://github.com/giselles-ai/giselle/releases/tag/v0.54.2)*
# December 23, 2025 (/en/releases/release-notes/2025-12-23)
---
title: December 23, 2025
description: GPT-5.2 & Gemini 3 Flash models, new Tasks page, Start/End node improvements, and security enhancements
---
This update brings new AI models, a redesigned Tasks page, improved Start/End node experience, and important security fixes.
## New AI Models
### GPT-5.2 Support
Added **GPT-5.2**, OpenAI's most capable flagship model with significant improvements in general intelligence, instruction following, and code generation:
- Configurable reasoning effort levels (`none`, `low`, `medium`, `high`, `xhigh`)
- Text verbosity control (`low`, `medium`, `high`)
- Enhanced vision capabilities and tool calling
### Gemini 3 Flash
Added **Gemini 3 Flash** model support with SDK upgrade, offering enhanced reasoning capabilities and improved performance for complex tasks.
## New Tasks Page
Introduced a dedicated **Tasks page** for viewing and managing your workflow execution history:
- Revamped tasks list layout with better organization
- Enhanced final step output display with count indicator
- Improved task detail page with status indicators
- Entrance/exit animations for task overlay
- Optimistic submission for smoother task execution
## Start/End Node Improvements
Significant updates to the app entry and exit nodes:
- **Renamed "App Entry" to "Start"** — clearer terminology throughout the application
- **Auto-pairing** — creating a Start node automatically creates a paired End node
- Enhanced node panels with improved styling
- Stage run readiness checks ensure proper configuration
## Node Naming Updates
Improved clarity with renamed nodes and categories:
- **Query Node** renamed to **Vector Query** for better understanding
- **Event grouping** renamed to **Integration** in the toolbar
## UI/UX Improvements
- Playground now autofocuses on prompt input when navigating
- Improved file attachment preview UI
- Replaced markdown rendering with Streamdown for better performance
- Updated recommended models display for Free/Pro tiers
- Fixed sample apps visibility for new users
## Subscription Management
- Implemented scheduled subscription cancellation at billing period end
- Smoother subscription lifecycle management
## Security Enhancements
Important security improvements in this release:
- Fixed Next.js DoS vulnerability (CVE-2025-55184)
- Encrypted OAuth tokens with AES-256-GCM
- Prevented Host Header Injection in OAuth callbacks
- Implemented timing-safe comparison for signed cookie verification
- Security fix for HMAC signature verification (jws 4.0.1)
## Architecture Improvements
- Migrated to modular app designer store with Zustand for better state management
- Major internal refactoring for improved maintainability
---
*This release includes [v0.55.2](https://github.com/giselles-ai/giselle/releases/tag/v0.55.2) through [v0.59.1](https://github.com/giselles-ai/giselle/releases/tag/v0.59.1)*
# December 24, 2025 (/en/releases/release-notes/2025-12-24)
---
title: December 24, 2025
description: Playground and Tasks now available to all users with dedicated app execution and results pages
---
This release makes Playground and Tasks generally available, providing dedicated pages for running apps and viewing execution results outside of the workspace editor.
## Playground and Tasks Now Generally Available
The stage feature flag is now enabled by default, making **Playground** and **Tasks** available to all users:
- **[Playground](/en/guides/playground)** — A dedicated page for running your apps without entering the workspace editor. Simply select an app and execute it with a streamlined interface focused on input and output.
- **[Tasks](/en/guides/tasks)** — A comprehensive execution history page where you can view all your workflow runs with clear status indicators and detailed results.
The default landing page has changed from `/workspaces` to `/playground`, reflecting this new workflow-first experience.
## Enhanced Node Connectivity
Action nodes now support input connections from Start nodes, enabling more flexible workflow designs where actions can be triggered directly from the workflow entry point.
## UI Improvements
- Updated stage node colors with "blue-muted" styling for Start and End nodes
- Removed task ID from task page titles for cleaner presentation
- Updated task start time display format
- Aligned document link styling across task and workspace pages
## Documentation Updates
- Added documentation URLs to node and task pages for easier access to help resources
- Updated workspace page documentation link URLs
---
*This release includes [v0.59.2](https://github.com/giselles-ai/giselle/releases/tag/v0.59.2) through [v0.60.0](https://github.com/giselles-ai/giselle/releases/tag/v0.60.0)*
# January 22, 2026 (/en/releases/release-notes/2026-01-22)
---
title: January 22, 2026
description: GPT-5.2 Codex model, Playground app selection, expandable task inputs, and GitHub Trigger comment control
---
This release adds the GPT-5.2 Codex model, improves the Playground and Tasks experience, and introduces control over GitHub Trigger in-progress comments.
## GPT-5.2 Codex Model
We've added support for **GPT-5.2 Codex**, OpenAI's code-focused model optimized for software engineering tasks. You can now select GPT-5.2 Codex in your Generator nodes for code generation and technical workflows.
## Playground App Selection
You can now select an app directly from the workflow designer and jump to Playground to run it. This streamlines the workflow from building to testing your apps.
## Tasks Page Improvements
- **Expandable input display** — String inputs are now shown in an expandable format in the task header, making it easier to review long inputs without leaving the task page
## GitHub Trigger In-Progress Comment Control
You can now control whether "in-progress" comments are posted to GitHub during workflow execution triggered by GitHub events. This gives you more flexibility over the notification behavior of your GitHub-integrated workflows.
## Bug Fixes & Improvements
- Added magic byte validation for avatar uploads to prevent invalid file types
- Added server-side repository access validation for GitHub vector store
- Fixed task input placeholder not updating when switching apps
- Upgraded Node.js from 22 to 24
---
*This release includes [v0.60.1](https://github.com/giselles-ai/giselle/releases/tag/v0.60.1) through [v0.62.0](https://github.com/giselles-ai/giselle/releases/tag/v0.62.0)*
# February 20, 2026 (/en/releases/release-notes/2026-02-20)
---
title: February 20, 2026
description: Data Stores and Data Query nodes, Claude Opus 4.6 model, and security improvements
---
This release introduces Data Stores and Data Query nodes for connecting external databases to your workflows, adds Claude Opus 4.6 model support, and includes security improvements.
## Data Stores & Data Query Nodes
You can now connect external PostgreSQL databases to your Giselle workflows using the new **Data Store** and **Data Query** nodes:
- **[Data Store Node](/en/glossary/data-store-node)** — Register and manage connections to your PostgreSQL databases from Team Settings
- **[Data Query Node](/en/glossary/data-query-node)** — Query your connected data stores directly within workflows, with dynamic schema resolution and cancellation support
Data Stores are available on Pro and Enterprise plans. Configure your data stores in [Team Settings > Data Stores](/en/guides/settings/team/data-stores).
## Claude Opus 4.6
We've added support for **Claude Opus 4.6**, Anthropic's most intelligent model purpose-built for building agents and coding. Key highlights:
- **1M token context window** with up to **128k output tokens**
- State-of-the-art performance on agentic coding, deep search, financial analysis, and legal reasoning
- Enhanced planning capabilities and stronger error detection in code reviews
- Available on the Pro plan
For details, see the [Anthropic models documentation](/en/models/providers/anthropic).
## Security Improvements
- Multiple CVE fixes
- Security enhancements
---
*This release includes [v0.62.1](https://github.com/giselles-ai/giselle/releases/tag/v0.62.1) through [v0.64.0](https://github.com/giselles-ai/giselle/releases/tag/v0.64.0)*
# Release Notes (/en/releases/release-notes)
---
title: Release Notes
description: This page provides chronological information about the latest releases and updates of our product.
---
Stay up to date with the latest features, improvements, and fixes in Giselle.
---
## February 20, 2026
**Data Stores & Data Query, Claude Opus 4.6**
Introducing Data Stores and Data Query nodes for connecting external PostgreSQL databases to your workflows. Added Claude Opus 4.6, Anthropic's most intelligent model with 1M context window and 128k output tokens. Multiple CVE fixes and security enhancements.
---
## January 22, 2026
**GPT-5.2 Codex, Playground & Tasks Improvements**
Added GPT-5.2 Codex model for code-focused workflows. Playground now supports app selection directly from the workflow designer. Tasks page features expandable input display. New control for GitHub Trigger in-progress comment posting. Node.js upgraded from 22 to 24.
---
## December 24, 2025
**Playground & Tasks Now Generally Available**
Playground and Tasks are now available to all users. Playground provides a dedicated page for running your apps without entering the workspace editor, while Tasks offers a comprehensive execution history page with clear status indicators and detailed results. The default landing page has changed from `/workspaces` to `/playground`.
---
## December 23, 2025
**GPT-5.2 & Gemini 3 Flash, New Tasks Page & Start/End Node Improvements**
Major update with new AI models and enhanced workflow experience. Added GPT-5.2 with configurable reasoning effort and Gemini 3 Flash for advanced capabilities. Introduced a dedicated Tasks page for managing execution history. Renamed "App Entry" to "Start" with auto-pairing for End nodes. Important security fixes including CVE-2025-55184 and OAuth token encryption.
---
## December 5, 2025
**Official Vector Stores Now Available to All Users**
We're making powerful knowledge bases accessible to everyone. This release introduces official vector stores—both document and GitHub-based—that you can use in your workflows without any setup. We've also improved team navigation with avatar icons and direct workspace links, plus enhanced GitHub integration with better error handling and a new reconnection UI for expired credentials.
---
## November 27, 2025
**Claude Opus 4.5 & Enhanced Content Generation**
We've added support for Claude Opus 4.5, Anthropic's most capable model for complex reasoning and creative tasks. This release also brings major improvements to content generation with streaming UI, copy-to-clipboard functionality, and tool integrations. Plus, subscription management is now easier with a new cancellation UI.
---
## November 14, 2025
**Enterprise Plan, GitHub Issues Vector Store & Mobile Navigation**
Introducing the Enterprise plan for organizations with advanced needs—higher quotas, team-based access control, and enhanced billing management. This release also brings GitHub Issues Vector Store for indexing your repository issues, and a mobile drawer menu for better navigation on smaller screens.
---
## November 4, 2025
**Workspaces, Claude 4.5 Models & Document Vector Store**
A major update that renames Apps to Workspaces for clearer project organization. We've added Claude Sonnet 4.5 and Claude Haiku 4.5 models, made Document Vector Store available to all users, and completely redesigned the global navigation with a new Navigation Rail for easier team switching and workspace access.
---
## October 17, 2025
**GitHub Discussion Triggers & Node Design Improvements**
Trigger workflows from GitHub Discussions and build AI-powered community support. This release also brings redesigned Image Generation and File Upload nodes, customizable GitHub Trigger labels, and an improved Query Node interface with scrollable layout.
---
## September 26, 2025
**Document Vector Store, GPT-5-codex & @ Mentions**
Upload your own documents to create searchable knowledge bases with Document Vector Store. This release also adds the GPT-5-codex model for code-focused workflows, @ mention functionality to reference nodes in prompts, and PDF text extraction support.
---
## September 16, 2025
**Gemini Image Generation, Image Editing & Cancelable Generation**
Create images with Gemini 2.5 Flash (Nano Banana) and edit existing images in your workflows. Plus, you can now cancel long-running text generations and run complex tasks beyond the 800-second limit.
---
## September 1, 2025
**GitHub Trigger Improvements & Multi-Embedding**
GitHub Trigger Node now supports label-based triggering and repository changes after configuration. Multi-embedding is enabled by default for better search accuracy. This release also includes unified error tracing, redesigned sidebar with navigation rail, and improved toast notifications.
---
## August 8, 2025
**GPT-5 Series, Claude Opus 4.1 & Anthropic Web Search**
Added GPT-5 model series and Claude Opus 4.1 for advanced reasoning capabilities. New Anthropic Web Search tool lets AI agents search the web in real-time. This release also includes enhanced keyboard shortcuts for the workflow designer, embedding profile selection in VectorStoreNode, team avatar registration, and download functionality for workflow results.
---
## July 16, 2025
**V2 Workflow Designer & GitHub PR Loader**
A major update introducing the V2 Workflow Designer with a completely redesigned interface, improved node organization, and simplified properties panels. This release also adds GitHub Pull Request loader for RAG/vector search, PostgreSQL connection string validation, and team-based flow selection.
---
## July 2, 2025
**Vector Store Settings & GitHub Trigger UI**
New Vector Store settings UI for managing knowledge bases. Added GitHub Trigger UI components with event selection workflow. Web Search is now enabled for OpenAI o3 and o4-mini models.
---
## June 13, 2025
**PostgreSQL Tools & GitHub Vector Store**
Added PostgreSQL tool support to text generation nodes for database queries. GitHub Vector Store is now enabled by default. You can paste images directly from clipboard into Image File Nodes. New workflow run button for one-click execution.
---
## May 23, 2025
**Query Node, Web Page Node & Claude 4**
New Query Node with RAG capabilities for context-aware AI generation. Web Page Node fetches and processes web content. Added Claude 4 model support. GitHub integration expanded with PR comment triggers and actions. Workflow cancellation now available with toast feedback.
---
## April 30, 2025
**GitHub Trigger & Action Nodes**
New GitHub Trigger Node for workflow automation based on PR and Issue events. GitHub Action Node enables creating issues and posting comments from workflows. Animated completion status provides visual feedback for workflow execution.
---
## April 16, 2025
**OpenAI Web Search & Team Invitations**
OpenAI Web Search Tool integration for real-time web searches during text generation. Complete team invitation system for collaboration. Enhanced GitHub integration with PR and Issue event triggers. Added OpenAI o3 and o4-mini models with advanced reasoning.
---
## March 14, 2025
**Image Generation, GitHub Webhooks & New Playground UI**
New Image Generation Node for creating AI images in workflows. GitHub webhook integration enables automated workflow execution from repository events. Gemini Search Grounding provides real-time information with source citations. Completely redesigned Playground UI with Builder/Preview toggle and improved settings pages.
---
## February 17, 2025
**Pro Plan & Free Plan Launch**
Major milestone with Pro and Free plan launches, making Giselle accessible to everyone. Pro plan offers time-based pricing for AI agent usage, while Free plan lets you start building at no cost.
---
## December 18, 2024
**Redesigned Workflow Editor, Google Gemini & Team Management**
Completely redesigned workflow editor with graph-based editing and real-time execution tracking. Added Google Gemini model support including Gemini 2.0 Flash Exp. New Google OAuth login and comprehensive team management features.
---
## November 5, 2024
**Workflow Execution & GitHub Login**
First workflow execution capability—workflows built with the editor can now be executed. Added GitHub Login for quick authentication and laid groundwork for GitHub App integration.
---
## October 17, 2024
**Giselle Goes Open Source**
Giselle is now open source! This marks the beginning of our journey to build AI workflow automation tools together with the community. Full source code, documentation, and community infrastructure are now available on [GitHub](https://github.com/giselles-ai/giselle).
---
## Community-Driven
We believe in building with our community. Your feedback and suggestions are essential to shaping our product direction. We actively welcome feature requests, improvement suggestions, bug reports, and use case scenarios. Please share your thoughts through [GitHub Issues](https://github.com/giselles-ai/giselle) or [GitHub Discussions](https://github.com/giselles-ai/giselle/discussions).
# Authentication (/en/guides/settings/account/authentication)
---
title: Authentication
description: Connect your Giselle account with third-party services to simplify login.
---
You can access the Authentication settings page by navigating to [Settings > Account > Authentication](https://studio.giselles.ai/settings/account/authentication).
### Connecting External Services
You can connect your Giselle account with external services such as Google and GitHub to streamline the login process. You can easily manage these connections:
- **Google**
Connect or reconnect your Giselle account with your Google account.
- **GitHub**
Connect or disconnect your Giselle account with your GitHub account.
You can manage your connections directly from the Authentication settings page.
# General (/en/guides/settings/account/general)
---
title: General
description: Configure your account basic settings and preferences
---
You can access the General settings page by navigating to [Settings > Account > General](https://studio.giselles.ai/settings/account/general).
### Display Name
You can edit your display name by clicking the "Edit" button on the General Settings page, entering your preferred name, and clicking "Save".
### Email Address
Your email address is displayed here and is used for account-related notifications. This email address cannot be edited directly in this view.
### Session Management
You can securely log out of all active sessions by clicking the "Log Out" button in the Session section.
Our team is actively working to bring additional configuration options to you soon. Stay tuned for updates!
# Account Overview (/en/guides/settings/account/overview)
---
title: Account Overview
description: View and manage your teams.
---
You can access the Account Overview page by navigating to [Settings > Account > Overview](https://studio.giselles.ai/settings/account).
## Account Overview Page Summary
The Account Overview page displays all teams you belong to and allows you to switch between teams and manage team settings. You can create new teams or leave existing teams.
## Team List
### Team Information Display
Each team card displays the following information:
- **Team Avatar**: Team profile image (or random image if not set)
- **Team Name**: Display name of the team
- **Plan Badge**: Pro Plan or Free Plan indicator
- **Role**: Admin or Member designation
- **Action Menu**: Dropdown menu for team operations (...)
### Team Search and Filter
A search field is available at the top of the team list to filter teams by name:
- Real-time search (filters instantly as you type)
- Case-insensitive search
- Shows only teams matching the search criteria
### Team Actions
Click the menu icon (...) in the top-right corner of each team card to access the following actions:
#### Apps
- Navigate to the team's apps page
- Switches to that team's context and redirects to `/workspaces` page
#### Settings
- Navigate to team settings page
- Switches to that team's context and redirects to `/settings/team` page
#### Leave team
- Leave the team
- Requires confirmation before execution
- Cannot leave if:
- It's your only team
- You are the last admin of the team
Leaving a team will remove your access to all apps, workflows, and data in that team. This action cannot be undone.
## Creating a New Team
### Create New Team Button
You can create a new team using the **Create New Team** button at the top of the team list.
#### Creation Restrictions
- **Free Plan Users**: Can create only 1 team
- **Pro Plan Users**: Can create multiple teams (single-user per team)
- **Team Plan Users**: Can create multiple teams with multiple members
Upgrading to Pro Plan is required to create multiple teams. For team collaboration features, contact sales about Team Plan. See the [pricing page](https://giselles.ai/pricing) for details.
#### Creation Steps
1. Click the **Create New Team** button
2. A team creation dialog will appear
3. Enter a team name (1-256 characters)
4. Optionally select a team avatar image
5. Click **Create** to complete creation
The created team will be automatically selected as your current team and added to the team list.
## Plans and Roles
### Plan Types
**Free Plan**:
- Can create only 1 team
- Basic features available
**Pro Plan**:
- Can create multiple teams
- Single-user account per team
- Advanced features and integrations
- See the [Plans page](/en/guides/learn-about/plans) for details
**Team Plan**:
- Can create multiple teams
- Invite and manage team members
- All Pro plan features plus team collaboration
- Contact sales for more information
### Role Types
**Admin (Administrator)**:
- Invite and remove team members
- Manage team settings
- Delete teams
- Access to all apps and workflows
**Member**:
- Access to apps and workflows
- Can only leave teams themselves
- No team management permissions
For detailed permissions, see the [Members documentation](/en/guides/settings/team/members).
## Related Pages
From Account Settings, you can also access the following settings pages:
- [General](/en/guides/settings/account/general) - Display name, email address, session management
- [Authentication](/en/guides/settings/account/authentication) - Google and GitHub authentication integration
These pages can be accessed from the sidebar menu on the left side of the page.
## Support
If you have questions or encounter issues with team management, please contact our support team at support@giselles.ai.
# Data Stores (/en/guides/settings/team/data-stores)
---
title: Data Stores
description: Register and manage PostgreSQL database connections.
---
This feature is currently in **Private Preview**. Access is limited to select users. Features may change without notice.
You can access the Data Stores page from [Settings > Team > Data Stores](https://studio.giselles.ai/settings/team/data-stores).
## Data Stores Page Overview
The Data Stores page allows you to manage connections to external PostgreSQL databases. Registered database connections can be used within workflows using the Data Store Node and Data Query Node.
Currently, the following databases are supported:
- **PostgreSQL**: Connect to PostgreSQL databases and execute SQL queries
### Verified Services
The following PostgreSQL hosting services have been verified to work:
- [Neon](https://neon.tech)
- [Supabase](https://supabase.com)
- Supabase does not support **Direct connection**. When obtaining the connection string, select **Transaction pooler** or **Session pooler**.
## Plan-Based Quotas
The number of Data Stores you can create is limited based on your team's subscription plan.
### Quotas by Plan
| Plan | Data Stores Limit |
|------|-------------------|
| Free | 0 (unavailable) |
| Pro | 10 |
| Team | 20 |
### Checking Usage
The Data Stores page displays your current usage:
- **Used / Maximum**: Example: "3 / 10 stores"
- **Remaining**: Example: "7 Data Stores remaining in your Pro plan."
- **Plan name**: Your current plan (Free, Pro, Team)
### Managing Plan Limits
When you reach the maximum capacity:
1. **An alert is displayed**:
- Title: "Maximum capacity reached"
- Message: "Delete an existing store or upgrade your plan in Team Settings to add more Data Stores."
2. **New Data Store button is disabled**:
- Hover over the button to see a tooltip explaining why
- "You've reached the maximum number of Data Stores included in your plan."
3. **How to proceed**:
- Delete an existing Data Store
- Upgrade your plan in [Team Settings](/en/guides/settings/team/general)
### For Free Plan Users
Data Stores are not available on the Free plan:
1. **Locked state is displayed**:
- Title: "Data Stores are locked"
- Message: "Upgrade to the Pro or Team plan to connect PostgreSQL databases and use Data Stores in your agents."
2. **Warning alert**:
- "Data Stores are not included in the Free plan"
- "Upgrade to Pro or Team to connect PostgreSQL databases with Data Stores."
3. **How to upgrade**:
- Click the **View plans** button to go to [Team Settings](/en/guides/settings/team/general)
- Upgrade to the Pro or Team plan
For more details about plans, see [Plans Information](/en/guides/learn-about/plans).
## Creating a Data Store
Go to [Settings > Team > Data Stores](https://studio.giselles.ai/settings/team/data-stores) in Giselle.
Click the **New Data Store** button to open the creation dialog.
Configure the following fields:
#### Name
Enter a name for the Data Store (e.g., "Production Database", "Analytics DB"). This helps you identify the connection later.
#### Connection String
Enter the PostgreSQL connection string.
```
postgresql://user:password@host:5432/database
```
The connection string is encrypted and stored securely. For security reasons, the connection string is not displayed in the UI once saved.
Currently, only IPv4 addresses are supported. Databases using IPv6 addresses cannot be connected.
#### SSL Connection (sslmode)
You can control the SSL connection mode by specifying the `sslmode` parameter in the connection string.
```
postgresql://user:password@host:5432/database?sslmode=verify-full
```
The following `sslmode` options are available:
| sslmode | Description |
|---------|-------------|
| `disable` | Do not use SSL |
| `allow` | Try non-SSL first, then SSL if that fails |
| `prefer` | Try SSL first, then non-SSL if that fails |
| `require` | Require SSL, but do not verify the certificate |
| `verify-ca` | Require SSL and verify the CA certificate |
| `verify-full` | Require SSL and verify the CA certificate and hostname |
For security, `verify-full` is recommended.
`sslmode` support varies by service. Connections to [Neon](https://neon.tech) support `sslmode`, but `disable` is not available. Connections to [Supabase](https://supabase.com) do not currently support `sslmode`.
Click **Create** to create the Data Store.
## Managing Data Stores
### Viewing Data Stores
The Data Stores page displays all Data Stores for your team with the following information:
- **Name**: The descriptive name you set
- **ID**: The unique identifier for the Data Store
- **Action Menu**: Options for editing and deleting
### Editing a Data Store
To edit a Data Store:
1. Select **Edit** from the action menu (three dots)
2. The "Edit Data Store" dialog opens
3. You can update the following fields:
#### Name
You can change the name of the Data Store.
#### Update connection string
Check the checkbox to update the connection string.
When updating the connection string, you must enter the new connection string completely. For security reasons, the existing connection string is not displayed.
4. Click **Save** to save your changes
### Deleting a Data Store
To delete a Data Store:
1. Select **Delete** from the action menu
2. Confirm in the "Delete Data Store" dialog
3. Execute the deletion
Deletion cannot be undone. The Data Store and its connection information will be permanently deleted. Workflows using this Data Store will need to be reconfigured.
## Error Messages
The following errors may occur:
- **Name is required**: Please enter a name
- **Connection string is required**: Please enter a connection string
- **Invalid connection string format**: The connection string format is incorrect
- **Connection string must use postgresql:// or postgres:// protocol**: The protocol is incorrect
- **Connection string must include a host**: The connection string must include a host
- **Connection to private or internal IP addresses is not allowed**: Connections to private IPs are not allowed
- **Unable to resolve hostname**: Cannot resolve the hostname
- **IPv6 addresses are not supported**: IPv6 addresses are not supported
- **Data store not found**: Data Store not found
- **No DataStore node connected to DataQuery node**: Data Store Node is not connected to Data Query Node
- **DataStore node is not configured**: Data Store Node is not configured
- **Data Stores are not included in your plan**: Your plan does not support Data Stores
- **You've reached the maximum number of Data Stores included in your plan**: Quota limit reached
## Using Data Stores
Registered database connections can be used with the following Nodes:
- **[Data Store Node](/en/glossary/data-store-node)**: Select a database connection
- **[Data Query Node](/en/glossary/data-query-node)**: Execute SQL queries against the Data Store
Using these Nodes, you can integrate PostgreSQL databases into your workflows.
## Support
If you encounter issues with Data Stores configuration or have any questions, please contact our support team at support@giselles.ai.
# Team Settings (/en/guides/settings/team/general)
---
title: Team Settings
description: Manage your team's profile, plan, and other settings.
---
You can access the Team Settings page by navigating to [Settings > Team Settings](https://studio.giselles.ai/settings/team).
## Team Settings Page Overview
The Team Settings page provides centralized management of key team settings. You can edit your team profile, manage your plan, delete your team, and access detailed configuration pages.
From this page, you can also access the following detailed settings pages:
- **Members**: Invite and manage team members
- **Integrations**: Configure external service connections
- **Vector Stores**: Manage document and code vector stores
- **Usage**: Track agent usage and activity
## Team Profile
The Team Profile section allows you to manage your team's display name and profile image.
### Viewing Team Information
The Team Profile card displays:
- **Team Avatar**: 48x48 pixel circular image
- **Team Name**: Click to edit
- **Edit Button**: Opens the profile editing dialog
### Editing Team Profile
Click the **Edit** button to open the "Edit Team Profile" dialog.
#### Editable Fields
**Team Name**:
- Must be between 1 and 256 characters
- Required field
- Cannot be blank or whitespace only
**Profile Image**:
- Supported formats: JPG, PNG, GIF, WebP
- Maximum file size: 1MB
- Image preview available
- If not set, displays team name initials
#### Editing Steps
1. Click the **Edit** button
2. Enter team name (1-256 characters)
3. Optionally select a profile image
4. Review the preview
5. Click **Save** to save changes
Image uploads are limited to 1MB. Supported formats are JPEG, PNG, GIF, and WebP.
### Validation
The following validations are performed when editing:
- **Team Name**: Must be 1-256 characters
- **Image Format**: JPG, PNG, GIF, or WebP only
- **Image Size**: 1MB or less
If validation errors occur, error messages will be displayed and saving will be prevented.
## Plan Management
Different information and actions are displayed based on your team's current plan.
### Free Plan
For teams on the Free Plan, the following is displayed:
#### Display Content
- **Heading**: "Free Plan"
- **Description**: "Have questions about your plan?"
- **Pricing Link**: "Learn about plans and pricing" (links to https://giselles.ai/pricing)
#### Actions
**Upgrade to Pro Button**:
- Initiates upgrade to Pro Plan
- Clicking starts the upgrade process
- Redirects to Stripe checkout
### Pro Plan
For teams on the Pro Plan, the following is displayed:
#### Display Content
- **Heading**: "Pro Plan" (displayed in primary color)
- **Description**: "Have questions about your plan?"
- **Pricing Link**: "Learn about plans and pricing" (links to https://giselles.ai/pricing)
- **Cancellation Notice** (if applicable): "Subscription will end on [date]" (displayed in warning color)
#### Actions
**Cancel Subscription Button**:
- Schedules cancellation for the end of your current billing period
- After clicking, a confirmation dialog will appear
- Once confirmed, the button will be hidden and the cancellation date will be displayed
**Manage Subscription Button**:
- Opens Stripe customer portal
- Available operations:
- Change payment method
- View invoices and receipts
You can cancel your subscription directly from this page. Payment method changes and invoice viewing are handled through the Stripe customer portal.
### Cancellation Schedule
If you cancel your Pro Plan subscription, the following is displayed:
- Cancellation notice: "Cancels [date]" showing when your subscription will end
- The cancel subscription button will be hidden once cancellation is scheduled
- You can continue using Pro Plan features until the end date
- Automatically switches to Free Plan after the end date
Canceling your subscription will prevent access to Pro Plan features after the end date.
## Danger Zone
The Danger Zone section allows you to completely delete your team. This action is irreversible and requires caution.
### Deleting a Team
#### Deletion Requirements
To delete a team, all of the following conditions must be met:
1. **Admin Permission**: You must be a team administrator
2. **Free Plan**: Pro Plan teams cannot be deleted (you must cancel the plan first)
3. **Multiple Team Membership**: You must belong to at least one other team (your only team cannot be deleted)
#### Deletion Steps
1. Click the **Delete Team** button
2. A confirmation dialog is displayed
- Title: "Delete Team"
- Description: "This action cannot be undone. This will permanently delete the team and remove all members."
3. Confirm deletion by clicking **Delete Team**
4. Team is deleted and you are automatically switched to another team
Deleting a team will permanently delete all of the following data:
- Team profile
- All team members
- Team apps and workflows
- Vector Stores and documents
- Integration settings
- Usage history
This action cannot be undone. We strongly recommend backing up important data before deletion.
#### Deletion Restrictions
You cannot delete a team in the following cases:
- **Active Pro Plan**: You must first cancel the subscription and wait until the plan ends
- **Only Team**: Your last team cannot be deleted. At least one team is required
- **Member Permission**: You cannot delete without Admin permission
If deletion is not possible, the delete button will not be displayed or an error message will be shown when clicked.
## Related Pages
From Team Settings, you can access the following detailed settings pages:
- [Members](/en/guides/settings/team/members) - Invite and manage team members
- [Integrations](/en/guides/settings/team/integrations) - Connect external services like GitHub
- [Vector Stores](/en/guides/settings/team/vector-stores) - Document and code vector stores
- [Usage](/en/guides/settings/team/usage) - Agent usage and activity
These pages can be accessed from the navigation menu at the top of the page.
## Support
If you have questions or encounter issues with Team Settings, please contact our support team at support@giselles.ai.
For information about plans and pricing, visit the [pricing page](https://giselles.ai/pricing).
# Integrations (/en/guides/settings/team/integrations)
---
title: Integrations
description: Configure and manage integrations with external services for your team.
---
You can access the Integrations page by navigating to [Settings > Team > Integrations](https://studio.giselles.ai/settings/team/integrations).
## Integrations Page Overview
The Integrations page allows you to connect and manage external services with Giselle. Currently, GitHub integration is supported, enabling access to GitHub repositories and management of GitHub App installations.
## GitHub Integration
### Connecting Your GitHub Account
To set up GitHub integration for the first time:
1. Click the **Configure GitHub App** button on the Integrations page
2. Navigate to the [account authentication page](/en/guides/settings/account/authentication)
3. Follow the on-screen instructions to authenticate your GitHub account
When your GitHub account is not connected, you'll see "Not connected" displayed with a "Configure GitHub App" button.
### GitHub App Installation
The GitHub App is required for Giselle to access your GitHub repositories.
#### New Installation
1. Click **Add Giselle's GitHub App** or **Configure Giselle's GitHub App** button on the Integrations page
2. A popup window will open with the GitHub installation page
3. Select where to install (personal account or organization)
4. Choose which repositories to grant access to:
- All repositories
- Only select repositories
5. Click **Install** to complete the installation
6. The popup window will close automatically and the page will refresh
#### Managing Installations
The Integrations page displays installed GitHub Apps in the following format:
- **Login status**: Displayed as "Logged in as (@username)"
- **Installation cards**: A card is displayed for each installation
- Account/organization name where installed
- Avatar image
- List of accessible repositories
- Repository visibility status (Private/Public badge)
- Links to repositories (opens in GitHub)
Each installation can retrieve up to 100 repositories. A warning will be displayed if the limit is exceeded.
### Authentication Status and Troubleshooting
#### Authentication Error
When your GitHub authentication token is expired or invalid, an "Authentication Error" will be displayed. In this case:
1. Review the displayed error message
2. Re-authenticate via the [account authentication page](/en/guides/settings/account/authentication)
#### Automatic Token Refresh
Giselle automatically refreshes your GitHub access tokens:
- Automatically checks token expiration
- Uses refresh tokens to auto-renew before expiration
- Displays an error if refresh fails
### Uninstalling GitHub App
To uninstall the GitHub App, use the GitHub settings:
1. Open your GitHub account settings
2. Navigate to **Settings > Applications > Installed GitHub Apps**
3. Find "Giselle"
4. Click **Uninstall** in the Danger Zone section
Uninstalling the GitHub App will immediately revoke all access permissions from Giselle to those repositories. Related workflows and triggers may stop functioning.
### Disconnecting GitHub Account
To disconnect your GitHub account itself:
1. Navigate to the [account authentication page](/en/guides/settings/account/authentication)
2. Follow the disconnection steps
You can only disconnect your GitHub account if you have multiple authentication methods configured. The last authentication method cannot be removed.
## Permissions and Access Control
### Team Member Access
- The Integrations page is accessible to all team members
- GitHub App installations are shared across the entire team
- Team members can access repositories selected in each installation
### GitHub App Permissions
The GitHub App has the following permissions configured:
- Read access to repository metadata
- Read access to repository contents
- Other permissions necessary for Giselle functionality
Specific permission details can be reviewed on the GitHub App installation page.
## Leveraging Integrations
### Using Repository Information
Connected GitHub repositories can be utilized in the following features:
- **Vector Stores**: Ingest repository contents as a knowledge base
- **Workflow Triggers**: Execute workflows triggered by repository events
For vector store configuration, refer to the [Vector Stores documentation](/en/guides/settings/team/vector-stores).
## Future Support
While currently only GitHub integration is supported, we plan to add more external service integrations in the future.
## Support
If you encounter issues with integration setup or have questions, please contact our support team at support@giselles.ai.
# Members (/en/guides/settings/team/members)
---
title: Members
description: Invite, manage, and oversee team members' access to your Giselle apps.
---
You can access the Members page by navigating to [Settings > Team > Members](https://studio.giselles.ai/settings/team/members).
## Members Overview
The Members page allows administrators to comprehensively manage member access within your team. You can invite new members, modify roles, remove members, and manage invitations.
Member invitations and role management are available to administrators on **Team Plan** only. This feature is not available on Free or Pro plans.
## Member Roles & Permissions
There are two roles available in a team:
### Admin
- Invite and remove members
- Change member roles
- Manage team settings (integrations, billing, etc.)
- Access to all AI apps
### Member
- Access to AI apps
- Can only leave the team themselves
- No member management permissions
| Action | Admin | Member |
|--------|-------|--------|
| Invite members | ✓ (Team Plan only) | ✗ |
| Change other member roles | ✓ (Team Plan only) | ✗ |
| Change own role | ✗ | ✗ |
| Remove other members | ✓ | ✗ |
| Leave team | ✓ | ✓ |
## Inviting Members
### How to Invite New Members
Click the **Invite Member** button (visible only to Team Plan admins).
Enter the email addresses of the members you want to invite in the email input field.
- You can enter multiple email addresses (separated by commas, semicolons, or spaces)
- Press Enter or click outside the field to add email tags
- Added email addresses appear as removable tags
Choose the role for the invited members:
- **Member**: Standard user access
- **Admin**: Full administrative privileges
Click the **Invite** button to send invitation emails.
### Email Validation
The following validations are automatically performed when inviting:
- **Email format validation**: Ensures valid email address format
- **Duplicate check**: Detects duplicate email addresses
- **Existing member check**: Detects email addresses already in the team
- **Already invited check**: Detects email addresses with active invitations
Email addresses that fail validation will be displayed with error messages.
### Pricing Information
Each member added to your team will be charged as an additional seat on your Team Plan subscription. Please contact sales for Team Plan pricing details.
## Managing Invitations
### Invitation Status
Sent invitations appear at the bottom of the member list with an **"(Invitation pending)"** label.
- Invitations are valid for **24 hours**
- Expired invitations appear in red with "Expired" status
- Users who receive invitations can join the team via the link in the email
### Invitation Actions (Admins Only)
The following actions are available for each invitation:
#### Copy Invite Link
1. Click the options icon (**...**) next to the invitation
2. Select **Copy invite link**
3. The link is copied to your clipboard (format: `/join/{token}`)
#### Resend Invitation
Use this when an invitation has expired or the email wasn't received:
1. Click the options icon (**...**)
2. Select **Resend invitation**
3. The old invitation is revoked and a new 24-hour invitation is created
4. The invitation email is resent with the same email address and role
#### Revoke Invitation
1. Click the options icon (**...**)
2. Select **Revoke invitation**
3. Confirm in the confirmation dialog
4. The invitation is permanently revoked (the invite link becomes invalid)
## Changing Member Roles
Role changes can only be performed by **Team Plan** administrators.
### How to Change a Role
1. Click the role dropdown for the member you want to change
2. Select the new role (**Admin** or **Member**)
3. The role is updated immediately
### Restrictions
You cannot change roles in the following cases:
- **Last admin**: If there is only one admin in the team, you cannot downgrade that admin to Member
- **Own role**: You cannot change your own role
A team must always have at least one administrator.
## Removing Members
### How to Remove a Member
1. Click the options icon (**...**) next to the member's name
2. Select **Remove from Team**
3. Confirm the removal in the confirmation dialog
4. The member is immediately removed from the team
### Removal Restrictions
You cannot remove members in the following cases:
- **Last member**: If there is only one member in the team, you cannot remove that member
- **Last admin**: If the member you're trying to remove is the last admin, you cannot remove them
- **Only team**: If you're trying to remove yourself and it's your only team, you cannot leave
Removing a member will immediately revoke all their access to Giselle apps. This action cannot be undone.
### Leaving a Team
Both regular members and admins can remove themselves from a team (unless restricted by the above conditions):
- You must belong to other teams
- If you're the last admin, you need to promote another member to admin first
## Member Details Display
Each member entry displays the following information:
- **Avatar image**: User's profile image (36×36 pixels)
- **Display name**: User's name (shows "**No display name**" if not set)
- **Email address**: User's email address
- **Role**: Current role (Admin or Member)
## Notifications & Feedback
Operation results are displayed as toast notifications at the top of the screen:
- **Success**: "Role updated: Admin", "Member removed", "Invitation resent!", etc.
- **Error**: Specific error messages (e.g., "Cannot remove the last admin from the team")
- **Info**: "Invite link copied!", etc.
When errors occur, detailed error messages may also appear below the member row.
## Frequently Asked Questions
Yes, you can enter multiple email addresses in the invite dialog. Separate them with commas, semicolons, or spaces. All invitations will be sent with the same role.
Admins can resend invitations. Resending creates a new 24-hour invitation and sends it to the same email address.
The system prevents the removal of the last admin. Before leaving, you need to promote another member to admin.
Yes, removed members can be re-invited as new members. However, their previous access rights and settings will not be restored.
No, member invitations and role management are Team Plan features only. Free and Pro plans are designed for individual users. Please contact sales to learn more about Team Plan.
## Support
For assistance or if you encounter issues managing team members, please contact our support team at [support@giselles.ai](mailto:support@giselles.ai).
# Usage (/en/guides/settings/team/usage)
---
title: Usage
description: Monitor and manage your team's AI app usage
---
You can access the Usage page by navigating to [Settings > Team > Usage](https://studio.giselles.ai/settings/team/usage).
## Usage Overview
Monitor your team's AI app usage clearly and efficiently. Recently, we've transitioned from calculating usage based on minutes to a credit-based system.
### Resource Metrics
Giselle tracks your team's AI app runtime in minutes for informational purposes only. This monitoring currently does not directly relate to your billing, as billing is now calculated through credits.
## Usage Limits
Your subscription plan includes AI credits each month:
- **Free Plan**: 30 minutes per month (limited-time offer)
- **Pro Plan**: $20 of AI credits per month. Additional usage billed at cost plus 10% markup
Note: App runtime displayed in minutes is separate from your actual billed credits.
## Usage Reports
Detailed logs of recent app activities, including start time, end time, and total duration, are provided for easy tracking.
## Usage Monitoring
Giselle continuously updates app usage throughout the day. We are currently transitioning from time-based to credit-based monitoring. Parts of the previous UI remain and might cause confusion.
If you find anything unclear or have concerns regarding your usage, please contact our support team at support@giselles.ai.
# Vector Stores (/en/guides/settings/team/vector-stores)
---
title: Vector Stores
description: Ingest and manage GitHub repositories and documents as knowledge bases.
---
You can access the Vector Stores page by navigating to [Settings > Team > Vector Stores](https://studio.giselles.ai/settings/team/vector-stores).
## Vector Stores Page Overview
The Vector Stores page allows you to ingest and manage your project's code and documents into Vector Stores. The ingested data can be utilized in GitHub Vector Store Nodes and Document Vector Store Nodes.
Currently, two types of Vector Stores are supported:
- **Document Vector Stores**: Ingest PDF, TXT, and Markdown files
- **GitHub Repositories**: Ingest code, Issues, and Pull Requests from GitHub repositories
## Document Vector Stores
A sidebar navigation with "Document" and "GitHub" options will appear on the left side of the page.
Document Vector Stores allows you to upload PDF, TXT, and Markdown files to ingest into Vector Stores.
### Plan-Based Quotas
The number of Document Vector Stores you can create is limited based on your team's subscription plan.
#### Quotas by Plan
| Plan | Document Vector Stores Limit |
|------|------------------------------|
| Free | 0 (unavailable) |
| Pro | 5 |
| Team | 20 |
#### Checking Usage
The Document Vector Stores page displays your current usage:
- **Used / Maximum**: Example: "3 / 5 stores"
- **Remaining**: Example: "2 Document Vector Stores remaining in your Pro plan."
- **Plan name**: Your current plan (Free, Pro, Team)
#### Managing Plan Limits
When you reach the maximum capacity:
1. **An alert is displayed**:
- Title: "Maximum capacity reached"
- Message: "Delete an existing store or upgrade your plan in Team Settings to add more Document Vector Stores."
2. **New Vector Store button is disabled**:
- Hover over the button to see a tooltip explaining why
- "You've reached the number of Document Vector Stores included in your plan."
3. **How to proceed**:
- Delete an existing Document Vector Store
- Upgrade your plan in [Team Settings](/en/guides/settings/team/general)
#### For Free Plan Users
Document Vector Stores are not available on the Free plan:
1. **Locked state is displayed**:
- Title: "Document Vector Stores are locked"
- Message: "Upgrade to Pro or Team to ingest knowledge bases and connect Document Vector Stores to your agents."
2. **Warning alert**:
- "Document Vector Stores are not included in the Free plan"
- "Upgrade to Pro or Team to ingest documents with Vector Stores."
3. **How to upgrade**:
- Click the **View plans** button to go to [Team Settings](/en/guides/settings/team/general)
- Upgrade to the Pro or Team plan
For more details about plans, see [Plans Information](/en/guides/learn-about/plans).
### Creating a Document Vector Store
1. Click the **New Vector Store** button
2. The "Create Vector Store" dialog opens
3. Configure the following items:
#### Name
Enter a name for the Vector Store (e.g., "Product Docs")
#### Embedding Models
Select at least one embedding model to use
Each model displays:
- Model name
- Provider
- Dimensions
4. Click **Create** to complete creation
### Managing Document Vector Stores
Created Document Vector Stores are displayed in the "Document Vector Stores" section.
Each Vector Store card displays:
- Store name
- Store ID
- Action menu (three-dot icon)
#### Action Menu
- **Configure Sources**: Update name, embedding models, and source files
- **Delete**: Delete the Document Vector Store
### Uploading and Managing Files
To upload files to a Document Vector Store:
1. Select **Configure Sources** from the action menu
2. The "Configure Sources" dialog opens
#### Name Section
You can update the Vector Store name.
#### Embedding Models Section
Select embedding models to use (at least one required)
#### Source Files Section
**Supported file formats**: PDF, TXT, Markdown (.md)
**Maximum file size**: 4.5MB
File upload methods:
- Drag and drop to add files
- Click the **Select files** button to choose files
#### Uploaded Files List
Uploaded files are displayed with the following information:
- **File name**: Truncated if long
- **Status badge**:
- **Pending** (yellow, clock icon): Waiting for ingestion
- **Processing** (blue, loading icon): Processing
- **Ready** (green, check icon): Ingestion complete
- **Failed** (red, alert icon): Ingestion failed
- **Delete button**: Can delete each file (trash icon)
Hover over a failed file to see the error code in a tooltip.
3. Click **Save** to save changes
After uploading files, the ingestion process starts automatically.
### Deleting a Document Vector Store
To delete a Document Vector Store:
1. Select **Delete** from the action menu
2. Confirm in the "Delete Document Vector Store" dialog
3. Execute deletion
Deletion cannot be undone. The Document Vector Store and its embedding profiles and source files will be permanently deleted.
## GitHub Repositories
### Plan-Based Quotas
The number of GitHub repositories you can register is limited based on your team's subscription plan.
#### Quotas by Plan
| Plan | GitHub Repositories Limit |
|------|---------------------------|
| Free | 0 (unavailable) |
| Pro | 3 |
| Team | 10 |
#### Checking Usage
The GitHub Repositories page displays your current usage:
- **Used / Maximum**: Example: "2 / 3 repositories"
- **Remaining**: Example: "1 GitHub Repository remaining in your Pro plan."
- **Plan name**: Your current plan (Free, Pro, Team)
#### Managing Plan Limits
When you reach the maximum capacity:
1. **An alert is displayed**:
- Title: "Maximum capacity reached"
- Message: "Delete an existing repository or upgrade your plan in Team Settings to add more GitHub Vector Stores."
2. **Register Repository button is disabled**:
- Hover over the button to see a tooltip explaining why
- "You've reached the number of GitHub Vector Stores included in your plan."
3. **How to proceed**:
- Delete an existing repository
- Upgrade your plan in [Team Settings](/en/guides/settings/team/general)
#### For Free Plan Users
GitHub Vector Stores are not available on the Free plan:
1. **Locked state is displayed**:
- Title: "GitHub Vector Stores are locked"
- Message: "Upgrade to Pro or Team to index GitHub repositories and connect them to your agents."
2. **Warning alert**:
- "GitHub Vector Stores are not included in the Free plan"
- "Upgrade to Pro or Team to index GitHub repositories."
3. **How to upgrade**:
- Click the **View plans** button to go to [Team Settings](/en/guides/settings/team/general)
- Upgrade to the Pro or Team plan
For more details about plans, see [Plans Information](/en/guides/learn-about/plans).
### Prerequisites
To use GitHub Vector Stores:
1. **GitHub Account Authentication**: Connect your GitHub account on the [account authentication page](/en/guides/settings/account/authentication)
2. **GitHub App Installation**: Install Giselle's GitHub App from [Integrations settings](/en/guides/settings/team/integrations)
If these conditions are not met, a guidance message will be displayed on the Vector Stores page.
### Registering a Repository
Steps to register a GitHub repository to Vector Store:
1. Click the **Register Repository** button
2. The "Register GitHub Repository" dialog opens
3. Configure the following items:
#### Owner / Organization
Select from installed GitHub Apps. You can choose a personal account or organization.
#### Repository Name
Select from repositories under the selected Owner.
#### Sources to Ingest
Select content types to ingest:
- **Code**: Ingest source code files (required, cannot be disabled)
- **Issues**: Ingest Issue descriptions, comments, and discussions (optional)
- **Pull Requests**: Ingest merged Pull Request content and discussions (optional)
Code is a required content type and is always enabled.
#### Embedding Models
Select embedding models to use for indexing. At least one model must be selected.
Available models:
- OpenAI (various sizes)
- Google (various sizes)
Each model displays provider name and dimensions.
4. Click **Register** to complete registration
### Managing Repositories
Registered repositories are displayed in the "GitHub Repositories" section.
Each repository card displays:
#### Repository Information
- Repository name (`owner/repo` format, click to go to GitHub)
- Action menu (three-dot icon)
#### Action Menu
- **Ingest Now**: Manually trigger ingestion
- **Configure Sources**: Modify content types and embedding models
- **Delete**: Remove repository from Vector Store
#### Embedding Model Status
A status card is displayed for each embedding model:
**Code Section**:
- Status badge:
- **Enabled** (green): Enabled
- **Running** (blue, animated): Ingestion in progress
- **Idle** (gray): Idle state
- **Error** (red): Error occurred
- **Disabled** (gray): Disabled
- Last sync: Last sync time (relative time format)
- Latest ingested commit SHA (first 7 characters)
- Error message and retry time (when failed)
**Issues Section**:
- Similar status display as Code
- Latest ingested Issue number (if ingested)
**Pull Requests Section**:
- Similar status display as Code
- Latest ingested PR number (if ingested)
If repository access fails, a "Check" link will appear on the Error status. Click it to open a diagnostic modal and attempt to restore the connection.
### Manual Ingestion
You can manually trigger ingestion with the **Ingest Now** button.
Conditions for ingestion:
- Status is "Idle", "Completed", or "Failed" (if retry time has passed)
- At least one content type is enabled
During ingestion, the status changes to "Running" and updates to "Completed" or "Error" upon completion.
### Configure Sources
To modify repository settings:
1. Select **Configure Sources** from the action menu
2. The "Configure Vector Stores" dialog opens
#### Sources Section
Select content types to ingest:
- **Code**: Always enabled (toggle disabled)
- **Issues**: Optional (toggle to enable/disable)
- **Pull Requests**: Optional (toggle to enable/disable)
#### Embedding Models Section
Select embedding models to use (at least one required)
3. Click **Save Changes** to save modifications
### Deleting a Repository
To delete a repository from Vector Store:
1. Select **Delete** from the action menu
2. Confirm in the "Delete Repository" dialog
3. Execute deletion
Deletion cannot be undone. The repository `{owner}/{repo}` and its embedding profiles will be permanently deleted.
### Diagnosing and Restoring Connection
If an error occurs accessing the repository:
1. Click the **Check** link on the Error status
2. The "Checking Repository Access" modal opens and performs diagnostics
3. Actions are displayed based on diagnostic results:
#### If Restorable
- Title: "Connection can be restored"
- Message: "Click Restore Connection to reconnect and continue ingesting data from this repository."
- Button: **Restore Connection** - Click to restore connection
#### If Not Restorable
- Title: "Repository no longer accessible"
- Custom error message is displayed
- Button: **Delete Repository** - Delete the repository
Issues detected by diagnostics:
- GitHub App installation cannot access the repository
- Repository not found
- Other diagnostic errors
## Empty State
### Document Vector Stores
When no Document Vector Store is created:
- "No document vector stores yet."
- 'Use the "New Vector Store" button to create one.'
### GitHub Repositories
When no repository is registered:
- "No repositories are registered."
- 'Please register a repository using the "Register Repository" button.'
## Error Messages
The following errors may occur:
- **Repository not found.**: Repository not found
- **Rate limited.**: Rate limit reached
- **Repository too large.**: Repository is too large
- **Repository error.**: Repository error
- **Failed to upload files**: File upload failed
- **Failed to delete file**: File deletion failed
## Leveraging Vector Stores
Ingested data can be utilized in the following Nodes:
- **Document Vector Store Node**: Search and use uploaded documents
- **GitHub Vector Store Node**: Search and use code, Issues, and Pull Requests ingested from GitHub repositories
By using these Nodes, you can integrate your project's knowledge base into AI workflows.
## Support
If you encounter issues with Vector Stores configuration or have questions, please contact our support team at support@giselles.ai.
For more details, please refer to the [Vector Stores documentation](https://docs.giselles.ai/en/guides/settings/team/vector-stores).